On This Page
Using Designer
|
|
This topic is intended for SecureChange handlers who are responsible for processing change requests. |
Overview
Designer is an automatic tool which recommends changes that are needed to process the ticket. After running Designer, many workflows allow you to use Provisioning to implement the changes, and then use Verifier to confirm that changes were implemented successfully.
Designer makes recommendations based on the workflow type:
-
Access Request Workflow: Designer recommends objects, rules, and other changes that would be need to implement the Access Request. If the request workflow does not use topology, then the Designer only runs on the access requests that have a target defined (the target cannot be Any).
When a request includes the Internet object, Designer uses the internet object for the target device to represent the all IPv4 addresses in the Internet in TOS features (Configurable in SecureTrack for Check Point and Stonesoft; ANY for other devices).
When a request includes application identities, the Designer considers the service that the application identity uses. When designing new groups in a rule, the Designer creates them according to how they have been defined in SecureApp. Then you provision the changes directly from the ticket.
-
Server Decommission Workflow: Designer suggests how specific rules should be modified to remove the server from them. The recommendations may be to remove the server from specific rules, remove a server from a group, or to remove a rule completely if it will no longer be relevant once the server has been decommissioned.
-
Server Clone Workflow: Designer lists the objects that need to be added to rules, for example, if the server being cloned is referenced in a rule, the cloned server will also need to be added to the rule.
-
Modify Group: Designer lists objects which should be added or removed from the group, or new groups that should be created.
-
Rule Modification: Designer: Designer gives recommendations how to change the rule base
-
Rule decommission Workflow: Designer recommends how to change the rule base to decommission a rule.
Device Types
To see which Designer recommendations are supported on each device type, and which devices support Provisioning, see SecureChange Features by Vendor.
If a device is not listed as supporting Provisioning, suggestions from Designer have to be imported manually.
Related or Conflicting Tickets
If you open an existing Designer suggestion or run new Provisioning to update a device, TOS checks whether there are other related tickets on the same device that will impact the update.
TOS only evaluates tickets on the same device, that ran Provisioning since Designer last ran on the ticket that you are updating. To be evaluated, a ticket must be on a supported device that was opened in SecureChange, not a manual change.
If there are conflicting tickets, which have already generated revisions, SecureChange will prompt you to run Designer again so that the recommendations from Designer can include changes in related tickets.
If there are conflicting tickets but SecureChange has not yet received revisions, a warning message will be displayed that there are conflicting tickets that are waiting for revision. The Redesign option will be available once SecureChange receives the revisions.
If the change is part of an automatic step, the automatic step will fail and you will need to run Designer manually.
The feature is only supported on the following devices:
-
Check Point CMA/SMC
-
Cisco ASA/IOS
-
Cisco Firepower Management Center (FMC)
-
Fortinet FortiManager
-
Juniper SRX
-
Palo Alto Panorama
-
VMware NSX
When working with unsupported devices, manual changes, or multiple handlers assigned on the same device in dynamic assignment, SecureChange is not able to identify related tickets. Instead every new revision includes an indication that you should manually run Designer. In these cases, automatic steps will not fail.
If multiple objects have the same IP Address value in different tickets, they are not considered dependent and they will not trigger a recalculation warning.
Remove Access Requests
A Remove or Decommission Access Request removes network access. For example, you may need to remove network access that is no longer required, or for an access request ticket that has reached its expiration date and its network access should be removed from the system.
Designer determines whether removing access requires rules to be removed or modified, or network groups need to be modified for each Access Request in a ticket. If a ticket includes multiple Access Requests, each Access Request is listed separately in Designer. A single ticket can include requests to add access, as well as requests to remove access.
If the Access Decommission contains user identities or application identities in the access request, Designer will only provide suggestions to remove access on the following supported devices:
- Panorama (user identities and application identities)
- Check Point R80 (user identities)
In the Designer Recommendations screen, Access Requests to add access are colored green, Requests to remove access are colored orange.
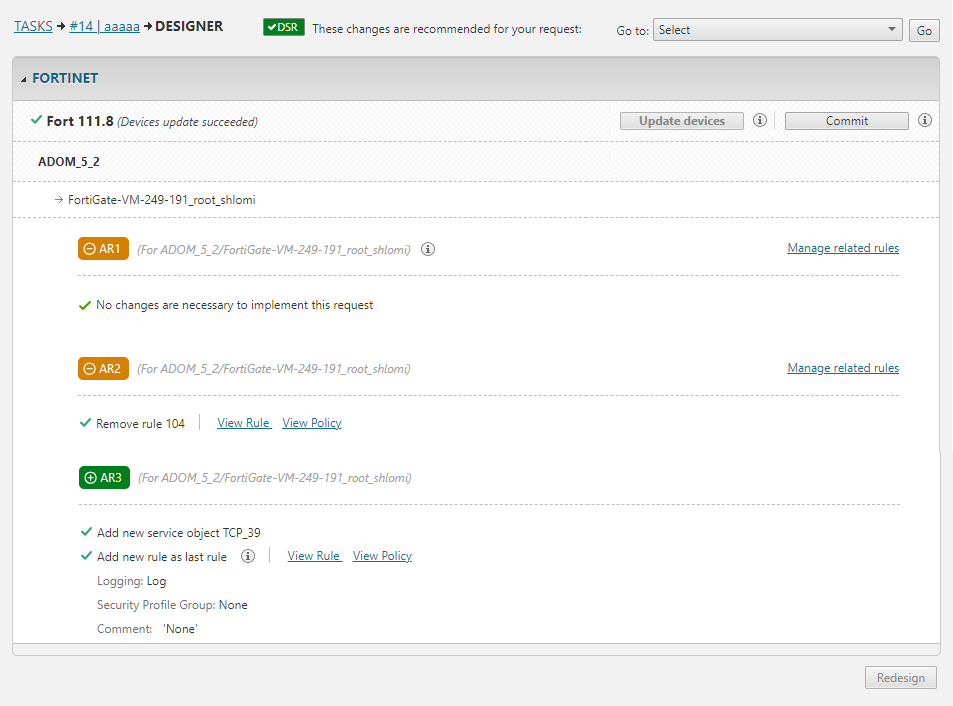
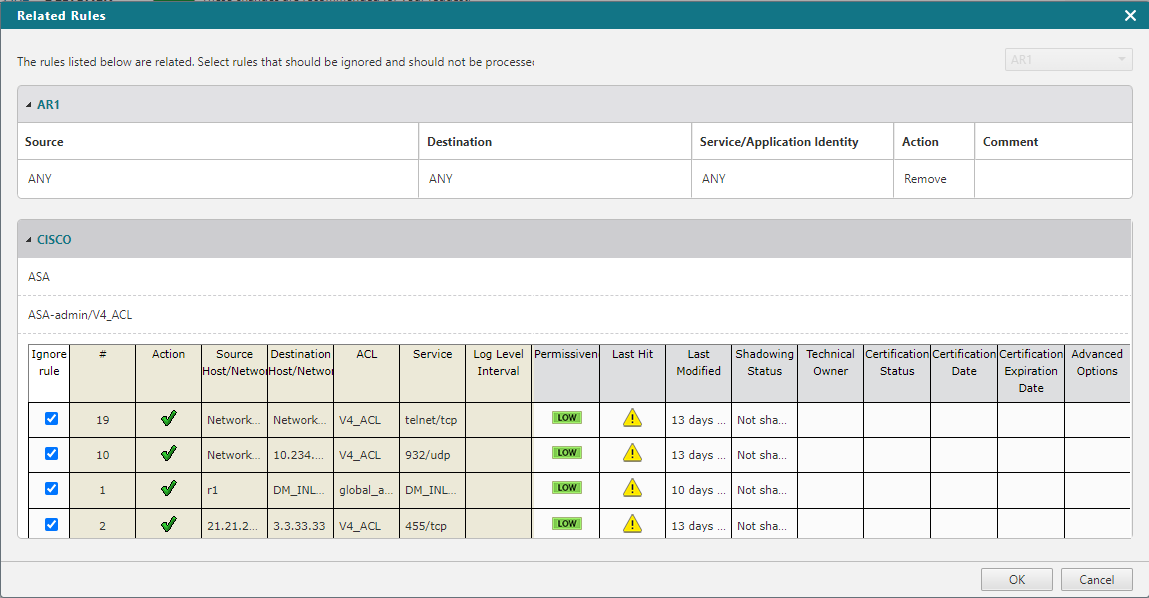
You can open the Manage Related Rules window to view a detailed list of rules that are impacted by a Decommission Access Request. This window also displays relevant rule properties such as the hit count and last modification date. Intersecting objects are highlighted. You can determine if some of these rules should be ignored by Designer so that Designer will not provide suggestions to remove access for these rules. For example, there may be core rules that should not be modified and should be ignored by Designer in this Access Request.
To view details of rules impacted by the Decommission Access Request, click Manage Related Rules. If you want Designer to ignore some of these rules for this specific Access Request, select Ignore next to the rules, click OK and then Redesign.
Troubleshoot Designer Issues
You can use the Designer Debug tool to help the Tufin development team debug and fix escalations relevant to Designer and Verifier in access requests.
Special Cases Handled by the Manage Related Rules Feature
The following cases are set to Ignore by default:
- If NAT is found on the path of an Access Request
- If you are using SecureApp and there are other SecureApp connections that are mapped to a related rule
For Designer to include these rules in its suggestions, in the Related Rules window, clear the Ignore checkbox next to these rules, click OK, and then Redesign.
What Can I Do Here?
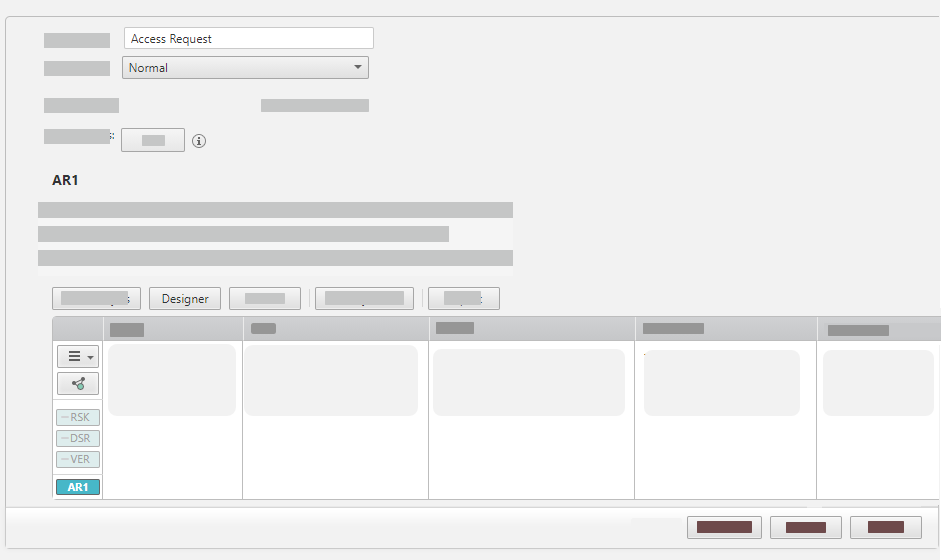
Using Designer for an Access Request
-
Open or create an Access Request and click Designer.

If there is no Designer button, check if Designer was enabled in this step of the workflow configuration.
-
If your access request contains an AWS instance, you must Select Security Groups for the VPC.
-
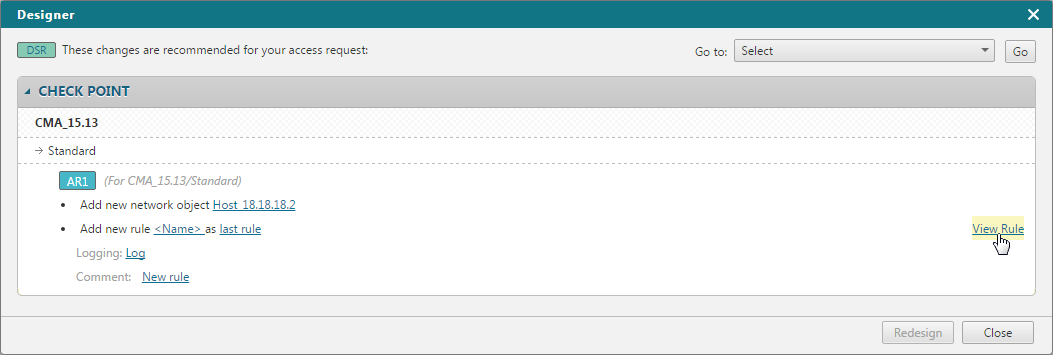
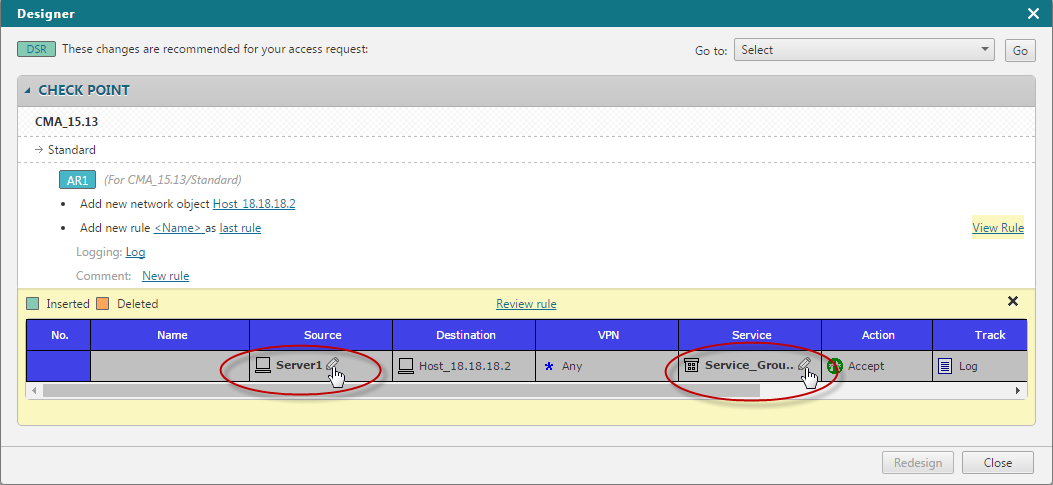
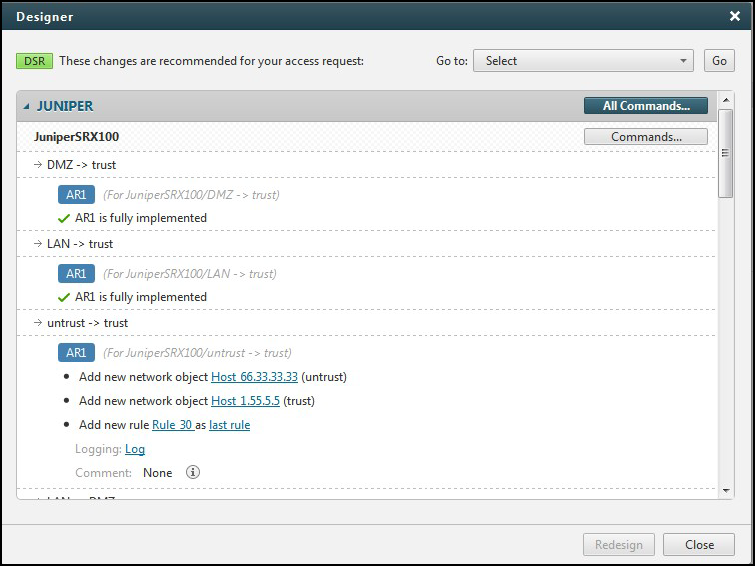
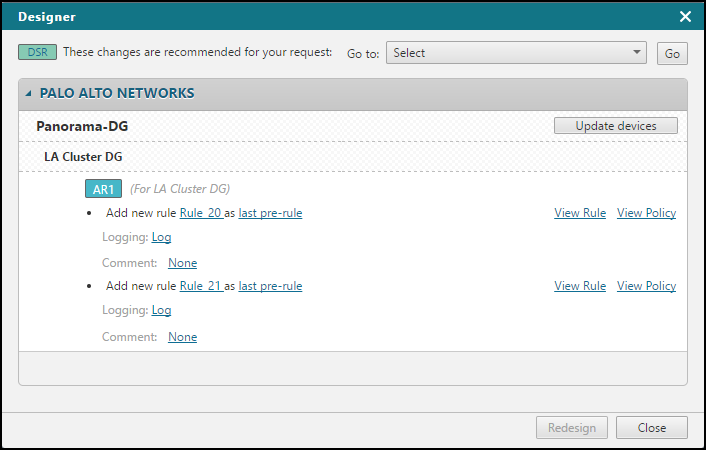
Click DSR and look through the Designer recommendations, organized by vendor > device > policy > access request.
If a later access request requires changes that are also required in an earlier access request, Designer notes that no changes will be implemented for the later access request.
-
In the recommendations, the Designer assigns names to the new servers/services/rule names using these guidelines:
-
Creates a name using the format:
host_<ip> / subnet_<ip> -
If the request came from SecureApp, then it uses the name given in SecureApp
If an "i" icon appears next to the recommendation, then Designer has modified the name assigned in SecureApp to meet the vendor's requirements. For example if you created a new connection with the name “Connection 1” the Designer changes it to “Connection1” if spaces are not allowed.
Click
 to view the original name.
-
-
In the recommendations, you can click on the following fields to change the values given by the Designer:
These values cannot be changed if a new revision was received from the device.-
Object names
-
Rule names
-
Rule location (before or after specific rule number, or as last rule)
-
Logging levels
-
-
For new or existing rules, you can add or edit comments on the following devices:
-
Check Point R80 (Can also edit comments of existing rules)
-
Juniper SRX (Can also edit comments of existing rules; Rule IDs are not sequential)
-
Fortimanager (Can add rule name)
-
Cisco (Cannot change the name of a new rule)
-
ASA
-
NSX
-
Panorama
-
-
For NSX devices, when adding new rules, if the Access Requests has a Security Group as a Source or Destination, Designer can provide more specific suggestions based on the relevant security groups, instead of using DFW. Click the Applied to field to select the relevant security groups.
-
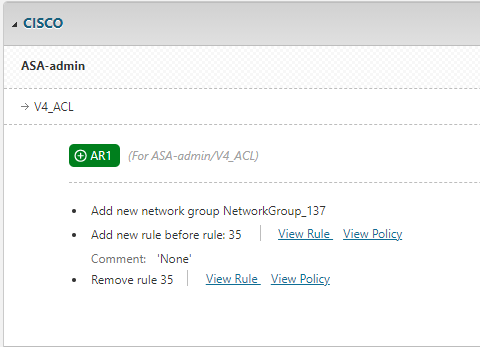
For Decommission Access Requests, if there are related rules, click Manage Related Rules, to review a list of related rules, and if required, select Ignore next to rules that should not receive suggestions by Designer, and click Redesign.
-
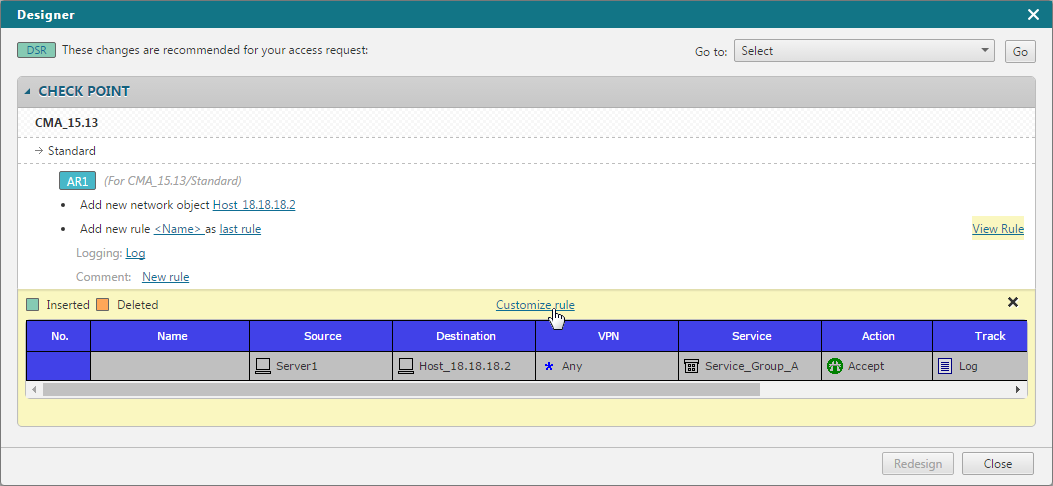
Click View rule to see the results as a firewall rule for the specified vendor.
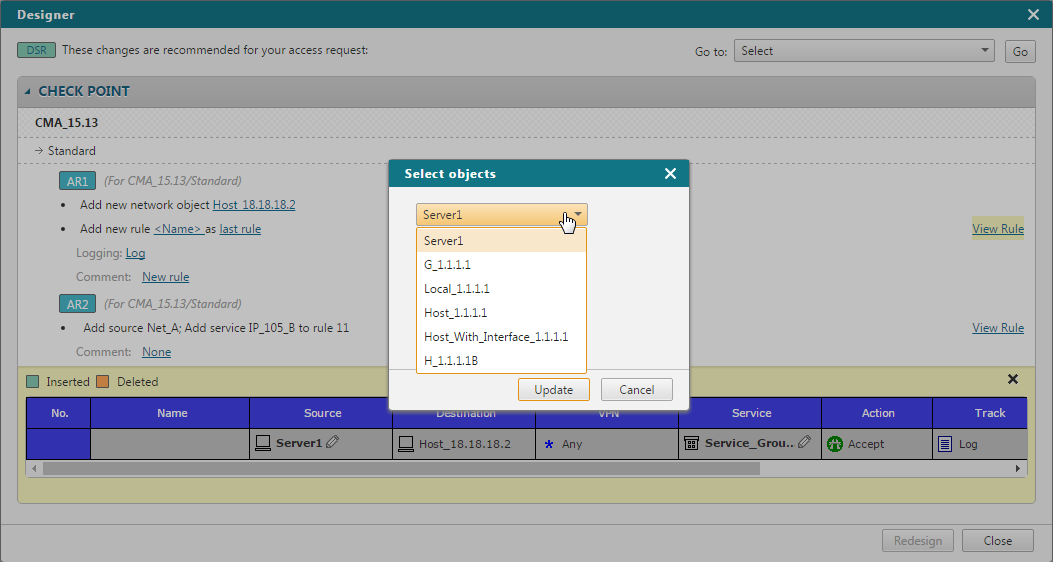
Click on Customize rule to see the objects that have alternative objects that match the access request. For example, when the access request specifies IP address 1.1.1.1 and the device has more than one object with that IP address, you can change the object that is used in the Designer results:
-
Click View rule.
-
Click Customize rule.
-
Click to change the editable object.

-
Select a different object to use in the rule.

-
Click Update.
-
-
Click
 to save the change or
  to cancel the change that you entered.
 -
If you have permissions, to implement the changes:
-
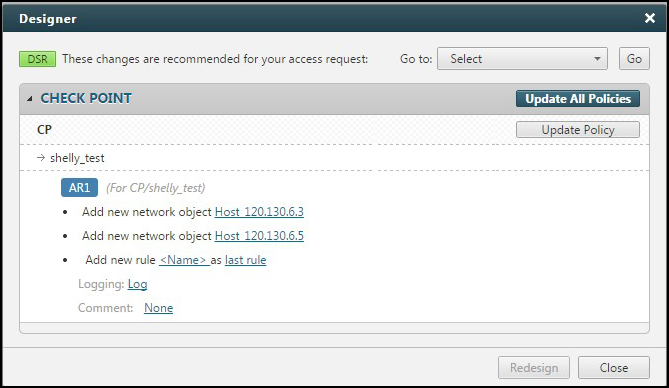
Check Point:
-
Click Update Policy or to update all policies at one time click Update All Policies. The updated policies are saved in CMA/SmartCenter.
To have the Update Policy option, enabling the Designer to apply changes directly to Check Point policies, you need to configure SecureTrack to use an OPSEC object that has Read/Write permissions.

-
Use Check Point SmartDashboard to install the policies.
-
-
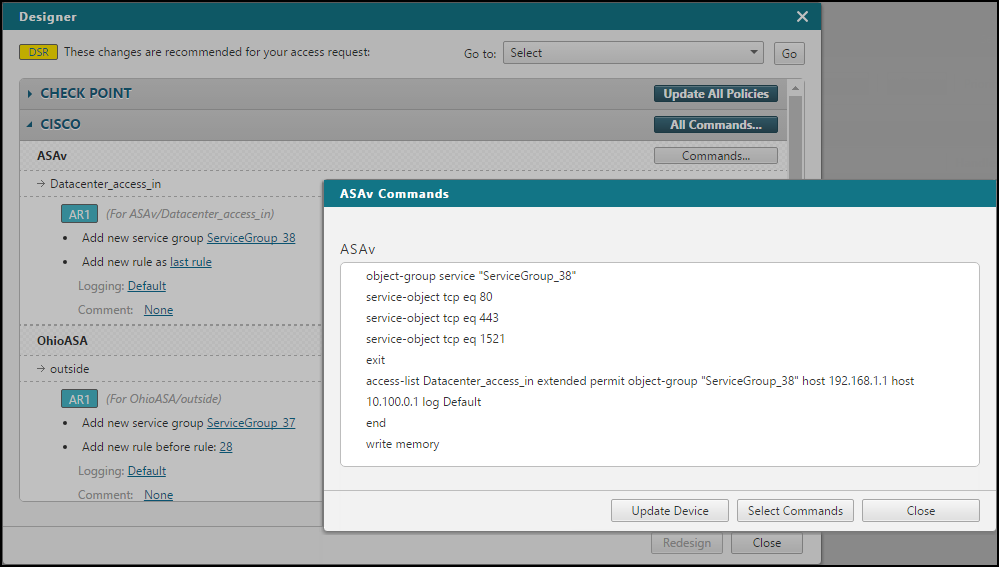
Cisco ASA, Cisco IOS, and Juniper SRX:
-
Click Commands > Update Device.
To have the Update Device option, enabling the Designer to apply changes directly to Cisco devices, you need to configure SecureTrack to monitor the devices via SSHv2.

-
-
Juniper NetScreen:
-
Click Commands > Copy Commands.
-
Paste the commands on to the device's CLI.

-
-
Palo Alto/Panorama:
-
Click Update devices.

-
-
-
Click Close to return to the ticket.
If you click Close and save the progress on the task, the designer results are saved.
You can click
 next to the access request to see the results, and other handlers can click in this step to see the results.
 -
Once you have implemented the changes recommended by Designer, you can run Verifier to confirm that the changes were implemented, see Verifying Access Requests.
How Do I Get Here?
SecureChange > My Requests > Open or create Request > Designer
