On This Page
Defining a Traffic Connection for a Request
An access request is a request to make a change in the security policies that have been configured on the network devices. The SecureChange requestor who submits the ticket is requesting to allow or decommission traffic connectivity.
Each Access Request includes an action that specifies, whether to open more traffic (Accept action), or to decommission traffic (Remove action). Basic Access Requests include IP addresses of hosts, subnets or ranges, combined with services and ports. In addition, the SecureChange ticket requestor can also make more advanced requests with changes to NAT addresses, LDAP groups, network or service objects or groups imported from the devices, or the internet object.
The service identity/application identity is the service/application-level protocol used to connect sources and destinations, such as Facebook Apps (NG applications/application aware). See the List of Tufin Predefined Application Identities.
The actions are as follows:
-
Accept: Request to allow the specified traffic connectivity in the security policies deployed on the network.
-
Remove: Request to decommission the specified traffic from the security policies deployed on the network.
-
Drop: The Drop action is only used for documenting changes manually made to the device.
Traffic connection options
After you build the traffic connection, you can:
-
Use Risk Analysis, Designer or Verifier to automate the provisioning process.
-
Enable topology so that the SecureChange automation tools automatically provide recommendations based on topology intelligence for each change specified per access request. Disable topology to manually select where the network changes should specifically apply.
-
 When topology is enabled, SecureChange finds the devices and subpolicies that are relevant to the access request and lets the Designer suggest firewall changes with the correct IP addresses.
For NAT environments, NAT translations will be accounted for in the calculations. -
 - When topology is disabled (non topology mode), you must manually choose the devices and subpolicies that are relevant to the access request and specify the correct IP addresses. Designer will calculate the rule changes required on the policies you selected. We recommend using non topology mode when the topology map is not yet fully constructed. Using access requests in topology mode with an incomplete topology may give incorrect results.
For NAT environments, NAT translations will be accounted for in the calculations. You may need to create one access request with an IP address before NAT and another access request with an IP address after NAT. The topology setting can be changed in any step but access request details that are not supported for topology are lost when you change the setting.
For an access request with topology mode enabled, if a manually selected target device is not in the path, Designer and Verifier cannot suggest or verify changes.
To reduce the possibility of performance degradation and security issues resulting from implementing wide-ranging change suggestions that may be related to your access request, if you plan to select a target device that is outside the known topology, you must use non topology mode.
-
For access requests that are initiated from SecureApp, see Requests from SecureApp.
Building Traffic Connections
-
If you want to specify the target subpolicy for an access request, click
to disable topology for the access request.If topology is disabled for an access request and you want SecureChange to identify the relevant subpolicies for the specified devices, click
to enable topology for the access request.If the request is created based on a workflow that has topology disabled, topology is disabled for all access requests.
You cannot use topology for access requests that include: ANY, class A network, Internet, non-continuous mask, IPv6 -
Select the target where you want to apply the traffic connection.
To select the target, you can enter a value directly in the access request or use the Advanced Options to select values:
-
Enter a value - Click the plus
 :
:- For Check Point devices, enter the management and gateway or policy name. For example:
CP_Mgmt/GatewayorCP_Mgmt/Policy - For all other devices, enter the device name. For example:
ASA - For ANY target, enter:
ANY(Not supported for topology)
- For Check Point devices, enter the management and gateway or policy name. For example:
-
Select from a list - Click Settings
 > Advanced Options and search by type, vendor or name.
 For requests that use a workflow without topology you need to search by device. Enter the device and click Search. For more information about workflows, see Configuring a Workflow.
-
Get a suggested target - Enter the source and destination for the connection, click Settings
> Advanced Options, and click Suggested. SecureChange lists the target devices and policies in the path of the traffic connection and you can select policies to use for the access request.The suggested target option is only available for requests that use a workflow and access request with topology enabled.
For requests that use a workflow with topology disabled, you need to manually enter the device, click Search, and then select the subpolicy (ACL, interface, or zone to zone policy). For more information about configuring workflows to use topology, see Configuring a Workflow.
-
-
Build the traffic connection for the access request. To build the traffic connection, you have the following options:
-
Enter a value - For each column, click the plus
and enter a value. To add an additional entry in any column, click the plus . To remove an entry, point to the entry and click delete  . You can enter text in these formats:
If you use NAT in your network, the IP addresses of the source and destination must be from the perspective of the source. For example, for a source with IP address 10.1.1.1 and a destination with IP address 192.168.1.1, if there is a device in between that translates both addresses to the 172.16.1.0 network, the access request must have the 10.1.1.1 address of the source and the 172.16.1.0 address of the destination.
- Select objects - Click Settings > Advanced Options to add objects to the traffic connection. Click Apply to add your entries to the traffic flow, and click OK to go back to the Access Request. To remove an entry, point to the entry in the Access Request table and click delete
 . To add objects from network devices:
 - Type or paste text - Click Settings > Advanced Options and type or paste into the text editor field for Users, Source, Destination, Service or Applications. Click Apply to add your entries to the traffic flow, and click OK to go back to the Access Request. To remove an entry, point to the entry in the Access Request table and click delete . You can type text or paste text from the clipboard in these formats:
-
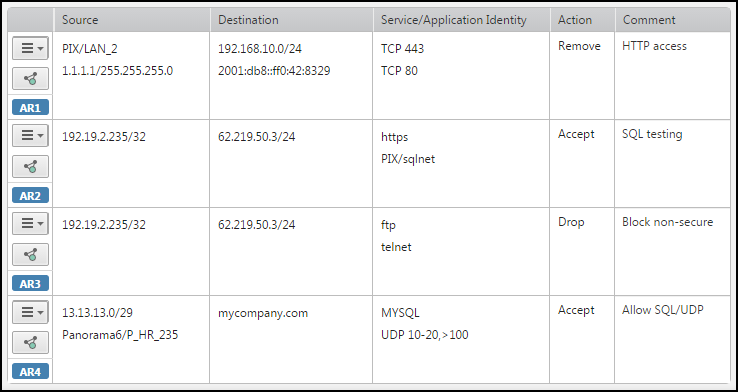
Paste from Excel - Copy a row of cells from a Microsoft Excel spreadsheet or any set of tab-delimited text, and paste into the text editor field. When you click OK or Apply, the traffic details are added to the access request. Each additional row of cells is added to the ticket as additional access request.
The text must have 3 columns in the order of Source, Destination, Service, Action (optional), and Comment (optional) in any of the text formats listed above. You can include multiple values in a single cell delimited with a semi-colon (;).
For example:

In this example, if the access request already has ASA/LAN_2 in the source, ASA/MCI_Zone in the destination, and TCP 443 in the service, then the result of importing the cells is:
-
Access Request Values
When building the traffic connection for the access request, you can select the following objects:
- User - Enter a username.
-
Source and Destination - Enter either:
- Host - Enter an IP address without a netmask. For example:
192.168.1.1or2001:db8::ff00:42:8329or::ffff:192.0.2.128 - Network - Enter an IP address and netmask or CIDR. For example:
192.168.1.0/255.255.255.0;192.168.1.0/24;2001:db8::/48 - Range - Enter a range of IP addresses. For example:
192.168.1.0-192.168.1.255or2001:db8::-2001:dba:: - Host or network with NAT - Enter the IP address and netmask with the NAT address and netmask. The NAT information is shown below the entry but is not used in Verifier or Designer calculations. For example:
192.168.1.1 nat 10.1.1.1or192.168.1.0/24 nat 10.1.1.0/24or10.0.0.1 nat 3001::A00:1 - DNS - Enter a DNS name. After you click outside of the entry field, you can hover over the DNS name to see the resolved IP address.
- Object - Enter the device and object name, the Internet, or ANY. For example:
ASA/hostorInternetorANY - The Internet object includes all public IP addresses except for addresses that are defined in other SecureTrack zones. If you do not have SecureTrack zones defined then the Internet zone is treated as ANY.
- User Identity (Source only) - Select and LDAP group from the object browser or enter @ and the name of the LDAP group, for example
@dev_team. You can add multiple LDAP groups, as with any source. LDAP groups in all LDAP servers must have unique names. Topology must be enabled for the access request and SecureChange must not be configured for Multi-Domain interconnected mode.For supported devices, SecureChange includes the LDAP groups in Designer and Verifier results for User Identity.
For other devices, SecureChange provides risk results for LDAP groups that have addresses in the Users Networks zone in the security zone matrix requirements of SecureTrack Unified Security Policy.
- Host - Enter an IP address without a netmask. For example:
- Service - Enter the name of a predefined service, the protocol and port of a service, or ANY. For example:
httportcp 80orANY - Application Identity - Enter the name of an application identity (NG application/application aware).
- Action - Select Accept, Drop, or Remove.
Selecting Objects for Access Requests
When building the traffic connection for the access request, you can select the following objects under Advanced Objects:
- User - Enter a username.
-
Source and Destination - Enter either:
- IP - Enter an IP address and netmask and click Add. You can also enter a NAT address and netmask for the entry.
- DNS - Enter a DNS name and click Add. You can click Lookup to see the resolved IP address before you add the DNS name.
- Object - Search for host, network, group and range objects by name or device, and click Add to select an object.
- Internet - Click Internet and click Add. The Internet object includes all public IP addresses except for addresses that are defined in other SecureTrack zones. If you do not have SecureTrack zones defined then the Internet zone is treated as ANY.
-
External/Cloud - Search to see a list of all network elements that are supported by SecureCloud or an external provider and click Add to select an object.
This option is only available if you have enabled SecureChange-SecureCloud integration. For a list of limitations, see Limitations of Azure Change Automation.
In the Source or Destination field, External or Secure Cloud network elements are identified with a # before the name of the device. Hover over the name of the device to view additional information including IP representation.
-
LDAP (Source only) - Click LDAP, find an LDAP group and click Add. If you do not see LDAP groups, check with your SecureChange administrator that SecureChange is not in Multi-Domain interconnected mode, and check with your SecureTrack administrator to make sure LDAP server configuration in SecureTrack is correct.
For supported devices, SecureChange includes the LDAP groups in Designer and Verifier results for User Identity. SecureChange provides risk results for LDAP groups that have addresses in the Users Networks zone in the security zone matrix requirements of SecureTrack Unified Security Policy.
-
Service - Enter either:
- Protocol - Select the protocol (TCP, UDP or ICMP), enter the port number, and click Add.
- Predefined - Select from the list of predefined services and click Add.
- Object - Search for service objects by protocol, name or device, and click Add to select an object. Use the Search options to limit the number of items displayed; if the search criteria returns more than 100 results, only the first 100 results are displayed.
Text Formats for Access Requests
When building the traffic connection for the access request, under Advanced Objects, you can enter text in the following format:
- User - Type a username or a list of usernames separated by commas.
-
Source and Destination - You can enter IP addresses in these formats:
- Host - Click IP and enter the IP address without a netmask. For example:
192.168.1.1 - Network - Click IP and enter an IP address and netmask or CIDR. For example:
192.168.1.0/255.255.255.0or192.168.1.0/24 - Range - Click IP and enter a range of IP addresses. For example:
192.168.1.0-192.168.1.255;2001:db8::-2001:dba:: - Host or network with NAT - Click IP and enter the IP address and netmask with the NAT address and netmask. For example:
192.168.1.1 nat 10.1.1.1or192.168.1.0/24 nat 10.1.1.0/24 - DNS - Click DNS, enter the URL of a server and click Add to add it to the list of sources. You can click Lookup to see the IP addresses that resolve to the URL before you add the URL.
- List - In the IP or DNS section, enter a list of hosts or networks separated by commas. For example:
10.10.10.1, 192.168.1.0/24, ASA/hostortufin.com, web.tufin.com - Object - Enter the device and object name, the Internet, or ANY. For example:
ASA/hostorInternetorANY - Internet - Click Internet and click Add. The Internet object includes all public IP addresses except for addresses that are defined in other SecureTrack zones. If you do not have SecureTrack zones defined then the Internet zone is treated as ANY.
- LDAP (Source only) - Click LDAP, find an LDAP group and click Add. If you do not see LDAP groups, check with your SecureChange administrator that SecureChange is not in Multi-Domain interconnected mode, and check with your SecureTrack administrator to make sure LDAP server configuration in SecureTrack is correct. For supported devices, SecureChange includes the LDAP groups in Designer and Verifier results for User Identity. SecureChange provides risk results for LDAP groups that have addresses in the Users Networks zone in the security zone matrix requirements of SecureTrack Unified Security Policy.
- Host - Click IP and enter the IP address without a netmask. For example:
-
Service - You can enter services in these formats:
- Predefined service - Enter the name of a predefined service. For example:
http - Protocols - Enter
TCPorUDPand a port number, enterICMPand the ICMP type number, or enterOtherand the protocol number. For example: To add HTTP, enterTCPand enter port80. To add OSPF, enterOtherand enter port89. - You can enter the port, type and protocol numbers in these formats:
- A single number:
80 - A range:
100-200 - An open-ended range of ports with Less Than or Greater Than:
>1023 - A combination of the above formats separated by commas:
21, 80-81, >1023
Each line must begin with either TCP, UDP, ICMP or Other.
- Predefined service - Enter the name of a predefined service. For example:
- Application Identity - Enter the name of an application identity (NG application/application aware).
