On This Page
Mount etcd - New Azure VM
Overview
This procedure is required for all clusters, including remote clusters, and is run on data nodes only.
The Kubernetes etcd database must be on a separate disk to give it access to all the resources required for optimal TOS performance, stability and minimal latency.
This procedure must be performed by an experienced Linux administrator with knowledge of network and storage configuration.
Preliminary Preparations
-
Switch to the root user.
-
Install the rsync RPM.
-
Find the name of the last disk added to the VM.
The output returns the list of disks on the VM. The last letter of the disk name indicates in which it was added, for example: sda, sdb, sdc.
-
Save the name of the last disk in a separate location. You will need it later for verification purposes.
Mount the etcd Database to a Separate Disk
-
Run the tmux command.
-
 Add a disk to the VM.
-
In the Azure VM, go to the Disks pane, and under Data Disks, click Create and Attach a new disk.
-
Configure the following settings:
-
Disk name
-
LUN
-
Storage type: Premium SSD LRS
-
Size: Allocate a disk size of at least 50 GB
-
Max IOPS: 7500
-
Max throughput: 250 MBps
-
Encryption: Use the default setting
-
Host caching: read/write
-
-
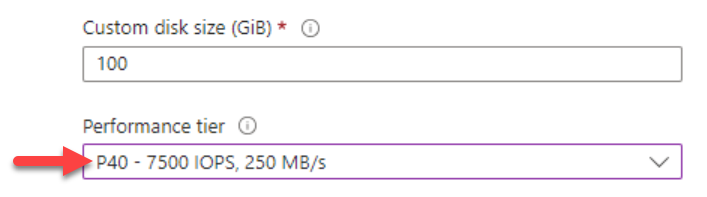
Click the Edit (
 )button, and in the Size field click the Change Size link.
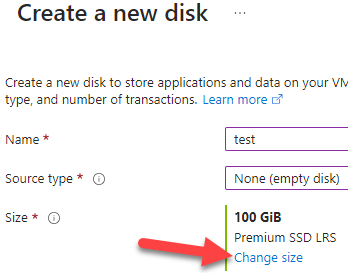
-
Verify that the performance tier is P40.
-
Click OK.
-
-
Mount the new disk.
-
Log into the data node as the root user.
-
Run the tmux command.
-
Verify that the new disk is recognized by the operating system.
Compare the output with the name of the disk you saved in the preliminary preparations, and verify that the disk name it returned ends with the next letter in the alphabet. For example, if the name you saved was sdb the output should return sdc. This indicates that the operating system recognizes the new disk.
-
Create a variable with the block device path of the new disk.
where <> represents the letter of the new disk.
-
Generate a UUID for the block device of the new disk.
-
Create a primary partition on the new disk.
-
Verify that the partition was created.
-
Format the partition as ext4.
-
Verify that the partition has been formatted with the UUID and the etcd label (output should return the partition with UUID and an ETCD label).
-
Create the mount point of the etcd database.
-
Set the partition to mount upon operating system startup.
-
Load the changes to the filesystem.
-
Mount the partition that was added to /etc/fstab.
If the output is not empty, stop the procedure. The etcd disk cannot be mounted. Review what was missed in the previous steps.
-
Verify the partition has been mounted (the output should return the block device and mount point).
[<ADMIN> ~]# mount | grep "/var/lib/rancher/k3s/server/db"mount | grep "/var/lib/rancher/k3s/server/db"If the output is empty, stop the procedure. The etcd disk is not mounted. Review what was missed in the previous steps.
-
You can now safely exit the tmux session:
-
-
Check the cluster status.
-
On the primary data nodes, check the TOS status.
-
In the output, check if the System Status is Ok and all the items listed under Components appear as ok. If this is not the case, contact Tufin Support.
Example output:
[<ADMIN> ~]$ sudo tos status
 Tufin Orchestration Suite 2.0

 System Status: Ok
 System Mode:   Multi Node

 Nodes:
   1 Master, 1 Worker. Total 2 nodes. Nodes are healthy.

 Components:
   Node:            Ok
   Cassandra:       Ok
   Mongodb:         Ok
   Mongodb_sc:      Ok
   Nats:            Ok
   Neo4j:           Ok
   Postgres:        Ok
   Postgres_sc:     Ok
-
