On This Page
Monitoring Microsoft Azure Cloud Platform
Overview
TOS Aurora monitors the Microsoft Azure Resource Manager (RM) platform for policy revision changes.
To see which TOS features are supported for your device, review the feature support table. Classic rules - rules that have been configured on the firewall directly and not included in Azure firewall policies - are not supported.
Prerequisites
To complete the Microsoft Azure configuration procedures, you must have the following connection information:
ID for an active Azure subscription - see Find your Azure subscription (Microsoft documentation).
A tenant represents a single organization, and is the dedicated instance of Azure that you receive when you sign up for Azure services.
-
Navigate to Microsoft Entra ID > Properties.
-
Copy the Directory ID.
An Application ID (also referred to as a Client ID) is the unique ID provided by Azure for any registered application. You must register an application in your tenant to enable TOS Aurora to monitor Azure devices.
-
Using the Azure portal, log in to your Azure Account with a user who can create an app registration.
-
Navigate to Microsoft Entra ID.
-
Select Manage > App registrations > New registration.
-
Type a name for the application (for example, Tufin app).
-
Under Supported account types, select Accounts in the organizational directly only - Single tenant).
-
Click Register.
-
Copy the App ID.
An Application Secret (also known as a Client Secret, Shared Secret, or Keys) is a credential used by an application to authenticate itself to a tenant when signing in to Azure. These keys do not refer to key vaults.
-
Navigate to Certificates and secrets > Client secrets > New client secret
-
In the Add a client secret panel, select an Expires value from the list.
-
Click Add.
-
Copy the secret Value BEFORE you leave the page.
You should also assign Tufin app permissions to monitor the Azure subscription. See Assigning Permissions to the App Registration.
Additional information from Microsoft documentation:
Add a Device
-
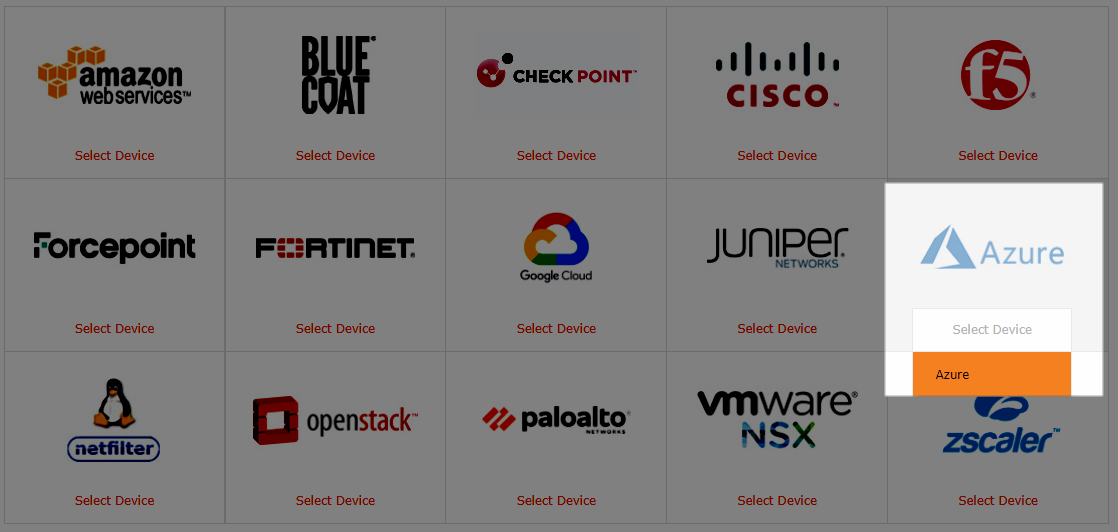
Select Azure:
-
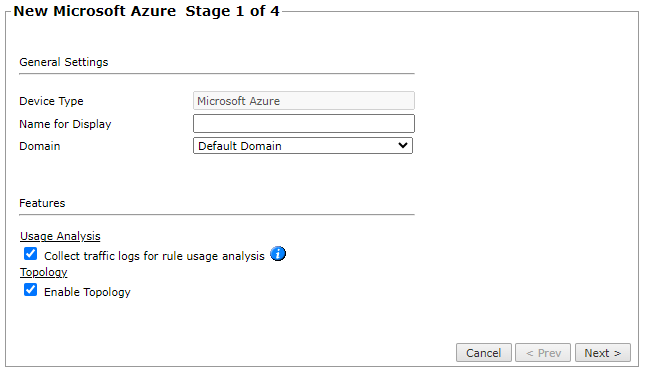
Configure the device settings:
- Name for Display
-
Domain: Available only if you have configured your system for managing multi-domains and All Domains is currently selected. Select the domain to which to add the device. The Domain can only be entered when adding a device; to change the Domain, you must migrate the device.
-
ST server: In a distributed deployment, select which TOS Aurora cluster monitors this device (not shown in image)
-
Usage Analysis: Select this check box to enable TOS Aurora to pull traffic log information from Azure Virtual Networks and Azure Firewall Policies. Note that enabling this feature requires configuration in your Azure environment for the relevant policies. For more information, see Retrieving Log Data from Azure.
Usage collection is not supported when Azure subscription is monitored on a remote collector.
Note: For Azure devices added to TOS Aurora prior to version R24-1, you must edit those device configurations and select this check box manually. From version R24-1 and later, this check box is selected by default. - Enable Topology: Collects routing information for building the network Interactive Map.
-
Click Next.
-
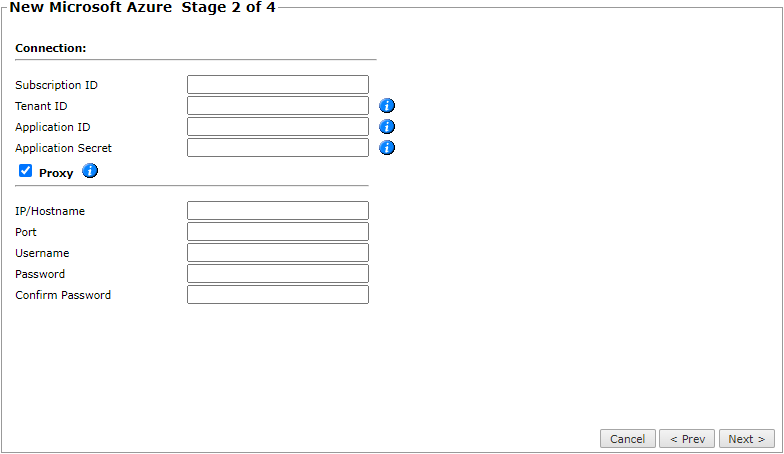
Configure the TOS Aurora connection to the Microsoft Azure device, according to the parameters required by the device:
For proxy server connections, select Proxy and enter the http/http proxy server and port. User/Password are optional.
-
Click Next.
-
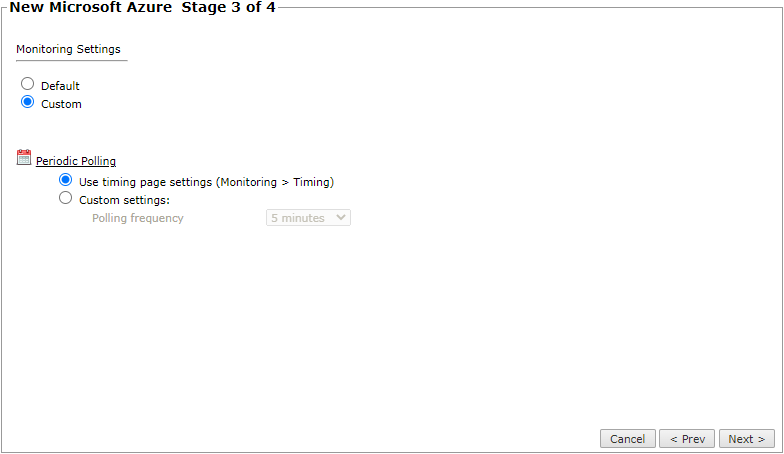
In Monitoring Settings, do one of the following:
- To use real-time monitoring and timing settings from the Timing page, select Default.
Otherwise, select Custom and configure the monitoring mode and settings.
- In Periodic Polling, select Custom settings and configure the Polling frequency: How often TOS Aurora fetches the configuration from each device.
If you select 1 day, you can then select the exact time (hour and minute) for the daily polling.
- Click Next.
-
Save the configuration.
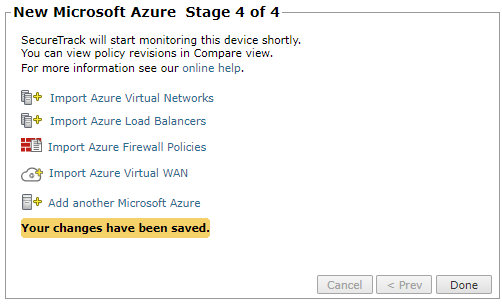
The Microsoft Azure device now appears in the Monitored Devices tree.
-
You can now do one of the following:
-
Import Azure Virtual Networks
-
Import Azure Load Balancers
-
Import Azure Firewall Policies
-
Import Azure Virtual WAN
-
Add another Microsoft Azure
Importing Virtual Networks requires that the vnet has at least one VNIC.
-
- Click Done.
Configure a Monitored Device
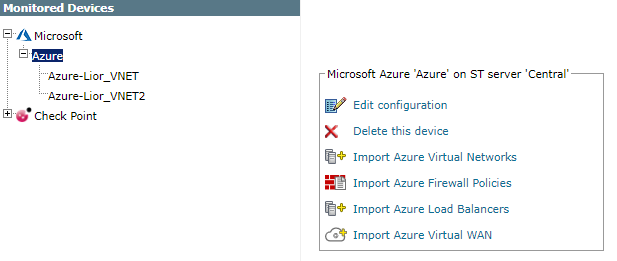
After you add a device, further configuration options are available.
Options vary depending on your environment.
Example
-
Edit configuration: Use the wizard to modify selected device settings. See Add a Device in this topic.
-
Delete this device: Type yes to confirm that you want to delete the device.
-
Import Azure Virtual Networks: Select the Azure Virtual Networks to be added.
-
Import Azure Load Balancers: Select the Azure Load Balancers to be added.
-
Import Azure Firewall Policies: Select the Azure Firewall Policies to be added.
-
Import Azure Virtual WAN: Select the Virtual WANs and Virtual Hubs to be added.
How Do I Get Here?
SecureTrack > Monitoring ![]() > Manage Devices
> Manage Devices
