On This Page
Monitoring Cisco ASA Firewall Devices
Overview
TOS Aurora monitors ASA firewall devices for policy revision changes. For TOS Aurora to show full accountability details (who made the policy changes and when the changes were made), you must also configure the device to send syslogs.
To see which TOS features are supported for your device, review the feature support table.
Cisco ASA Clusters
-
Layer 2 ASA clusters are supported.
-
Layer 3 ASA clusters are not supported.
-
Multi-context clusters are supported, but syslogs need to be configured per context.
-
ASA clusters must be monitored through the VIP address.
Prerequisites
TOS Aurora and the monitored devices must be synchronized with the correct date and time, either manually or automatically. We recommend that you also configure the devices to resolve DNS queries.
The Cisco ASA management interface must allow SSH connections from the TOS Aurora server. For port details, see Device-Related Ports.
Before you start, make sure that the device user account that you use for TOS Aurora monitoring has permission to run these commands:
-
Retrieve revision:
show running-config
show access-list
show ipv6 access-list
show clock
show version
terminal pager 512
show cluster info -
Retrieve dynamic topology:
show version
show name
show route
show route management-only
show interface -
Virtual context:
changeto context <context_name>
-
Provisioning:
changeto system
show context
exit
configure terminal
end
write memory
Recommendations
-
Object usage analysis requires plenty of free disk space (depending on the number of gateways and the amount of traffic logs generated). If disk space is limited, you can configure TOS Aurora to limit the number of days that data is kept.
-
Enable TOS Aurora administrative alerts, which notify you if there is low disk space on the server. When disk utilization exceeds 90% in the partition that has the database, TOS Aurora sends an alert.
-
If the device is a standby member in a high availability cluster, monitor the device as a standalone device with usage analysis collection and topology disabled. This will prevent the standby member from appearing on the interactive map, and ensure that routing is correct.
Add a Device
-
Select Cisco > ASA:
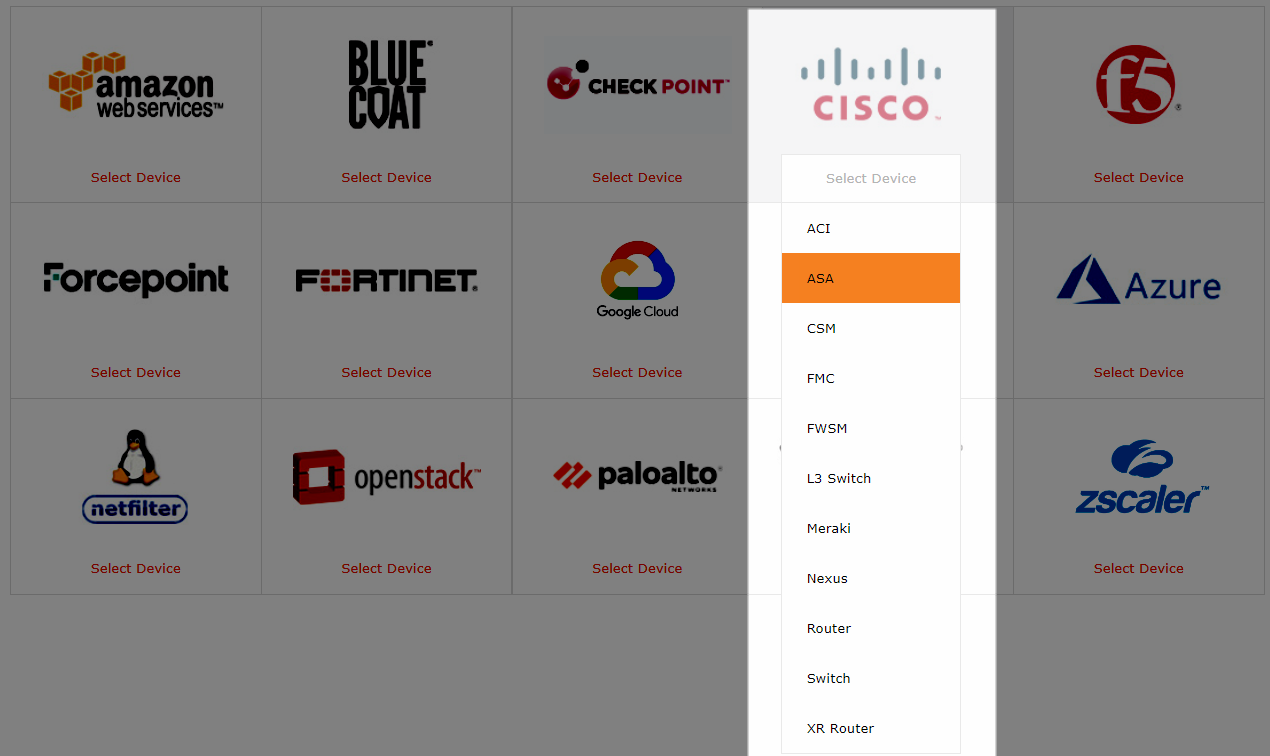
-
Configure the device settings:
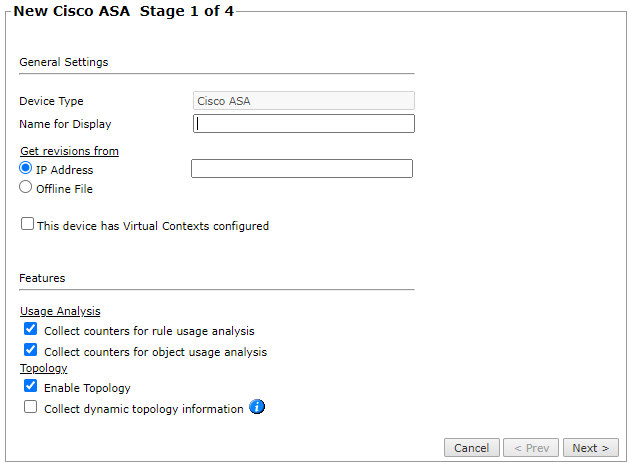
-
Name for Display
-
Domain: Available only if you have configured your system for managing multi-domains and All Domains is currently selected. Select the domain to which to add the device. The Domain can only be entered when adding a device; to change the Domain, you must migrate the device.
-
Get revisions from: One of the following:
-
IP Address: Revisions are retrieved automatically
Enter the IP of the management device. If the device is in a cluster, enter the VIP.
-
Offline File: (If available) Revisions are manually uploaded to TOS Aurora for Offline Analysis
-
-
ST server: In a distributed deployment, select which TOS Aurora cluster monitors this device (not shown in image)
-
To enable adding and monitoring Virtual Contexts, select This device has Virtual Contexts configured.
-
Collect counters for rule usage analysis is necessary for Rule Usage reports.
-
Collect counters for object usage analysis enables Rule Usage reports to include per-object usage information.
-
Enable Topology: Collects routing information for building the network Interactive Map.
Topology options for Advanced management mode are configured when you import managed devices. -
If the device uses dynamic addressing (such as DHCP) or dynamic routing protocols (such as OSPF), also select Collect dynamic topology information. To collect dynamic topology information from Cisco routers using SNMP v2 or v3, select SNMP in the next stage and specify the protocol details for your device.
Click Next.
-
-
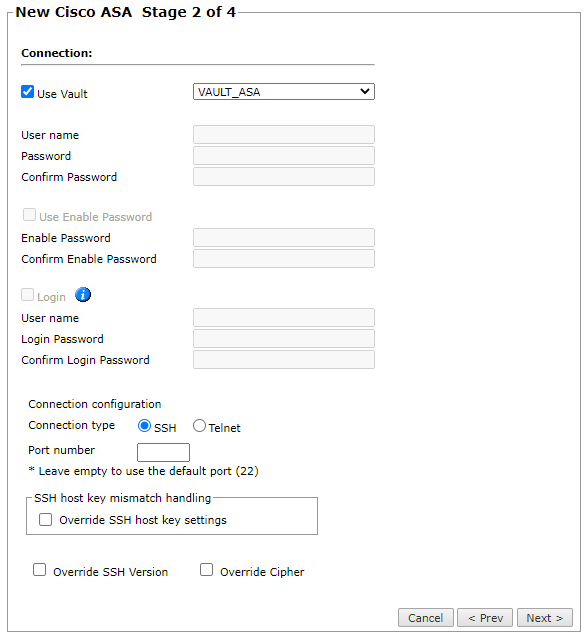
Configure the TOS Aurora connection to the Cisco ASA Firewall device, according to the parameters required by the device. To use a vault server that contains access credentials, select Use Vault and select the server. For more information, see Configuring a Vault Server.
-
Enter the authentication details needed to connect to the Cisco ASA Firewall device.
- Username and password: Enter the device username and password
- Enable password: Enter the password to give TOS Aurora elevated privileges on the device
- Login: If your device requires the Login password, select this option and enter the username and password that is required for the login command
-
Select whether to use SSH (preferred) or Telnet.
You can configure the connection to use either SSH version 1 or 2 with the Override SSH version option.
- To use default settings (recommended in most cases), leave the Port number and both Override options clear.
-
If TOS Aurora is configured to automatically replace the SSH host key when a new SSH host key is detected for a device, you can Override SSH host key settings to prevent the host key from being replaced for this device.
You can then set TOS Aurora to Replace SSH host key automatically for this specific device.
Warning: Automatic replacement of the SSH host key can expose your server to security risks and is not recommended.
- Override SSH Version: Select this option to force the device to use SSH-1 or SSH-2
- Override Cipher: Select this option to force the device to use DES or 3DES encryption
Click Next.
-
-
In Monitoring Settings, do one of the following:
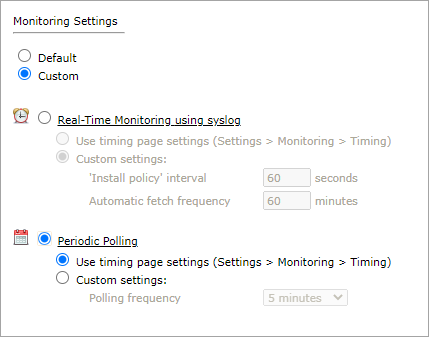
- To use real-time monitoring and timing settings from the Timing page, select Default.
Otherwise, select Custom and configure the monitoring mode and settings.
Real-Time Monitoring: Applies only if syslogs (Configuring Devices to Send Logs) are configured. Select Custom settings and configure:
- 'Install policy' interval: When two or more Install Policy events for the same policy occur within this time interval, TOS Aurora combines the events into a single Install Policy revision (Default: 60 seconds)
- Automatic fetch frequency: Frequency (in minutes) for automatic fetch
- Periodic Polling, select Custom settings and configure the Polling frequency: How often TOS Aurora fetches the configuration from each device.
If you select 1 day, you can then select the exact time (hour and minute) for the daily polling.
Click Next.
- Save the configuration.
The Cisco ASA Firewall device now appears in the Monitored Devices tree.
Configure a Monitored Device
After you add a device, further configuration options are available.
Options vary depending on your environment.

-
Edit configuration: Use the wizard to modify selected device settings. See Add a Device in this topic.
-
Delete this device: Type yes to confirm that you want to delete the device.
How Do I Get Here?
SecureTrack > Monitoring ![]() > Manage Devices
> Manage Devices
