On This Page
Prepare a T-820/T-1220 Appliance Using iDRAC
This procedure explains how to prepare a T-820 or T-1220 Tufin appliance for a TOS deployment using iDRAC. After the operating system is installed, all existing data on the machine will be deleted.
The Tufin Appliance is delivered with TufinOS pre-installed, and TOS ready to be installed (according to the instructions in the Quick Start Guide). However, there may be circumstances in which you will later need to reinstall TufinOS and TOS.
Other Deployment Options
-
For all other deployment options, see Prepare The Server
Prerequisites
General Requirements
-
This procedure must be performed by an experienced Linux administrator with knowledge of network and storage configuration.
-
Make sure the TufinOS release you are going to install, supports your target TOS release - see TufinOS 4 Supported Upgrade Paths.
-
To ensure optimal performance and reliability, the required resources need to always be available for TOS. If resources become unavailable, this will affect TOS performance.
-
Verify that you have sufficient resources (CPUs, disk storage and main memory) to run TOS. The required resources are determined by the size of your system. See Sizing Calculation for a Clean Install.
-
We do not recommend installing on your server 3rd party software not specified in the current procedure. It may impact TOS functionality and features, and it is your responsibility to verify that it is safe to use.
- All nodes in the cluster must be running the same operating system.
- The node's network IP must be on the same subnet as the cluster primary VIP.
-
If you intend to use syslog, allocate a syslog VIP on the same subnet as your primary VIP.
-
Complete the preliminary set up described in the T-820 / T-1220 quick start guide.
Network Requirements
-
Tufin Orchestration Suite must only be installed in an appropriately secured network and physical location. Only authorized users should be granted access to TOS products and the operating system on the server.
-
You must allow access to required Ports and Services.
-
All TOS nodes need to be on the same subnet.
-
Network configurations for your interface must be set to manual IPv4 with gateway and DNS Servers set to the IPs used by your organization.
-
Allocate a 24-bit CIDR subnet for the Kubernetes service network and a 16-bit CIDR subnet for the Kubernetes pods network (10.244.0.0/16 is used by default).
The pods and services networks must be inside the following private networks: 10.0.0.0/8, 172.16.0.0/12, 192.168.0.0/16. In addition, ensure that the dedicated CIDR for the service network and pods network don't overlap with each other, and:
-
The physical addresses of your TOS servers (see below)
-
Your primary VIP, Syslog VIP or external load balancer IP (see below)
-
Any other subnets communicating with TOS or with TOS nodes
-
-
If a proxy is configured on your system, make sure this network is excluded.
-
You must have available the following dedicated IP addresses:
- For on-premises deployments, a primary VIP that will serve as the external IP address used to access TOS from your browser. The primary VIP will not be needed in the installation of the operating system, except in the final step - the installation command.
- The physical network IP address of the first network interface used by the administrator for CLI commands. This is the IP address you will use in most steps of the procedure.
-
If additional nodes are subsequently added to the cluster, each node will require an additional dedicated physical network IP address.
- Additional syslog VIPs can be allocated as needed.
-
The VIP, all node physical network IP addresses and all syslog VIPs must be on the first network interface.
-
Make sure your first physical interface is correctly configured and all other interfaces are not on the same network.
To find the first network interface, run the following command:
[<ADMIN> ~]$ sudo /opt/tufinos/scripts/network_interface_by_pci_order.sh | awk -F'=' '/NET_IFS\[0\]/ { print $NF }'sudo /opt/tufinos/scripts/network_interface_by_pci_order.sh | awk -F'=' '/NET_IFS\[0\]/ { print $NF }'Otherwise network errors such as connectivity failures and incorrect traffic routing might occur.
-
All unused interfaces must be disabled.
iDRAC Requirements
-
Additional ports and services are required for iDRAC. See the Dell iDRAC user guide for the full list.
Install the Operating System
Skip any steps that have already been done when following the quick-start guide: T-820 / T-1220
Download TufinOS 4.50
-
Download the TufinOS 4.50 installation package from the Download Center to your local machine.
-
Extract the TufinOS image from its archive.
The run file name includes the release, version, build number, and type of installation.
TufinOS USB file example:
TufinOS-4.50-4368238-x86_64-Final.usb.img -
Verify the integrity of the TufinOS installation package.
[<ADMIN> ~]# sha256sum -c TufinOS-X.XX-XXXXXX-x86_64-Final.usb.img.sha256sha256sum -c TufinOS-X.XX-XXXXXX-x86_64-Final.usb.img.sha256The output should return OK
Make sure the TufinOS release you are going to install, supports your target TOS release - see TufinOS 4 Supported Upgrade Paths.
Install TufinOS 4.50
-
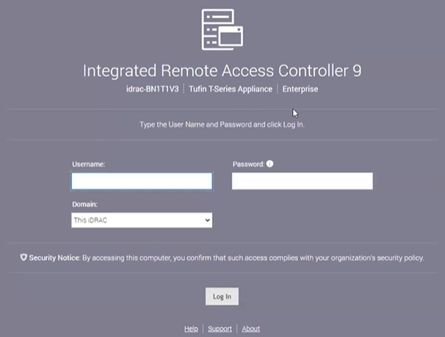
In your browser, navigate to the IP address that you defined when setting up your appliance.
-
Enter the credentials you received with your Tufin appliance.
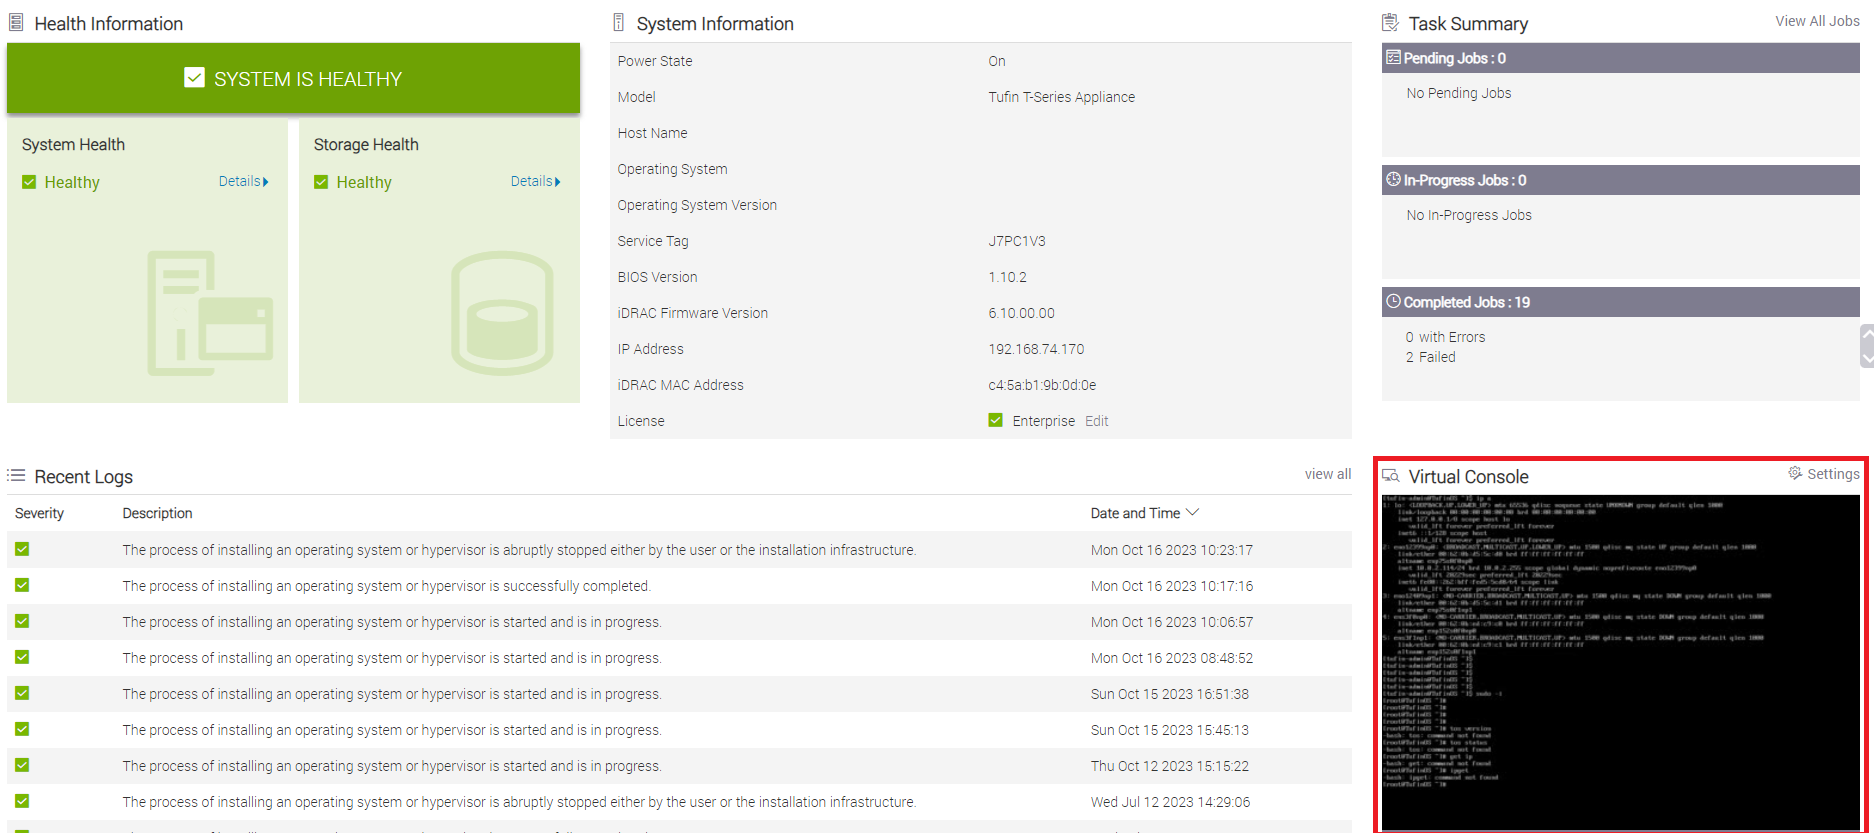
The iDRAC9 interface is displayed.
-
Click anywhere in the Virtual Console pane to open the virtual console Java application.
-
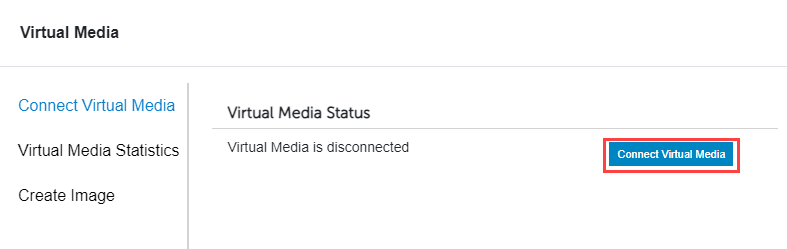
In the menu bar, click Virtual Media.

-
In the Virtual Media dialog box, click Connect Virtual Media to connect the virtual media emulator to the appliance.
-
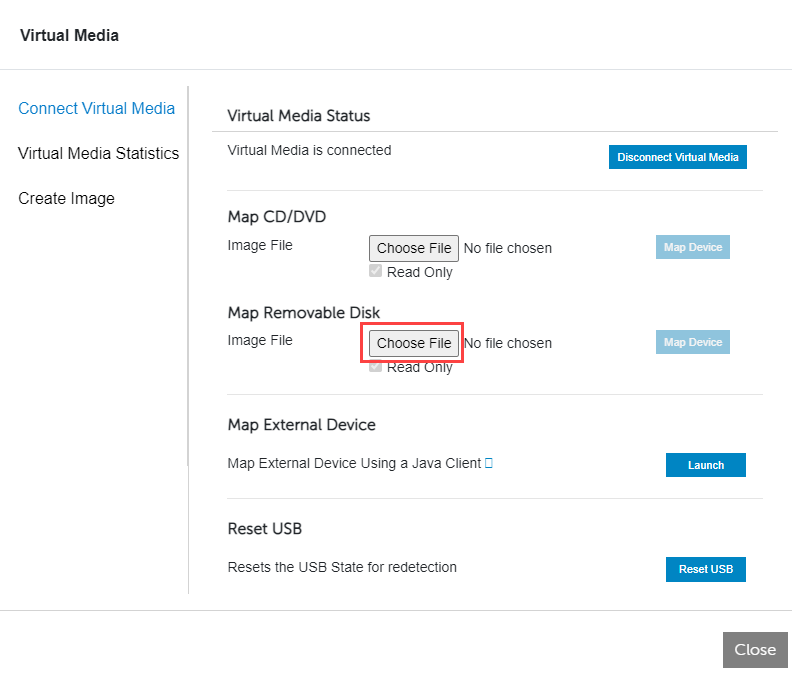
After the virtual media emulator is connected, in the Map Removable Disk section, click Choose File.
-
Select the TufinOS USB image file, and then click Map Device.
-
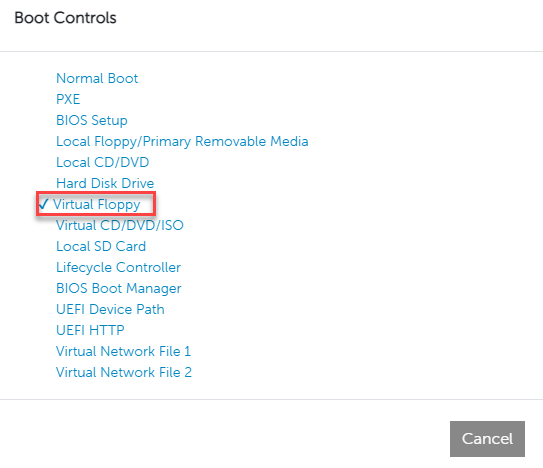
After the file is successfully mapped, in the menu bar click Boot, and select Virtual Floppy.

-
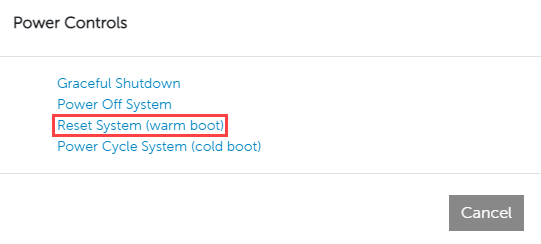
In the menu bar, click Power, and select Reset System (warm boot) to reboot the appliance.

After the reboot, the TufinOS 4.50 installer launches.
-
Select TufinOS 4.50 installation for TOS Aurora.
- Select Install 4.50 via KVM:
-
When prompted, select Yes.
-
When the installation is complete, reboot the appliance.
-
Once the device has rebooted, log in again as tufin-admin. The default admin user credentials are:
-
username:tufin-admin
-
password: admin
-
-
The system requires that you change the password on the first login.
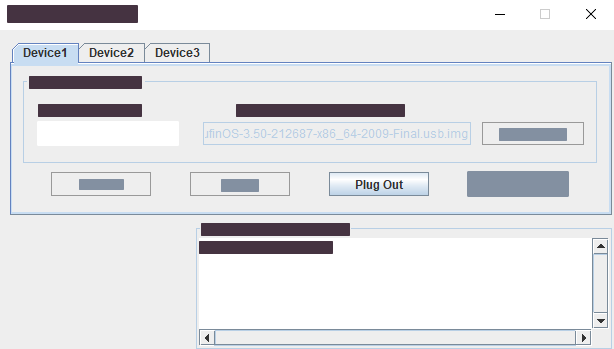
When the BIOS POST starts, detach the TufinOS installation image. Go to Virtual Media > Virtual Storage, click Plug out, and then OK.
Set Up The Appliance
-
Give the node a unique name in the cluster
-
If you want to reset the host name or IP of the machine, do so now. It cannot be done at a later stage. See Changing IP Address/Host Names.
-
If you want to configure NIC bonding, do so now. It cannot be done at a later stage. See Link Redundancy on Tufin Appliances.
-
Configure the server timezone.
where
<timezone>is in the format Area/Location. Examples: America/Jamaica, Hongkong, GMT, Europe/Prague.To view a list of the time-zone formats that can be used, run:
Ukraine only. Since the change in timezone name from Kiev to Kyiv, not all software products have been adjusted. We therefore recommend avoiding these names and instead using an alternative city in the same timezone such as Europe/Tallinn. -
Synchronize your machine time with a trusted NTP server. Follow the steps in Configuring NTP Using Chrony. In an HA deployment, all servers need to be synchronized to the same time.
-
Configure the IP address and DNS, where
<Interface Name>is the name of the interface you are using (for example, ens32). If you have several network interfaces, configure the first one. -
To assign a static IP address:
-
Run the command:
- Set IPv4 CONFIGURATION to Manual
- Set Addresses for the physical IP, together with the chosen subnet
- Set Gateway and DNS Servers to the IPs used by your organization
- Restart the network service.
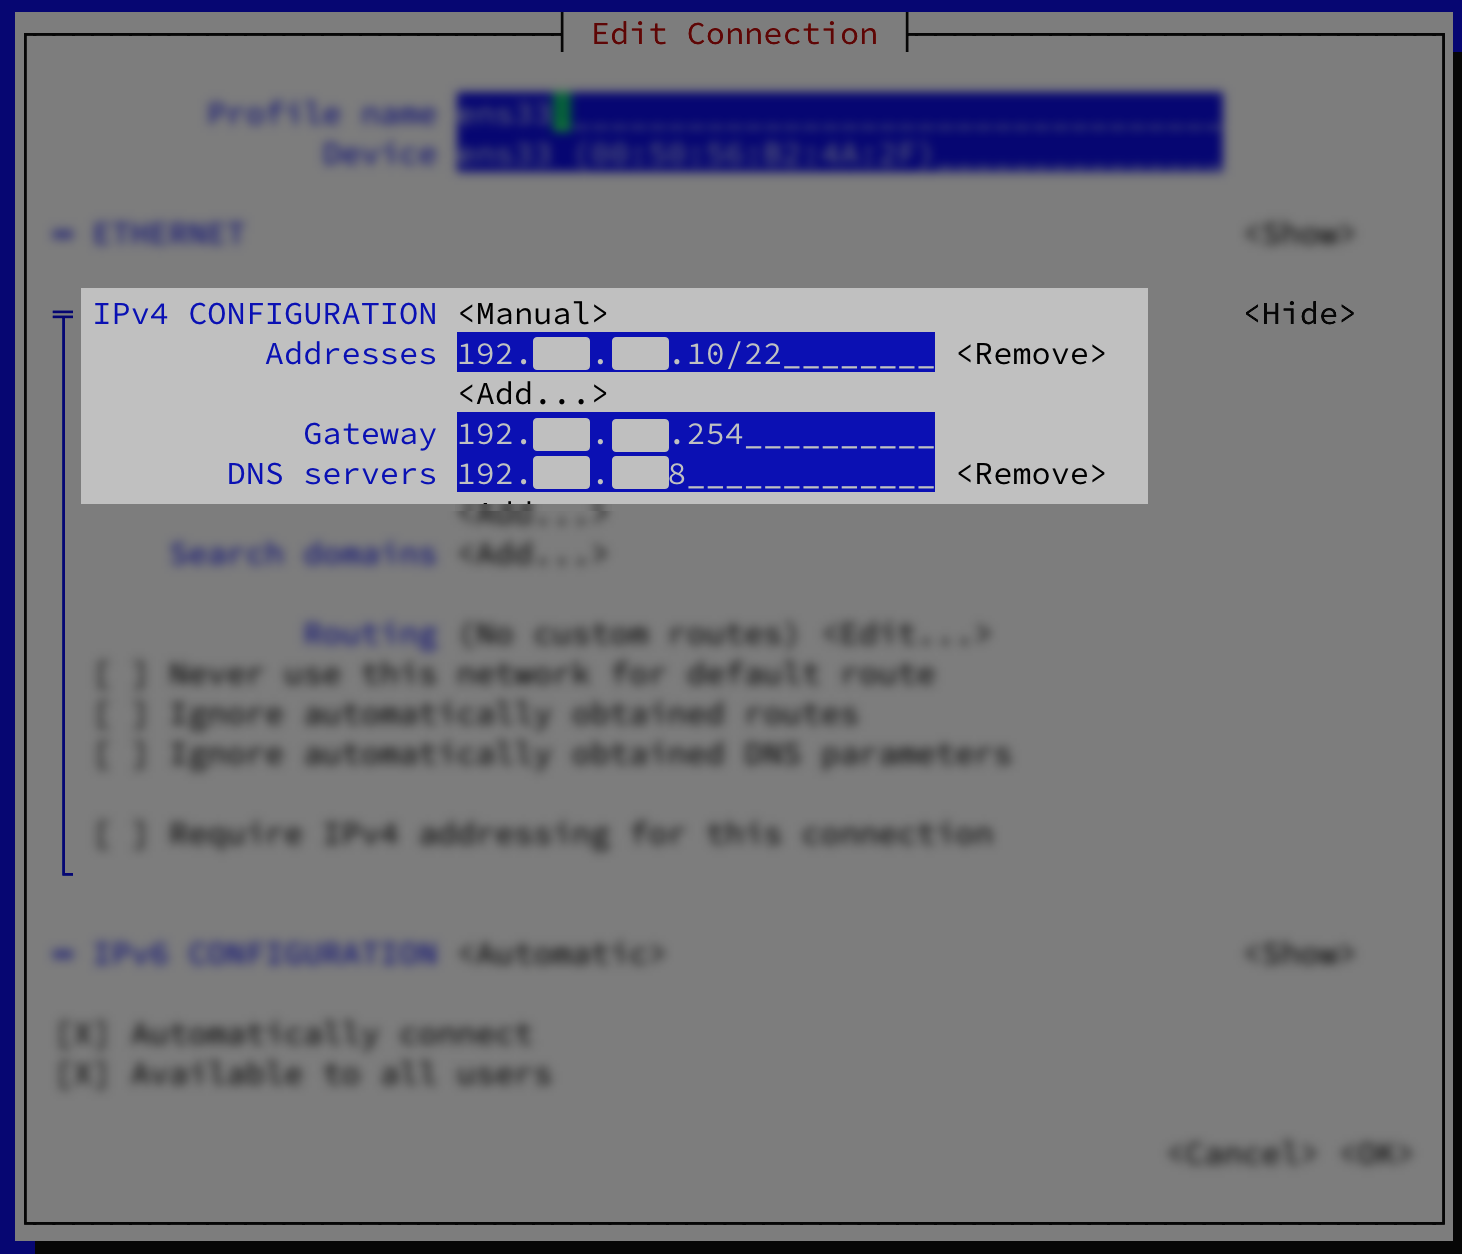
and set the following parameters in the window:
-
-
 Verify that the DNS server can resolve its own address using a reverse lookup
Run:
If the name of the server appears, the DNS server can resolve its own address using a reverse lookup.
Example Output
[<ADMIN> ~]$ sudo nslookup  1.2.3.4
4.3.2.1.in-addr.arpa	name=EXAMPLE.company.com
If the name of the server does not appear, set it using a reverse lookup entry at /etc/hosts.
Example Output where
1.2.3.4 4.3.2.1.in-addr-arpawas added.[<ADMIN> ~]$ sudo cat /etc/hosts 127.0.0.1 localhost localhost.localdomain localhost4 localhost4.localdomain4 ::1 localhost6 localhost6.localdomain6 1.2.3.4 admin.company.com admin 2.3.4.5 5.4.3.2.in-addr-arpa
What Next?
-
For a first time install, see Install TOS
-
If you need to add a worker node to your existing deployment, see add a worker node
-
For high availability, see Deploy High Availability
Was this helpful?
Thank you!
We’d love your feedback
We really appreciate your feedback
Send this page to a colleague