On This Page
Defining Access to an Application
Overview
To make an application accessible to users, the application owner first defines the allowed connectivity. This includes two main operations:
- Creating a server group that users can ask to join.
- Adding this server group to connections that are part of the requested application.
For example, users may request access to the Email Access application. In this case, the application owner defines a group called Email Users, to which users can be added.
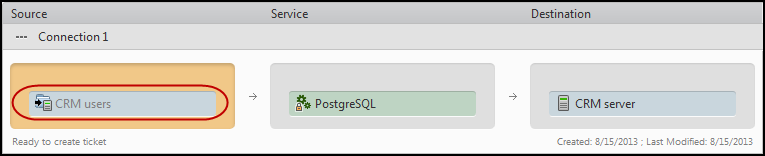
Next, the owner adds this group to the Source field of the Email Access connection that has the company’s email server in its Destination field.
Define Access to An Application
-
Define a server group that users can ask to join:
-
In the Resources pane, go to the Servers expander and either:
-
Create a new server group: Click
 and select New group.
 -
Edit an existing server group: Select the group and click
 .
.
-
-
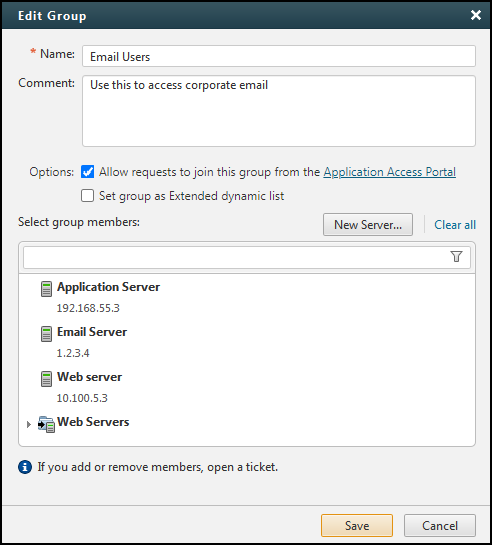
Edit the group details.
The details you define here will be displayed in the Application Access Portal. This information helps users to choose the type of access to request.
-
Name: Enter the name that you want users to see in the Application Access Portal as the Access Type.
-
Comment: Enter the text that you want users to see in the Application Access Portal as the Access Type Description.
-
Options:
-
Allow requests to join this group from the Application Access Portal: Through the Application Access Portal, users will be able to request access to connections that include this group.
-
Place a link to the Application Access Portal on an intranet site that requesters use to submit requests, or send them the link by email.
The URL for the Application Access Portal:
https://<SecureApp_IP_Address>/tufinapps/secureapp/application-access-portalWhere the
<SecureApp_IP_Address>is the IP address of your SecureApp server.This URL is also found in the Application Access Portal link in the New Group or Edit Group windows.
-
-
Click Save. The list of servers shows this group as a group icon that has a black arrow, indicating that users can ask to join this group:

-
-
Add the new group to the Source fields of connections you want to make available to users, and then click Save Connections.
-
Make sure that all requesters have a SecureApp user account. If not, create these users.
-
Allow users to view the Application Access Portal, used to submit access requests:
-
Go to Settings > Users > Permissions, and select View application access portal.
-
-
To customize the automatic email notifications that SecureApp sends when application access requests are submitted and processed, go to Settings > Mail Notifications and edit these templates as needed:
-
Requested access to application (to owner) – sent to the application owner once a user submits a new application access request through the Application Access Portal. The application owner is required to review the request and either approve or reject it.
If the owner approves the application access request, the next step is to open a ticket that specifies the required firewall updates.
-
Requested access application submitted (to requester) – sent to the requester after submitting a new application access request through the Application Access Portal. This notification confirms that the request has been received.
-
Request to access application completed – sent to the requester once the application can be accessed. This notification is sent after the application owner approves the request, and the ticket specifying the required firewall updates is completed.
-
Request to access application rejected – notifies the requester that the application access request has been denied, and suggests contacting the application owner for more information.
For detailed instructions on using mail notifications, see Customizing Mail Notifications.
-
The connections to which you added the group are now available through the Application Access Portal, and users can submit requests to access the application.
How Do I Get Here?
SecureApp > Applications