On This Page
Upgrade TOS Aurora
Overview
This procedure is for upgrading any supported release to R24-1 and it is identical for all platforms and operating systems. For all other installation paths such as upgrading from TOS Classic to TOS Aurora and clean install, see the appropriate procedure in the menu. All clusters must be running the same TOS version.
The procedure must be run once per cluster including remote and disaster recovery clusters, on the primary data node . It will automatically upgrade TOS on all other worker and data nodes in the same cluster. The TOS CLI will be upgraded on the other nodes when you next run a TOS CLI command on them.
If you are upgrading a high availability environment, you are going to need to prepare the other data nodes before upgrading TOS. This will require logging into them separately in a different session.
Before starting, you should make a backup and export it outside of the cluster in case you need to roll back. After the upgrade completes successfully, you should make a new backup as previous backups made on one product version cannot be restored to another.
Prerequisites
TOS Compatibility and Upgrade Paths
- Make sure your current version can be upgraded directly to this version of TOS Aurora - see TOS Aurora Upgrade Paths.
-
If you are running on a non-TufinOS operating system, make sure it is supported for this TOS release here.
-
If you are running on the TufinOS operating system, make sure your current OS version will support the new version of TOS Aurora - see TufinOS Compatibility. Either way, we always recommend upgrading TufinOS to the latest version.
Port and Services
-
If your deployment incorporates remote clusters and you are upgrading from a release lower than R23-1, be aware that an additional port 9090 is now required for successful running of TOS - see remote collector ports.
Downloads
-
Download the TOS R24-1 PHF1.0.0 installation package from the Download Center.
-
Verify the integrity of the TOS installation packages by entering the following commands and comparing the output with the checksum information.
-
Extract the TOS run file from its archive.
The run file name includes the release, version, and build number.
TOS file example:
R24-1-PHF1.0.0-final-4577.run
The downloaded files are in .tgz format <FILENAME>.tgz.
Required Steps Before Starting
-
Run the command tos status. In the output, make sure system status is "OK", all nodes are "healthy" and under "Disk usage" /opt is not more than 70%. If any of these conditions are not met, the upgrade will fail.
-
Make sure you have at least 25 GB free on the primary data node in the
/tmpdirectory. -
If you monitor devices managed by a management device/domain that does not have a dedicated license because it inherits its license status from its monitored devices/domains e.g. FMC, FMG, Panorama, make sure all such monitored devices/domains are licensed or removed. Failure to do this will cause the management device/domain to be unlicensed after the upgrade.
-
If you are upgrading a remote collector cluster:
-
Do not start the upgrade until the upgrade to the central cluster has completed.
-
It must run it under the same release as the central cluster.
-
When upgrading from a remote collector cluster running release R20-2, the cluster will need to be reconnected manually to the central cluster. When upgrading from later versions, this is done automatically.
-
-
You must have a valid license before starting the upgrade, otherwise the procedure will abort.
-
Select Admin
 > Licenses.
 -
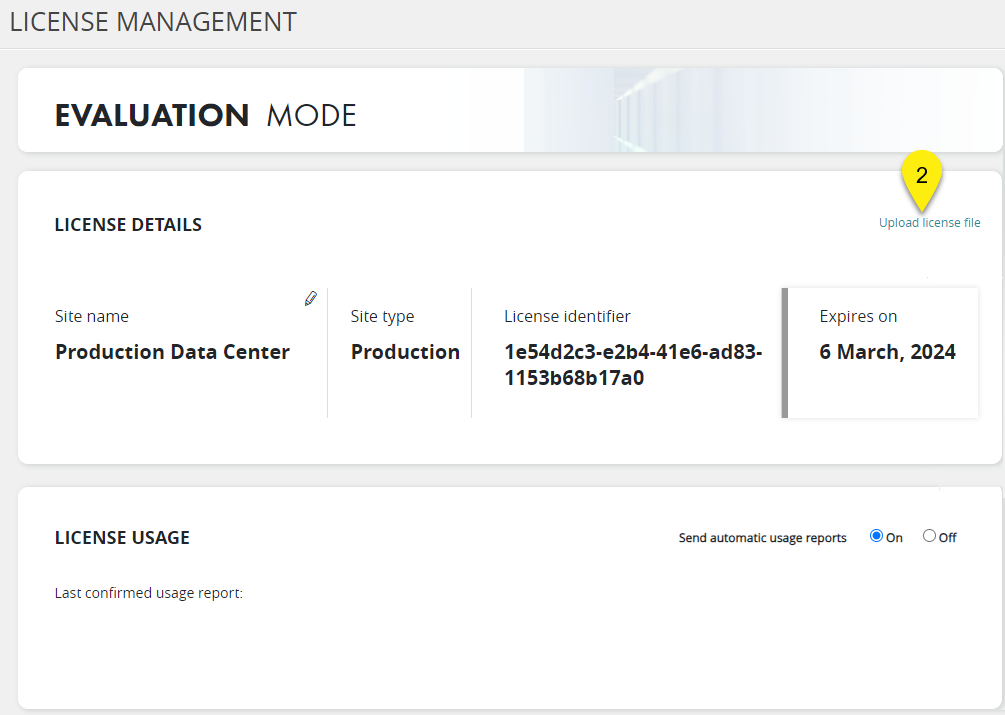
If your license has expired, or if there is no license uploaded, upload a valid license. For more information see, Uploading License Files to TOS (Solution Tiers)
The License Management page appears.
-
-
Create a backup of the installation file that was used for your current TOS Aurora installation - /opt/tos/tos.tar - to a directory outside of /opt/tos This is necessary in case there is a need to roll back.
-
Create a backup of your TOS Aurora data (see One-Time Backup Procedure).
- Transfer the run file to the primary data node to directory /opt/tufin/data.
-
If you use automated provisioning, make sure there are no queued provisioning tasks. You can check this using the waiting_tasks API.
-
 Verify that the DNS server can resolve its own address using a reverse lookup
Run:
If the name of the server is displayed, the DNS server can resolve its own address using a reverse lookup.
Example Output
[<ADMIN> ~]$ sudo nslookup  1.2.3.4
4.3.2.1.in-addr.arpa	name=EXAMPLE.company.com
If the name of the server is not displayed, set it using a reverse lookup entry at /etc/hosts.
Example Output where
1.2.3.4 4.3.2.1.in-addr-arpawas added.[<ADMIN> ~]$ sudo cat /etc/hosts 127.0.0.1 localhost localhost.localdomain localhost4 localhost4.localdomain4 ::1 localhost6 localhost6.localdomain6 1.2.3.4 admin.company.com admin 2.3.4.5 5.4.3.2.in-addr-arpa
-
See the R24-1 Pre-Installation Information in the Release Notes
Upgrade Procedure
Read and understand Prerequisites before you start.
-
Log in to the primary data node using SSH as user tufin-admin or another user with sudo or root privileges.
-
Check your current version by running the following command:
-
Check that your cluster status is healthy.
-
Run the following command on the primary data node:
Example Output
[primary data node]# systemctl status k3s [root@TufinOS ~]# systemctl status k3s Redirecting to /bin/systemctl status k3s.service ● k3s.service - Aurora Kubernetes Loaded: loaded (/etc/systemd/system/k3s.service; enabled; vendor preset: disabled) Active: active (running) since Tue 2021-08-24 17:14:38 IDT; 1 day 18h ago Docs: https://k3s.io Process: 1241 ExecStartPre=/sbin/modprobe overlay (code=exited, status=0/SUCCESS) Process: 1226 ExecStartPre=/sbin/modprobe br_netfilter (code=exited, status=0/SUCCESS) Main PID: 1250 (k3s-server) Tasks: 1042 Memory: 2.3G -
In the output under the line k3s.service - Aurora Kubernetes, check that two lines appear - Loaded... and Active... similar to the example above. If they appear, continue with the next step, otherwise contact Tufin Support for assistance.
-
-
Make sure all users are logged out from the browser.
-
Make a one-time backup.
-
After your backup has completed, run the following command:
-
Extract the TOS run file from its archive.
-
Run the following commands:
where
<rls>is the name of the file extracted in prerequisites.This step will replace the TOS CLI. Do not run any other TOS CLI commands until the TOS update command, which will be run in a subsequent step, has completed. If you attempt to run TOS CLI commands other than tos update, you will receive a message that there is a mismatch between the TOS CLI and the application and you will have the option of reverting to the CLI that was just replaced. If you revert to the previous CLI, you will be able to run other TOS CLI commands but will not be able to continue with the upgrade until you run the run file again. -
HA only. Prepare the other data nodes.
-
Open separate sessions to the non-primary data nodes.
-
On the primary data node, run:
A command will be generated.
-
Copy the command and run it on one of the non-primary data nodes. The names of these nodes are displayed in the output.
After the command finishes running, in the primary data node, a second command will be generated.
-
Copy the command to the other non-primary data node. The name of this node is displayed in the output.
Once that command finishes running, proceed to the next step.
If no command was generated, this may indicate that the other data nodes have already been prepared.
-
For each data node, run the following command to check if it is ready to be upgraded:
If the output for all data nodes is The system is ready for upgrade, proceed to the next step.
-
-
If upgrading from R22-2 PGA.0.0 or R22-1 PHF3.x and your syslog VIP is set up with transport TCP, import the syslog certificate.
[<ADMIN> ~]# sudo tos certificate import --type syslog --ca=<CA-PATH> --cert=<CERT-PATH> --key=<KEY-PATH> --skip-cli-validationsudo tos certificate import --type syslog --ca=<CA-PATH> --cert=<CERT-PATH> --key=<KEY-PATH> --skip-cli-validationMake sure your TCP syslogs are sent over TLS.
-
Upgrade TOS:
When the command completes, you will again be able to run any TOS CLI command.
-
Verify.
Check again the tos version as described in upgrade procedure step 2 above. Make sure that the version displayed is the one to which you intended to update.
Check again the cluster status. This time there is only one option - that for R21-3 and later - as described in upgrade procedure step 3 above.
-
HA only. Copy the TOS CLI to all data nodes.
On the primary data node, copy TOS from /usr/local/bin/ to the same location on the other data nodes.
-
Make a new backup.
Before allowing users to start work, make a new one-time backup. This is necessary because the data schemas have been modified and any backups made before the upgrade can no longer be restored to the new version of the product. See Backup Procedure.
-
If you monitor FortiManager devices, add a SAN signed certificate to each device.
-
To enable automatic license usage tracking, make sure that all TOS users are able to access the domain aus.tufin.com from the browsers on their work stations. For more information, see Sending License Usage Reports Automatically.
-
If your deployment incorporates remote clusters and you have upgraded from a release lower than R23-1, make sure port 9090 is open - see remote collector ports.
-
Make sure users clear their browser cache.
Where <non-primary data node> is the IP address of the non-primary data node.
Was this helpful?
Thank you!
We’d love your feedback
We really appreciate your feedback
Send this page to a colleague
