On This Page
Configuring Network and DNS Settings
You can configure network information such as the IP address and hostname of the server. The procedures described below modify the TOS management interface.
For TufinOS 3.50 or higher see Configuring on TufinOS 3.50 or higher.
For RHEL/CentOS 7 see Configuring on RHEL/CentOS 7.
Configuring on TufinOS 3.50 or higher
You can access SecureTrack from a browser
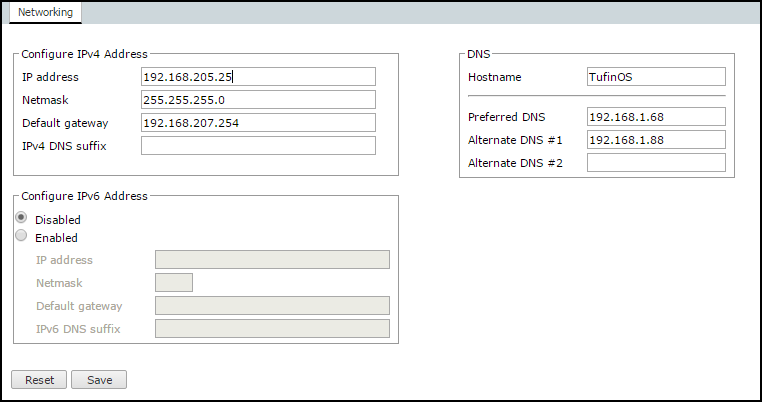
If you can access SecureTrack then you can configure the setting from the networking settings page.
-
Log in to SecureTrack: as an Administrator.
-
Navigate to Configure > System > Networking.
-
Configure the desired networking settings.
You cannot access SecureTrack from a browser
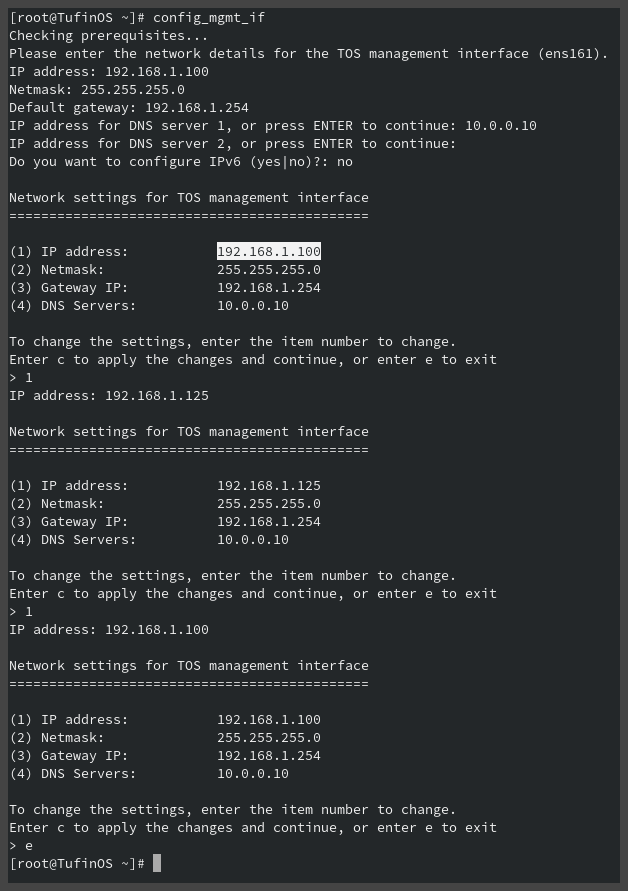
If you cannot access SecureTrack from a browser (for example after a clean install of TufinOS) then you can configure the network settings using the CLI command config_mgmt_if. The command will prompt you for the configurable network settings. The CLI menu lets you view current settings, modify specific settings, and save your changes only when you have the desired settings.
If you do not have direct SSH access to the server, you can connect to the server via the console.
-
Run the following:
sudo su -
config_mgmt_if
-
Follow the prompts and instructions displayed.
Configuring on RHEL/CentOS 7
To configure the network settings on RHEL/CentOS 7 you must have root privileges.
Configure the interface IP, DNS, Gateway
To configure the interface IP of SecureTrack you must edit the configuration file of the first network interface. If you do not know the name of the first network interface, see Discovering the name of the First Network Interface.
-
Edit the file /etc/sysconfig/network-scripts/ifcfg-<first interface name>.
-
Modify the desired network settings and save your changes.
-
Run the following to make your changes take effect:
systemctl restart network
systemctl restart NetworkManager
The format of the configuration file for IPv4:
TYPE=<network interface device type>
BOOTPROTO=<boot-time protocol>
NAME=<network interface name>
DEVICE=<network interface device name>
UUID=<generated automatically>
ONBOOT=yes
IPADDR=<IP address>
PREFIX=<network prefix>
GATEWAY=<Default_gateway>
DOMAIN=<interface domain>
DNS1=<DNS1 address>
DNS2=<DNS2 address>
DNS3=<DNS3 address>
For example, to set interface ens161 to address 192.168.1.100 with a class A netmask in an IPv4 file, edit /etc/sysconfig/network-scripts/ifcfg-ens161 with these details:
TYPE=Ethernet
BOOTPROTO=none
NAME=ens161
DEVICE=ens161
ONBOOT=yes
IPADDR=192.168.1.100
PREFIX=24
GATEWAY=192.168.1.254
DOMAIN=yourdomain.com
DNS1=10.0.0.1
DNS2=10.0.0.2
DNS3=10.0.0.3
With IPv6 files you also have the following two fields:
IVPV6INIT=yes
IPV6ADDR=<IPv6 address>
For example:
IVPV6INIT=yes
IPV6ADDR=2001:db8::2/48
Associate a hostname with an IP address
To associate a hostname with a specific IP address, you must edit the file /etc/hosts.
-
Edit the file
/etc/hosts. -
Edit the file, as desired.
After the third line (beginning with
127.0.0.1), add a line in this format:<IP> <hostname> <hostname.domain>
The IP Address for the hostname configuration must belong to the First Network Interface
For example:
10.0.0.1 yourdomain yourdomain.com
-
Run the
hostnamectlcommand:hostnamectl set-hostname <hostname>
For example:
hostnamectl set-hostname yourdomain
-
Reboot the machine to start all services with the new hostname.
Verify the hostname with the
hostnamectlcommand:[root@tufinos ~]# hostnamectl status Static hostname: yourdomain Pretty hostname: yourdomain Icon name: computer-vm Chassis: vm Machine ID: edea429cc120475383c451380a028b13 Boot ID: 18e063b724bd4e598e0bc94cdd45a7d0 Virtualization: vmware Operating System: CentOS Linux 7 (Core) CPE OS Name: cpe:/o:centos:centos:7 Kernel: Linux 3.10.0-1160.11.1.el7.x86_64 Architecture: x86-64 [root@tufinos ~]#Confirm that
Static hostnameis the new hostname
