On This Page
Creating a Security Risk Report
This is a Legacy Feature. It will be discontinued as of version R21-3.
We recommend you consider using the following features:
- Unified Security Policy
- Unified Security Policy Alerts
- Configuring Exceptions for the Unified Security Policy
These features give you greater flexibility in the number of zones that you can configure and allow you to define the requirements that you need.
To configure a Security Risk report:
-
Go to Report> General Reports, and click New Report.

The report configuration wizard has 3 steps.

-
STEP 1: Configure the General Criteria and click Next.
- For ReportType, select Security Risk:
- Optionally, you can change the Title.By default, the report's general name with the current date is the report name.
- In a Multi-Domain environment, select the Domains that contain the devices you want to run the report on.
-
Select Devices for the report.
If you have selected one domain, you can limit the report to include specific devices in the domain.
If you have selected more than one domain, then Any is selected for Devices, and all devices in the selected domains are included in the report. - For Check Point devices, if you have selected one device, you can limit the report to include specific Policy Packages.If you have selected more than one device, then Any is selected for Policy Packages and all policy packages in the selected devices are included in the report.
-
Select the zones to use for vulnerability tests. You can select, either:
-
Use Topology - Calculate vulnerability based on the networks and clouds that are defined as Internal, External, and DMZ using Topology Intelligence.
-
Manual - Calculate vulnerability based on the zones defined in Zones
You can also select Analyze only relevant policies to let Topology Intelligence find the policies that include rules with the specified zones.
-
-
STEP 2: Configure the Specific Criteria as explained in the table and click Next.
In the Specific Criteria page, select tests to be included in the report.You can also change the Severity setting of selected tests.
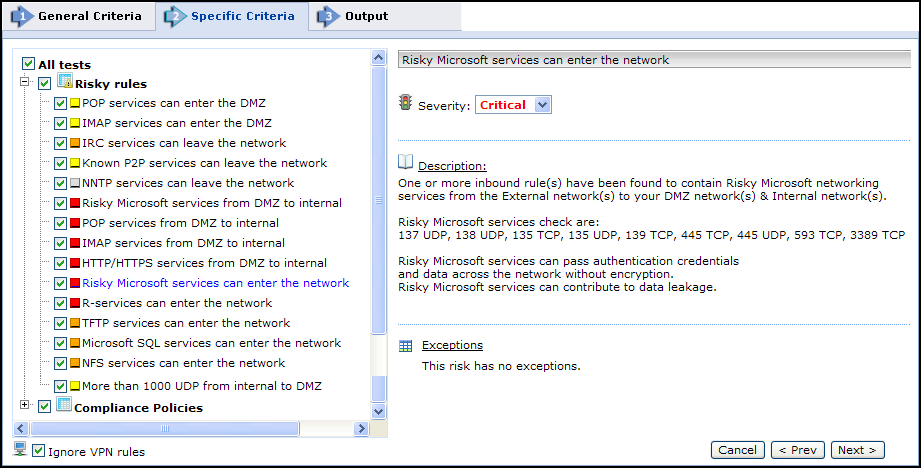
Ignore VPN rules prevents VPN rules from being considered as risks.This setting affects Risky rules; Compliance Policies ignore VPN rules in any case.
Click Next.
-
STEP 3: Configure the report Output as explained in the table below and click Save.
The saved report appears in the General Reports list.From the list, you can Run (
 ), Edit (
 ), or Delete (
 ) it.
) it.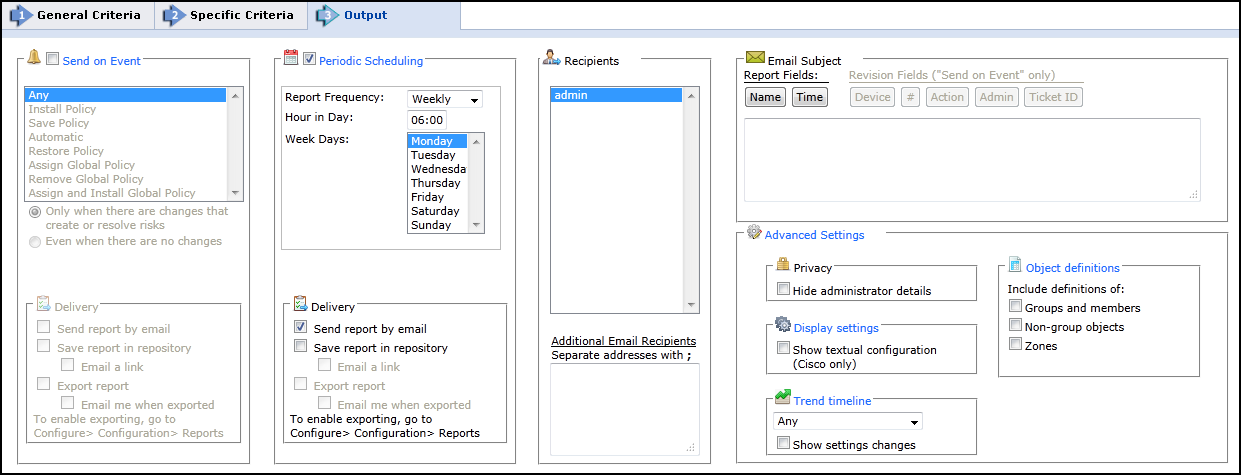
Parameter
Description
Send on Event
Select the events to trigger this report.You can use the <shift> key to select more than one event.
Select one of the following, to decide whether to always run the report after the event, even when there are no changes:
- Only when the policy was modified: Only if there are changes to be reported on, relative to the previous revision.
- Even if the policy was not modified: If there are no changes, the report will state that there were no changes.For example, if an administrator first saves a Check Point policy, and then installs the policy on a gateway a few minutes later, the second event has not modified the policy.
Delivery
The report can be delivered in any of the following three ways:
- Send report by email: The report is generated for each of the selected Recipients and emailed to them.The emailed report's formatting (embedded HTML, MHT attachment or PDF attachment) is globally configurable for all users.
- Export report: This option is available only to SecureTrack Administrators, and only when enabled in the Reports page.A report is generated according to the owner's configured preferences and permissions, and exported according to the configuration in the Reports page.To be notified when a report is generated, select Email me when exported.
- Save report in Repository: The report is saved and users can later view it by selecting the Reports Repository tab (in Report view).Select Email a link to have a link to the report sent to recipients when a report is generated, provided the recipient's email is configured.
Periodic Scheduling
Defines a recurring schedule for report generation.The report can be generated on a daily, weekly, or monthly basis.
Recipients
Recipients: The SecureTrack users who receive the report (or a link or notification).When a SecureTrack User creates a report, only that User is a recipient.When a SecureTrack Administrator creates a report, multiple recipients can be defined.These Recipients are SecureTrack Administrators or Users whose email addresses have been configured in SecureTrack.Other email addresses can be defined, separated by semicolons ( ; ) in the Additional Email Recipients text box.
Note: In a Multi-Domain environment, administrators (Super and Multi-Domain) can only add users who have permissions for the current Global or Domain context.SecureTrack does not send the report if a specified recipient does not have permission for a device or Domain included in the report configuration when the report is generated.
Additional Email Recipients
Enter additional email recipient addresses.Separate the addresses with a semicolon (;).
Email Subject
You can click on the field buttons to add the fields to the subject line of the email notifications.
- Report Fields: You can include the name of the report and the time that the report was generated.
- Revision Fields: When the report is configured to Send on Event, you can include the name of the device, the revision number, the action that triggered the notification, the name of the administrator who did the action, and the ticket ID associated with the change in the new revision.
Advance Settings
Privacy
- Hide administrator details - The report does not include the names of users that made changes to policies or the name of the report creator.
Display Settings
- Show textual configuration (Cisco only) (when ticket ID recognition is configured) - If selected, the rule Name and Comment fields are removed from the report results.Only the ticket ID is included.This is useful if ticket comments contain confidential information that should not be sent to report recipients, such as administrator details.
Object definitions - Include definitions of:
- Groups and members - The report includes the definitions of group objects and their member objects.This is useful for recipients that do not have SecureTrack access.SecureTrack users can click on group objects in the report to see the definitions.
- Non-group objects - The report includes definitions of non-group objects.
Trend Timeline
- Select the date range for the security trend graph.
