On this page
TOS CLI Reference
Overview
The TOS CLI - command line interface - is a set of commands that can be run from the Linux command line. The command sudo tos help will list all CLI commands. All TOS commands require root privileges to run, therefore on TufinOS, they must be run using sudo as user root is not available on the TufinOS operating system.
Commands that retrieve information can be run on any node; commands that make changes can only be run on the primary data node, unless specified otherwise.
Global parameters
Many of the commands can be run with the following optional flags
--helpor-h: lists the usage, available commands and the flags (options) for the command for example,sudo tos backup --help--debugor-d: adds additional information for some commands, used for troubleshooting for example,sudo tos backup --debug--skip cli-validation:skips the cli version validation
TOS CLI commands
If your system runs on TufinOS, all TOS commands must be run using sudo, because user root is not available on this operating system.
For details of SecureChange CLI commands, see the SecureChange Command Line Reference.
Archive revision data
This is a subset of commands that allows you to archive and temporarily restore old revision data (device policy rules):
sudo tos archive create
Description
This command is a variant of sudo tos archive. It stores the revision data in a file outside of the cluster. If a previously archived file is currently loaded (see sudo tos archive load), you cannot create a new archive containing any rules in the loaded range.
When running this command you also have the option of removing old unnecessary files in the database. This will require down time.
We recommend first running the tmux command to ensure that the archive command runs to completion.
Syntax
[<ADMIN> ~]$ sudo tos archive create [-t|--date=<TODATE>] [-p|--path=<PATH>]Parameters
|
Parameter |
Description |
Required/Optional |
|---|---|---|
|
|
To-date, in format YYYY-MM-DD, up to which revisions will be archived. |
Required |
|
|
Target directory, excluding file name, in which the new archive file will be created. |
Required |
|
|
Removes the items that were archived, allowing the storage space to be reclaimed. |
Optional |
On completion:
-
A log file is created
/opt/tufin/logs/services/st-archive-job/app.log. -
If the operation completes successfully, the archive file is created in the target directory, with the to-date as part of its name.
Example
[<ADMIN> ~]$ sudo tos archive create --date=2021-12-31 --path=/tmp
Archive completed successfully. Archive file created: /tmp/archive_2021-12-31.tar
sudo tos archive load
Description
This command is a variant of sudo tos archive. It restores old revision data from a file created previously with sudo tos archive create. More than one archive can be loaded at a time. If the command is run again with a different archive file, the data will be appended to the database. The archive file can only be loaded on the machine in which it was created.
Syntax
Parameters
|
Parameter |
Description |
Required/Optional |
|---|---|---|
|
|
Full path of the archive file from which to restore the data, including directory path and file name. |
Required |
Example
[<ADMIN> ~]$ sudo tos archive load --path=/tmp/archive_2021-12-31
Loading archive file completed successfully.
sudo tos archive unload
Description
This command is a variant of sudo tos archive. It removes all revision data from the TOS database that was previously loaded from one or more archives using sudo tos archive load.
Syntax
Parameters
-
Global parameters only
Example
[<ADMIN> ~]$ sudo tos archive unload
Unloading revisions completed successfully.
Backup restore
A subset of commands to create on-time backups and manage backup policy.
A subset of commands for restoring TOS backups, continuing a TOS restore that failed and showing the restore progress.
sudo tos backup create
Description
Create an on-demand backup of your data. You can create this type of backup at any time, whether you have a policy defined or not. The command will check if there is enough disk space available. The backup requires a little over twice the space currently taken up by your databases.
Syntax
Parameters
|
Parameter |
Description |
Mandatory/Optional |
|---|---|---|
|
|
Name for the backup that appears in the tos backup list command. If not specified, a default name will be given, containing the date and time. |
Optional |
|
|
Time to Live (TTL) in hours, minutes, and seconds. When the specified time has passed, the backup will automatically be deleted and its disk space released. If no value is set, the default TTL is 720 hours (30 days). Format: XhYmZs |
Optional |
sudo tos backup delete
Description
Delete a single backup, multiple backups, or all backups. This does not affect the backup policy. The alias remove can be used instead.
Syntax
Parameters
|
Parameter |
Description |
Required/Optional |
|---|---|---|
|
|
Name of a single backup file, as shown using the tos backup list command. |
Optional |
|
|
Deletes all backups. |
Optional |
sudo tos backup expiry
Description
Assigns an expiration date to a specific backup. The backup is deleted once it is expired.
Syntax
Parameters
|
Parameter |
Description |
Required/Optional |
|---|---|---|
|
|
Name of a backup file, as shown using the tos backup list command. |
Required |
|
|
String with the date and time for the expiration. Format: YYYY-MM-DD HH:MM:SS |
Required |
Example
$ sudo tos backup expiry tufin-scheduler-000999 "2022-04-30 00:30:45"
sudo tos backup export
Description
Transfer all your backup files from the TOS backup directory to a single .gzip file in a remote location so they can be restored if required. All the backup files and your backup policy will be saved to a single backup archive file in the specified target location. If the target location is not specified, the archive will be created in /opt/tufin/backups. The alias tar can be used instead.
The backup archive file will be named in the following format:
backup-<TOSVER>-YYYYMMDDHHMMSS.tar.gzip
where <TOSVER> is your SecureTrack version number. We strongly recommend using the tmux command before proceeding.
Syntax
Parameters
|
Parameter |
Description |
Required/Optional |
|---|---|---|
|
|
Destination directory in which to place the archived backup (directory only, without a file name). If the path does not exist, it will be created automatically. |
Optional |
Examples
$ sudo tos backup export --target /mapdrive/save/
$ sudo tos backup export -t "/opt/myarchive/"
To ensure you have enough disk space, we recommend that before exporting, you check the disk usage of your backup files and compare it to the available space in the target destination.
To check disk usage of your backup files:
[<ADMIN> ~]$ sudo du -sh /opt/tufin/data/volumes/minio/velerok8s/To check available space in the target:
where <path> is the target path.
The files will be compressed in the export but the degree of compression cannot be known in advance. We recommend ensuring that you have at least the amount of space available in your target equal to the original files.
After the backup is exported, we recommend verifying that the file contents can be viewed by running the following command:
sudo tos backup import
Description
Extract all backups from a TOS backup export file (gzip format) file and place them in the TOS backup directory, so they can be subsequently restored to your database. The import command does not restore data. If the source location is not specified, the default path/file name /opt/tufin/backups/backup.tar.gzip will be used. After completion of the command, the restored backups and policy will replace those currently in your system. We strongly recommend using the tmux command before proceeding.
The alias untar can be used instead.
Syntax
Parameters
|
Parameter |
Description |
Required/Optional |
|---|---|---|
|
|
Full path including the backup archive file name, created previously by the tos backup export command. |
Optional |
Example
$ sudo tos backup import --source /etc/mapped/save/backup-25-2-pga-20200526092902.tar.gzip
- Backups have an expiration date. You cannot restore from a backup that has expired.
- You can import a backup file to a machine with an existing file. The original backup file is deleted by this action. Therefore, if the backup file is needed, export it first to a separate location. When importing the file, if an existing backup file is detected, a warning will be displayed and you will need to confirm the action.
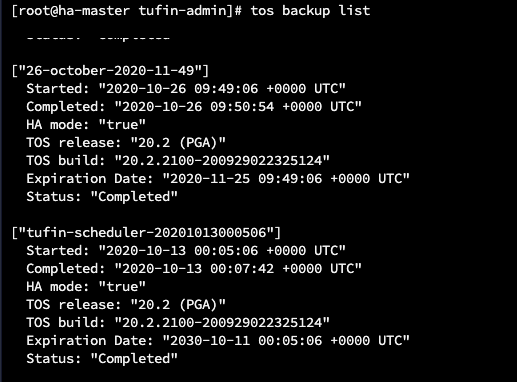
sudo tos backup list
Description
List all backups in the backup location, including automated backups created from the policy and on-demand backups created manually.
Syntax
Information provided in output
- Backup name
- Date/time started
- Date/time completed
- Modules included
- Whether high availability was active at the time of backup
- TOS release and build
- file expiration date
- Completion Status
Sample output
["16-december-2025-12-4"]
			Started: "2020-12-16 10:04:14 +0000 UTC"
			Completed: "2020-12-16 10:05:52 +0000 UTC"
			Modules: "RC"
			HA mode: "false"
			TOS release: "21.1 (PRC1"
			TOS build: "21.1.1100-201215163002315"
			Expiration Date: "2021-01-15 10:04:14 +0000 UTC"
			Status: "Completed" # sudo tos backup list
			["23-august-2021-16-18"]
			Started: "2021-08-23 13:18:43 +0000 UTC"
			Completed: "N/A"
			Modules: "ST, SC"
			HA mode: "false"
			TOS release: "25.2 (PGA.0.0) Final"
			TOS build: "21.2.2100-210722164631509"
			Expiration Date: "2021-09-22 13:18:43 +0000 UTC"
		Status: "InProgress"
sudo tos backup policy delete
Description
Delete the current backup policy and stop further automatic backups until a new backup policy is created.
Syntax
sudo tos backup policy get
Description
Display the current backup policy.
Syntax
Information provided in output
- Policy creation date and time
- backup days, hour and minute in cron format
- Status - always Enabled
- Last backup date and time
- Number of backups found that were produced from this policy
Sample output
[tufin-scheduler]
Creation Time: 2019-11-18 12:13:47 +0000 UTC
Cron: 0 0 * * 0,1,2
TTL: 720h0m0s
Status: Enabled
Last backup: 2019-11-18 12:13:47 +0000 UTC
Found backups: 1
sudo tos backup policy set
Description
Create a backup policy, which will run automatically and perform self cleanup. Only one backup policy can be defined at a time, so executing this command a second time will delete the current policy and create a new one in its place.
Syntax
$ sudo tos backup policy set --days <DAYS> --hour <HOUR> [--min <MINUTE>] [--ttl <TIME TO LIVE>]|
Parameter |
Description |
Required/Optional |
Possible Values |
|---|---|---|---|
|
|
Days of the week on which to run the backup. |
Required |
One or more values separated by a comma with no spaces: sun,mon,tue,wed,thu,fri,sat. |
|
|
Hour of day at which to execute the backup. |
Required |
Number 0-23. |
|
|
Minute after the hour at which to run the backup. |
Optional |
Number 0-59. Default 0. |
|
|
Time to Live (TTL) in hours, minutes, and seconds. When the specified time has passed, the backup will automatically be deleted and its disk space released. If no value is set, the default TTL is 720 hours (30 days). The TTL can not be set above 720 hours. |
Optional |
XhYmZs.
|
Examples
sudo tos backup policy set --days sun,fri --hour 23 --min 30(backup every Sunday and Friday at 23:30)sudo tos backup policy set --days sun,mon,tue,wed,thu,fri,sat --hour 00 --min 05 --ttl 720h00m00s(backup every day of the week at 5 minutes past midnight, expiry after 30 days)
sudo tos backup status
Description
Show details of backups currently in progress.
Syntax
Sample output
$ sudo tos backup status
Found active backup "23-august-2021-16-18"
$ sudo tos backup status
No active backup was found
sudo tos backup storage set
Description
Sets either local backup storage or external backup storage. Supported for all cloud providers (AWS/Azure/GCP) for public cloud only and not private cloud. For external backup storage, you can either provide a configuration file, or enter the configuration details manually in the CLI.
For external backup storage, you can also optionally provide the path to the private certificate in one of two ways:
-
Interactively: When prompted to enter ca_cert_path, define the full path </path/ca.crt>. To skip this step, press Enter.
-
Manually: Add the certificate path to the CONF_PATH configuration file , for example: ca_cert_path: </path/to/your/ca.crt>
Syntax
$ sudo tos backup storage set --location external --conf <CONF_PATH>] $ sudo tos backup storage set --location external --provider <PROVIDER_TYPE> Parameters
|
Parameter |
Description |
Required/Optional |
Possible Values |
|---|---|---|---|
<LOCATION>
|
Location of the backup storage file.
|
Required |
external local |
|
|
(For external location) Path to a configuration file that contains the required fields depending on the provider (see Provider Details). If you do not provide this file, you must provide a value for |
Optional |
|
<PROVIDER_TYPE>
|
(For external location) String that indicates the provider. If you do not use this parameter, you must provide a |
Optional |
aws azure gcp minio nfs |
Provider details
The following information needs to be provided, either manually when prompted or in the configuration file:
|
Provider |
Required Fields |
|---|---|
|
AWS |
provider: aws bucket: <bucket_name> region: <region> secret_key: <secret_key> access_key: <access_key> Optional. http_proxy: <IP address or URL>. |
|
Azure |
provider: azure bucket: <bucket_name> storage_account: <storage_account> storage_account_key: <storage_account_key> resource_group: <resource_group> subscription_id: <subscription_id> |
|
GCP |
provider: gcp project_id: <project_id> private_key_id: <private_key_id> private_key: <private_key> client_email: <client_email> client_id: <client_id> bucket: <bucket_name> |
|
Minio |
provider: minio bucket: <bucket-name> secret_key: <secret_key> access_key: <access_key> endpoint: <IP>:<PORT> secure: <true/false> Indicates whether to use HTTPS (true) or HTTP (false). |
|
nfs |
provider: nfs server-ip: <NFS Server IP> path: <Shared directory path> uid: <User ID> gid: <Group ID> |
Examples
$ sudo tos backup storage set --location local
$ sudo tos backup storage set --location external --provider <provider name>
$ sudo tos backup storage set --location external --conf <path to configuration file>
sudo tos restore
Description
Restore your data from a single backup from the same TOS release and version (for example, backups made under TOS 55.2.00 can only be restored to an TOS 55.2.00 deployment).
If you are restoring a remote collector cluster, you must reconnect the RC to the central cluster after the restore. If you are restoring a central cluster with remote collectors attached, you must reconnect all remote collectors after the restore.
The backup policy is not included in backups, so after restoring you must configure a new backup policy using tos backup policy set.
Tufin auto-generated certificates will be automatically re-created on the first connection following the restore.
We strongly recommend using the tmux command before proceeding.
Important. After restoring from a backup in a production environment, the Site type appears as Lab in the Tufin Customer Portal. You must reinstall the license file; otherwise, TOS deactivates after 30 days. This isn’t required for lab environments.
Syntax
Parameters
|
Parameter |
Description |
Required/Optional |
|---|---|---|
|
|
Name of a single backup, as shown in the tos backup list command. |
Required |
Examples
- sudo tos restore from-backup 26-october-2020-11-49 (for on-demand backups)
-
sudo tos restore from-backup tufin-scheduler-20201208073700 (for scheduled backups)
sudo tos restore continue
Continues the TOS restore from the point where it failed. Command should be run after resolving the issue which caused the restore to fail.
Syntax
sudo tos restore show
Shows information on the TOS restore process.
-
If there is no restore running, shows the steps of the restore process.
-
If the restore is in progress, shows the status of the current restore.
Syntax
Certificate management
This is a subset of commands related to certificates:
sudo tos certificate client generate
Description
Create an authorization certificate for an OPM device.
[<ADMIN> ~]$ sudo tos certificate client generate[--id=<"ID">][--output=<"OUTPUT.TAR.GZ"][--help][--debug]Parameters
|
Parameter |
Description |
Required/Optional |
|---|---|---|
|
|
Certificate ID name. |
Required |
|
|
Name of the file to be created. |
Required |
sudo tos certificate import
Description
Import your own SSL certificates to authenticate and encrypt communications with your TOS server. Generation of certificates must be done outside of TOS (see Importing and Reverting a CA-signed Certificate).
Syntax
[<ADMIN> ~]$ sudo tos certificate import [-t|--type=["server"]["auth"]["syslog"]] [-c|--cert=<CERT-PATH>][-k|--key=<KEY-PATH>][--ca=<CA-PATH>][--help] [--debug]Parameters
|
Parameter |
Description |
Required/Optional |
Possible Values |
|---|---|---|---|
|
|
The type of certificate. |
Required |
"server" "auth" "syslog" |
|
|
Location of the certificate. |
Required |
|
|
|
Location of the private key. |
Required |
|
|
|
Location of the CA certificate. |
Required for type "syslog". Skip for other types. |
|
Example
$ sudo tos certificate import --type="server" --cert=/tmp/certfile.pem --key=/tmp/keyfile.key
sudo tos certificate renew
Description
Renew your existing SSL certificates to authenticate and encrypt communications with your TOS server. TOS must be stopped before running this command and started again afterwards.
Syntax
[<ADMIN> ~]$ sudo tos certificate renew [-t|--type=["server"]["auth"]["all"]][--help] [--debug]Parameters
|
Parameter |
Description |
Required/Optional |
Possible Values |
|---|---|---|---|
|
|
The type of certificate. |
optional |
"server" (default if no type is entered) "auth" "all" |
Cluster management
This is a subset of commands related specifically to clusters:
sudo tos cluster connect
Description
Connect a remote collector cluster to the central cluster. The command is run on the remote collector cluster after generating a password by running tos cluster generate-one-time-password on the central cluster. Requires the password generated previously by running tos cluster generate-otp on the central server.
In rare cases, connecting or disconnecting one RC can cause additional RCs to disconnect. Check that no other RCs have been disconnected by going on the SecureTrack status page. If you see that an RC has become disconnected, wait a few minutes. If it remains disconnected, connect it manually.
See Connect a Remote Collector for full procedure.
Syntax
IP
[<ADMIN> ~]$ sudo tos cluster connect --central-cluster-vip=CENTRAL-CLUSTER-VIP --remote-cluster-vip=REMOTE-CLUSTER-VIP --remote-cluster-name=REMOTE-CLUSTER-NAME --initial-secret=OTPName
[<ADMIN> ~]$ sudo tos cluster connect --central-cluster-name=CENTRAL-CLUSTER-NAME --remote-cluster-vip=REMOTE-CLUSTER-VIP --remote-cluster-name=REMOTE-CLUSTER-NAME --initial-secret=OTPParameters
|
Parameter |
Description |
Required/Optional |
|---|---|---|
|
|
External IP address (VIP) of your central server cluster. |
One of these parameters is required |
|
|
DNS-resolvable hostname of the central server cluster or FQDN. |
|
|
|
External IP address (VIP) of the server you want to connect (i.e. the current server). |
Required |
|
|
Any alphanumeric string you choose; quotes are not used so you cannot embed spaces. |
Required |
|
|
One-time password returned from running tos cluster generate-otp on the central server. |
Required |
tos cluster connect command again with the domain name. There is no need to disconnect the remote collectors first.sudo tos cluster disconnect-rc-cluster
Description
Disconnect a remote collector cluster from its central cluster.
In rare cases, connecting or disconnecting one RC can cause additional RCs to disconnect. Check that no other RCs have been disconnected by going on the SecureTrack status page. If you see that an RC has become disconnected, wait a few minutes. If it remains disconnected, connect it manually.
Syntax
[<ADMIN> ~]$ sudo tos cluster disconnect-rc-cluster --cluster-id <ID>Parameters
|
Parameter |
Description |
Required/Optional |
|---|---|---|
|
|
ID of the remote collector cluster displayed when running command sudo tos cluster list. |
Required |
See Disconnect a Remote Collector for full procedure.
sudo tos cluster generate-otp
Description
Run on a central server to which you want to connect a remote collector and generates a password that needs to be provided when connecting the remote collector using tos cluster connect. The password remains valid for about five minutes. (otp stands for one time password.)
Syntax
Example
[tufin-admin@TufinOS ~]$ sudo tos cluster generate-otp
4a120db6-401a-4991-b0c5-54ufc91c150c
[tufin-admin@TufinOS ~]$
sudo tos cluster ha disable
Description
Turn off high availability mode. On completion replication of data to the additional data nodes will cease.
Syntax
Run on the primary data node:
--force should be used only if the cluster status is not healthy - see sudo tos status.
For the full procedure, see Disabling High Availability.
sudo tos cluster ha disable continue
Description
Continues disabling high availability (HA) from the point of failure.
Recommended to run command after resolving the issue which caused the failure.
Syntax
sudo tos cluster ha disable show
Description
Shows information on the high availability (HA) disablement process.
-
If there is no HA disablement, shows the steps of the disablement process.
-
If HA disablement is in progress, shows the status of the current process.
Syntax
sudo tos cluster ha enable
Description
Turn on high availability mode.
Prerequisites:
-
A total of three data nodes in your cluster.
Syntax
-
On the primary data node:
Replication of data will commence. The time to completion will vary depending on the size of your database.
On completion, TOS will be in high availability mode.
For the full procedure, see Enabling High Availability.
sudo tos cluster ha enable continue
Description
Continues enabling high availability (HA) from the point of failure.
Recommended to run command after resolving the issue which caused the failure.
Syntax
sudo tos cluster ha enable show
Description
Shows information on the high availability (HA) enablement process.
-
If there is no HA enablement, shows the steps of the enablement process.
-
If HA enablement is in progress, shows the status of the current process.
Syntax
sudo tos cluster list
Description
List all remote collector clusters for a central cluster.
Syntax
Parameters
|
Parameter |
Description |
Required/Optional |
Possible Values |
|---|---|---|---|
|
|
Format of the output. |
Required |
text (default) json |
Example

sudo tos cluster node add
Description
This command adds a data node or worker node to the cluster.
Syntax
On the primary data node run:
where <TYPE> is worker or data, depending on the type of node you want to add.
On completion, a new command string appears, which you will need to run on the new node within one hour. If the allocated time expires, you will need to repeat the current step.
For the full procedure, see:
sudo tos cluster node list
Description
This command lists all nodes in the cluster showing IP address, node status and other attributes for each.
Syntax
Parameters
|
Parameter |
Description |
Required/Optional |
Possible Values |
|---|---|---|---|
[--output] or [-o] |
Specifies that the output will be json/text format. Default is text | Optional |
|
<type>
|
Format of the output if the output flag is used. | Optional |
json text |
Example output:
# tos cluster node list -o text

Nodes list:

[ node1 ]
Status:  Ready
Role:  data
Primary:  true
Data-Enabled:  true

[ node2 ]
Status:  Ready
Role:  data
Primary:  false
Data-Enabled:  true

[ node3 ]
Status:  Ready
Role:  data
Primary:  false
Data-Enabled:  true
sudo tos cluster node remove
Description
This command removes a node from the cluster.
When a node is removed from the cluster, the functions it performs are transferred to the primary data node and/or other nodes.
Limitations
-
A data node cannot be removed from the cluster while high availability is active.
If you want to replace a node, use sudo tos cluster node replace instead of removing and adding nodes
-
The command will not remove a node, with a status is not healthy, unless the
--forceflag is used. Running the command without force flag on the wrong node will not result in the destruction of the cluster as there is hostname match validation; however, running it with--forceon the wrong node can destroy the cluster.
For the full procedure for removing a worker node, see Removing a Worker Node.
sudo tos cluster node replace
Description
Replace an existing data node in the cluster with a new node.
Limitations
-
If the existing node is not healthy, you must use the --force flag. This will allow the command to be run but will not delete the TOS data.
-
The new node cannot already be a node in the cluster.
-
The primary data node cannot be replaced using this command. You must first elect a different data node for the role, using sudo tos cluster set-primary.
Cluster and node status and health can be seen using sudo tos status.
Syntax
[primary data node]# sudo tos cluster node replace <OLD_NODE> [--force] On completion, one or two new command strings will appear in the output. The second command string will appear only if the original node was in a healthy state, i.e. -force was not used.
Parameters
|
Parameter |
Description |
Required/Optional |
|---|---|---|
|
|
Name of the node you want to remove, as seen in the output of sudo tos cluster node list. |
Required |
|
|
Only use this flag when the node you want to remove is not in a healthy state. |
Optional |
For the full procedure, see Replace a Data Node.
sudo tos cluster node replace continue
Description
Continues the node replacement procedure from the point of failure. Run command after resolving the issue which caused the failure.
Syntax
sudo tos cluster node replace show
Description
Shows information on the node replacement process.
-
If there is no node replacement, shows the steps of the node replacement process.
-
If node replacement is in progress, shows the status of the current replacement.
Syntax
sudo tos cluster primary-vip get
Description
Display the primary VIP of the cluster.
Syntax
sudo tos cluster primary-vip set
Description
For on-prem deployments, change the primary VIP of the cluster, providing a valid IPv4 address. When completed, check that the command succeeded by running command tos cluster primary-vip get.
Syntax
[<ADMIN> ~]$ sudo tos cluster primary-vip set <11.22.33.44>sudo tos cluster primary-vip set external
Description
For cloud deployments, change the primary VIP of the cluster to use the cloud platform's load balancer. When completed, check that the command succeeded by running command tos cluster primary-vip get.
Syntax
sudo tos cluster rotate-certificate
Description
Creates a new SSL certificate on a central server for connection with remote collectors.
Syntax
sudo tos cluster node set-primary
Description
This command gives the role of primary data node to a data node in the cluster. It can be run on any data node.
Syntax
-
On the node you want to assume the role of primary data node:
Verify that the node roles are as you intended, by running sudo tos cluster node list on any data node.
We strongly recommend performing a one-time backup and exporting it immediately, as all prior backups are deleted from the original primary data node.
sudo tos cluster snapshot create
Description
Saves a snapshot of TOS and Tufin Extensions.
After saving the snapshot, this command stops TOS. Use this command before an upgrade of TufinOS.
After the upgrade, the sudo tos cluster snapshot restore command restores the saved data and restarts TOS.
Syntax
sudo tos cluster snapshot restore
Description
Restores a snapshot of TOS and Tufin Extensions.
Before upgrading TufinOS, the sudo tos cluster snapshot create command saves the data and stops TOS.
Use this command during a re-installation, after an upgrade of TufinOS, to restore TOS data. After re-installation, this command starts TOS. The command needs to be run in /opt/tufin/cluster-snapshot/binaries.
Syntax
[<ADMIN> ~]$ sudo /opt/tufin/cluster-snapshot/binaries/tos cluster snapshot restoresudo tos cluster syslog-vip add
Description
Add a syslog VIP, specifying the IP to use. This action will temporarily stop TOS services until it completes, which may take up to 15 minutes or more.
Syntax
[<ADMIN> ~]$ sudo tos cluster syslog-vip add <SYSLOG_VIP> [--port <PORT>] [--transport <STRING>]Parameters
|
Parameter |
Description |
Required/Optional |
Possible Values |
|---|---|---|---|
|
|
VIP of the cluster. |
Required |
|
|
|
Allows you to specify a port. Any port can be entered. The default port is determined according to the syslog transport protocol. Default ports are:
|
Optional |
Any port number can be entered. |
|
|
Syslog transport protocol. By default, the transport protocol is UDP. When using TCP, a syslog certificate must be imported beforehand. |
Optional |
UDP TCP TCP-plain |
sudo tos cluster syslog-vip list
Description
List all syslog VIPs.
Syntax
sudo tos cluster syslog-vip remove
Remove a syslog VIP, specifying the VIP to remove. This action will temporarily stop TOS services until it completes, which may take up to 15 minutes or more.
[<ADMIN> ~]$ sudo tos cluster syslog-vip remove <SYSLOG_VIP>Configuration management
tos config is a subset of commands for viewing and changing various TOS settings or properties. It has the following formats:
Each is described in more detail below.
Global and service-specific properties
There are two types of TOS property - global and service-specific. Some global properties can be changed freely to suit the needs of your organization and these are explained in Configuring TOS. However the majority of properties - mostly service-specific but also some global - should be changed only if specific problems are encountered and should be done only with the guidance of Tufin support.
sudo tos config get
Description
Display the current value of one or more TOS properties that have been configured using tos config set and/or properties that still retain their default values. You can filter by service, property or both, or run without any parameters to list all properties for all services. Properties that have never been set using sudo tos config set or have been reset using sudo tos config reset are not displayed unless the --default or -d flags are used.
Syntax
[<ADMIN> ~]$ sudo tos config get [-p param1,param2...][-s service][--default|-d]Parameters
|
Parameter |
Description |
Required/Optional |
|---|---|---|
|
|
Used with one or more specified properties, separated by comma (no spaces). Displays only specified global properties. |
Optional |
|
|
Used with a specified service. Displays only properties related to the specified service. |
Optional |
|
|
Additionally include properties that still retain their default values. |
Optional |
Examples
[<ADMIN> ~]$ sudo tos config get
[<ADMIN> ~]$ sudo tos config get -p server.timezone
[<ADMIN> ~]$ sudo tos config get -p load.model
[<ADMIN> ~]$ sudo tos config get -s device-collector -f
[<ADMIN> ~]$ sudo tos config get -f -p tos.sso.enabled,promtail.memory.limit -s device-collector
Output formats
No parameters - all properties in all services, sorted by property.
[<ADMIN> ~]$ sudo tos config get
SERVICE    PROPERTY    VALUE   MESSAGE
service1   property1   value
service2   property1   value
service3   property1   value
service1   property2   value
service2   property2   value
..
..
..
Parameter -s only - all properties for specified service
[<ADMIN> ~]$ sudo tos config get -s <service name>
SERVICE          PROPERTY    VALUE   MESSAGE
<service name>   property1   value
<service name>   property2   value
<service name>   property3   value   Awaiting approval
<service name>   property4   value   Authorized by IT
<service name>   property5   value
..
..
..
Parameter -p only - all specified properties in all services. sorted by property
[<ADMIN> ~]$ sudo tos config get -p <property1,property2 name>
SERVICE     PROPERTY           VALUE   MESSAGE
service 1   <property1 name>   value
service 2   <property1 name>   value   Changed by admin
service 2   <property2 name>   value
service 1   <property2 name>   value
service 5   <property2 name>   value
..
..
..
Parameter -p and -s - all specified properties for specified service
[<ADMIN> ~]$ sudo tos config get -p <property name> -s <service name>
SERVICE          PROPERTY    VALUE   MESSAGE
<service name>   property1   value
<service name>   property2   value
<service name>   property3   value
<service name>   property4   value
<service name>   property5   value
..
..
..
sudo tos config list
Description
List properties that can be configured using sudo tos config set. Each property is listed followed by information such as description, default value, type, whether applicable globally or service-specific, and constraints such as values and format.
Syntax
[<ADMIN> ~]$ sudo tos config list [-p <property1>,<property2>...>][-s <service>][--services][--all]Parameters
|
Parameter |
Description |
Required/Optional |
|---|---|---|
|
|
Lists only the global properties that you can modify without assistance from Tufin technical support to suit the needs of your organization. |
Optional |
|
|
Used with one or more specified properties, separated by comma (no spaces). Lists only specified global properties that you can modify without assistance from Tufin technical support. Specifying any other property will be ignored . |
Optional |
|
|
Lists information on a specified service. |
|
|
|
Lists all services including a description of each service without any related property details. |
Optional |
|
|
Lists all properties that can be modified. |
Optional |
Output Format (all except when used with --services parameter)
[<ADMIN> ~]$ sudo tos config list
PROPERTY 1
  Description - <description>
  Default - <default value>
  Applicable on - global/service-specific
  Type - <string, boolean...>
  Constraints - values, format etc
PROPERTY 2
  Description - <description>
  Default - <default value>
  Applicable on - global/service-specific
  Type - <string, boolean...>
  Constraints - values, format etc
	..
	..
Examples
[<ADMIN> ~]$ sudo tos config list
[<ADMIN> ~]$ sudo tos config list -p server.timezone
[<ADMIN> ~]$ sudo tos config list -p server.timezone,web.session.inactivityTimeout
[<ADMIN> ~]$ sudo tos config list --all
[<ADMIN> ~]$ sudo tos config list --service firewalld.service
[<ADMIN> ~]$ sudo tos config list --services
sudo tos config log-level
Description
This command is intended for use by Tufin support only to view and set the log levels of the various TOS services. By default, services do not have a debug log level. This needs to be manually set.
Syntax
Parameters
|
Parameter |
Description |
Required/Optional |
Possible values |
|---|---|---|---|
|
|
Manage the TOS log level:
|
Optional |
get reset set |
sudo tos config set
Description
Change one or more TOS properties.
There are two types of TOS property - global and service-specific. You are encouraged to modify global properties to suit the needs of your organization. See all global properties by running command tos config list. Changing service-specific properties should only be done if specific problems are encountered and should be done only with the guidance of Tufin support.
Syntax
[<ADMIN> ~]$ sudo tos config set –p param1=val1[,param2=val2...][-s service1,service2][-c] [-m <TEXT>] [-d]Parameters
|
Parameter |
Description |
Required/Optional |
|---|---|---|
|
|
One or more specified property/value pairs, separated by comma (no spaces). |
Required |
|
|
Used with a specified service. When not specified, sets only global properties; when specified, sets only properties related to the specified service. Global properties (see sudo tos config list ) cannot be set for a specified service. |
|
|
|
Skip confirmation. |
|
|
|
Include a description. |
|
|
|
The text to append within double quotation marks when |
|
|
|
Duration: Time period after which the properties will return to their previous value. Format |
|
Examples
[<ADMIN> ~]$ sudo tos config set -p load.model=medium -d 24h -m "temporary change of load for a day"
[<ADMIN> ~]$ sudo tos config set -p st.trace.Mem=false -s device-collector
sudo tos config reset
Description
Reset one or more TOS settings to their default values.
Syntax
[<ADMIN> ~]$ sudo tos config reset [–p param1=val1,param2=val2...][-s service1,service2][-c]Parameters
|
Parameter |
Description |
Required/Optional |
|---|---|---|
|
|
One or more specified property/value pairs, separated by comma (no spaces). |
Required |
|
|
Used with a specified service. When not specified, sets only global properties; when specified, sets only properties related to the specified service. |
Optional |
|
|
Skip confirmation. |
Optional |
Examples
[<ADMIN> ~]$  tos config reset -p load.model
[<ADMIN> ~]$  tos config reset -p st.trace.Mem=false -s device-collector
Disaster recovery management
This is a subset of commands related to disaster recovery:
sudo tos dr connect
Run this command on the cluster that will be designated as the standby cluster.
Description
Connects the standby cluster with the active cluster. After the connection is complete, most of the services in the standby cluster will be shutdown.
Syntax
[<ADMIN> ~]$ sudo tos dr connect [-n <name>][-p <IP_ADDRESS>][-t <TOKEN>]Parameters
|
Parameter |
Description |
Required/Optional |
Possible Values |
|---|---|---|---|
|
|
Use this to provide a name to help identify this cluster in the tos dr status command. If you don't use it, the hostname of the primary node will be used. |
If you used the -n or --name parameter previously when running tos dr init on the active cluster, you must use the -n or --name parameter here as well, specifying a different name to represent the standby cluster. |
Standard name convention |
|
|
Network IP address of the active cluster primary node (not the VIP) |
Required |
Actual machine IP address only |
|
|
Token generated |
Required |
Value generated from tos dr generate-token |
Example
$ sudo tos dr connect -p 192.168.32.23 -t Zbk7lwH4Qu7rINz8DvuwjQgJgpWjcsgtxKe3h90=
[Jul 18 10:39:07]  INFO Local cluster state is "StandBy"
sudo tos dr disable
Run this command to disable disaster recovery on a cluster with DR.
Description
Disables DR on the cluster.
Syntax
sudo tos dr generate-token
Run this command on the cluster that will be designated as the active cluster.
Description
Generates a unique token that is used to authenticate the connection between the two clusters.
Syntax
Example
$ sudo tos dr generate-token
[Jul 18 10:38:45]  INFO Please save the token and use it when running the connect command from remote peer
Token: z1obGYNhdcb85rsDI7IrygGfMP5rHFq50iygPcEWxnE=
sudo tos dr init
Run this command on the cluster that will be designated as the active cluster.
Description
Initializes DR on a cluster and makes it the active cluster. The backup destination must be set to external storage before running. The command also sets the backup policy in the same way as sudo tos backup policy set. Disaster recovery uses the TOS time zone.
Syntax
[<ADMIN> ~]$ sudo tos dr init [-n <NAME>][--rate <RATE>][--hour <HOUR>][--minute <MINUTE>]Parameters
|
Parameter |
Description |
Required/Optional |
Possible Values |
|---|---|---|---|
|
|
Use this if you want to provide a name to help identify this cluster. If you don't use it, the hostname of the primary node will be used. |
Optional |
Standard name convention |
|
|
Backup frequency (in hours). |
Optional |
24 (default), 12, 8, 6 |
|
|
Hour when the first daily backup occurs. Format is HH. |
Optional |
Default: 00 |
|
|
Minute of the hour when the first daily backup occurs. Format is mm. |
Optional |
Default: 00 |
Example
$ sudo tos dr init
[Jul 18 10:38:34]  INFO DR initialization finished successfully
sudo tos dr status
Description
Display DR status for active and standby peers. The standby cluster can view the backups taken on the active cluster .
Syntax
Example
$ sudo tos dr status
DR configuration:
  Backup policy rate: 24H
  Hour: 0:0h

Last compatible healthy backup Timestamp: 2023-07-10 06:10:40 +0000 UTC

Local cluster status:
  Name: local
  State: Active, Ready
  Last Update: 2023-07-10 09:33:45 +0300 IDT
  Version: 23.2.1100-20230709122412+23-2-pga.0.0
  HA: false
  Modules: ST, SC

Peer cluster status:
  Name: remote
  State: StandBy, Ready
  Last Update: 2022-07-26 13:53:22 +0300 IDT
  Version: 23.2.1100-20230709122412+23-2-pga.0.0
  HA: false
  Modules: ST, SC
sudo tos dr switch
Description
Switches activity between peer clusters.
Syntax
Parameters
|
Parameter |
Description |
Required/Optional |
Possible Values |
|---|---|---|---|
|
|
Backup to be used on switch. |
Optional |
Default: latest completed backup will be used |
|
|
Bypass confirmation |
Optional |
|
Example
$ sudo tos dr switch
[Jul 18 10:46:55]  INFO Switching current peer to Active
[Jul 18 10:46:55]  INFO Setting peer to "Switch" mode
General commands
This is a subset of commands that allows you to archive and temporarily restore old revision data (device policy rules):
sudo tos completion
Description
Adds the ability to use auto-completion for commands or arguments in a Linux shell session. Run these commands:
Syntax
sudo tos help
Description
List all available TOS CLI commands.
Syntax
sudo tos install
Description
Initiate the installation of TOS on your system.
Syntax
[<ADMIN> ~]$ sudo tos install [--dry-run] --modules=<MODULE-TYPE> --primary-vip=<PRIMARY> --services-network=<SERVICE-CIDR> --load-model=<LOAD> -dParameters
|
Parameter |
Description |
Required/Optional |
Possible Values |
|---|---|---|---|
|
|
Runs through all the steps without installing anything. |
Optional |
|
|
|
Either the VIP you will use to access an on-premise deployment or the text external if you are installing on a cloud VM like Azure. |
Required |
|
|
|
The CIDR you want to use for the Kubernetes service network. It must not overlap with the pods network. |
Required |
|
|
|
Type of module. |
Optional. |
|
|
|
The CIDR you want to use for the Kubernetes pods network. It must not overlap with the services network. The default pods network is 10.244.0.0/16 |
Optional |
|
|
|
|
Optional |
small, medium (default), large , extra-large |
|
-d |
Creates a debug log.
We recommend including this debug flag when running |
Optional |
|
Examples:
[<ADMIN> ~]$ sudo tos install --migrate --modules=ST,SC --primary-vip=192.168.1.2 --services-network=10.10.10.0/24 --load-model=small
[<ADMIN> ~]$ sudo tos install --clean --modules=RC --primary-vip=external --services-network=10.10.10.0/24 --load-model=large
sudo tos maintenance
Description
tos maintenance lets you put TOS into maintenance mode, a state in which users cannot access the UI and communication with devices and connected clusters is halted. Only command line access is allowed.
Syntax
Parameters
|
Parameter |
Description |
Required/Optional |
Possible Values |
|---|---|---|---|
|
|
TOS state |
Required |
|
Examples
[<ADMIN> ~]$ sudo tos maintenance --mode on
[<ADMIN> ~]$ sudo tos maintenance --mode off
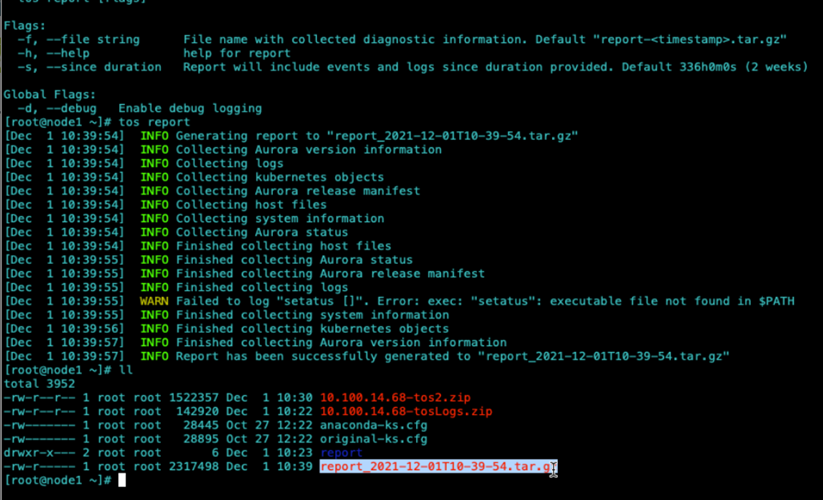
sudo tos report
Description
Create a file containing a list of cluster events, similar to sudo tos status history.
You can use the flags only or a combination of the commands with flags (see examples).
You can also use label sets with commands. The syntax for label sets is key=value. Examples of label sets include container, filename, instance, or pod (see examples).
By default logs from the following pods are not included in the report (unless specified with a label set):
-
device-collector
-
device-comm-service
-
lea-processor
-
lea-coordinator
Syntax
[<ADMIN> ~]$ sudo tos report [command] --file <FILE> --since <DATE> --until <DATE> <HMS>|
Parameter |
Description |
Required/Optional |
|---|---|---|
|
|
Collect filtered logs. |
Optional |
|
|
List available logs according to flags. |
Optional |
|
|
File name with diagnostic information that was collected. If not specified, a default name will be used in the format |
Optional |
|
|
File name for the output file. |
Optional |
|
|
Indicates that you will provide an age limit for the events to be included. This command returns entries that are not older than the specified date. Default value: 3 days ago. |
Optional |
|
|
Age limit for events to be included, in the format |
Required when |
|
|
Indicates the ending date for which the report includes data. |
|
|
|
Format is YYYY-MM-dd hh:mm:ss. |
Required when |
[<ADMIN> ~]$ sudo tos report -f myreport
[<ADMIN> ~]$ sudo tos report -s 12h30m30s
[<ADMIN> ~]$ sudo tos report -s "2022-01-01 14:00:00" -u "2023-01-01 14:00:00"
[<ADMIN> ~]$ sudo tos report collect -s "2022-10-20 13:30:00" -u "2022-12-20 13:30:00"
[<ADMIN> ~]$ sudo tos report list -s "2022-10-20 13:30:00" -u "2022-12-20 13:30:00"
[<ADMIN> ~]$ sudo tos report list pod=cassandra
[<ADMIN> ~]$ sudo tos report list instance=dev
sudo tos run
Description
Start the TOS services. The alias start can be used instead.
Syntax
Parameters
|
Parameter |
Description |
Required/Optional |
|---|---|---|
|
|
Show the configuration preset file. |
Optional |
sudo tos start
Description
An alias for sudo tos run.
Syntax
sudo tos status
Description
Display information about your TOS system.
Syntax
Parameters
|
Parameter |
Description |
Required/Optional |
Possible Values |
|---|---|---|---|
|
|
Specifies that the output will be json/text format. Default is text. |
Optional |
|
|
|
Format of the output if the output flag is used. |
Optional |
json text yaml |
Example output
[<ADMIN> ~]$ tos status
[Mar 28 13:42:09]  INFO Checking cluster health status
TOS Aurora
Tos Version: 25.2 (PRC1.0.0)

System Status: "Ok"

Cluster Status:
   Status: "Ok"
   Mode: "Multi Node"

Nodes
  Nodes:
  - ["node1"]
    Type: "Primary"
    Status: "Ok"
    Disk usage:
    - ["/opt"]
      Status: "Ok"
      Usage: 19%
  - ["node3"]
    Type: "Worker Node"
    Status: "Ok"
    Disk usage:
    - ["/opt"]
      Status: "Ok"
      Usage: 4%

registry
  Expiration ETA: 819 days
  Status: "Ok"

Infra
Databases:
- ["cassandra"]
  Status: "Ok"
- ["kafka"]
  Status: "Ok"
- ["mongodb"]
  Status: "Ok"
- ["ongDb"]
  Status: "Ok"
- ["postgres"]
  Status: "Ok"

Application
Application Services Status OK
Running services 50/50

Remote Clusters
Number Of Remote Clusters: 2
  - ["RC"]
     Connectivity Status:: "OK:"
  - ["RC2"]
     Connectivity Status:: "OK"

  Backup Storage:
  Location: "Local
s3:http://minio.default.svc:9000/velerok8s/restic/default "
  Status: "Ok"
  Latest Backup: 2024-03-23 05:00:34 +0000 UTC
[<ADMIN> ~]$ tos status
[Mar 28 13:42:09]  INFO Checking cluster health status
TOS Aurora
Tos Version: 25.2 (PRC1.0.0)

System Status: "Ok"

Cluster Status:
   Status: "Ok"
   Mode: "High Availability"

Nodes
  Nodes:
  - ["node1"]
    Type: "Primary"
    Status: "Ok"
    Disk usage:
    - ["/opt"]
      Status: "Ok"
      Usage: 32%
  - ["node3"]
    Type: "Ha Data Node"
    Status: "Ok"
    Disk usage:
    - ["/opt"]
      Status: "Ok"
      Usage: 11%
  - ["node2"]
    Type: "Ha Data Node"
    Status: "Ok"
    Disk usage:
    - ["/opt"]
      Status: "Ok"
      Usage: 11%

registry
  Expiration ETA: 819 days
  Status: "Ok"

Infra
Databases:
- ["cassandra"]
  Status: "Ok"
- ["kafka"]
  Status: "Ok"
- ["mongodb"]
  Status: "Ok"
- ["ongDb"]
  Status: "Ok"
- ["postgres"]
  Status: "Ok"

Application
Application Services Status OK
Running services 54/54

  Backup Storage:
  Location: "Local
s3:http://minio.default.svc:9000/velerok8s/restic/default "
  Status: "Ok"
  Latest Backup: 2024-03-23 05:00:34 +0000 UTC
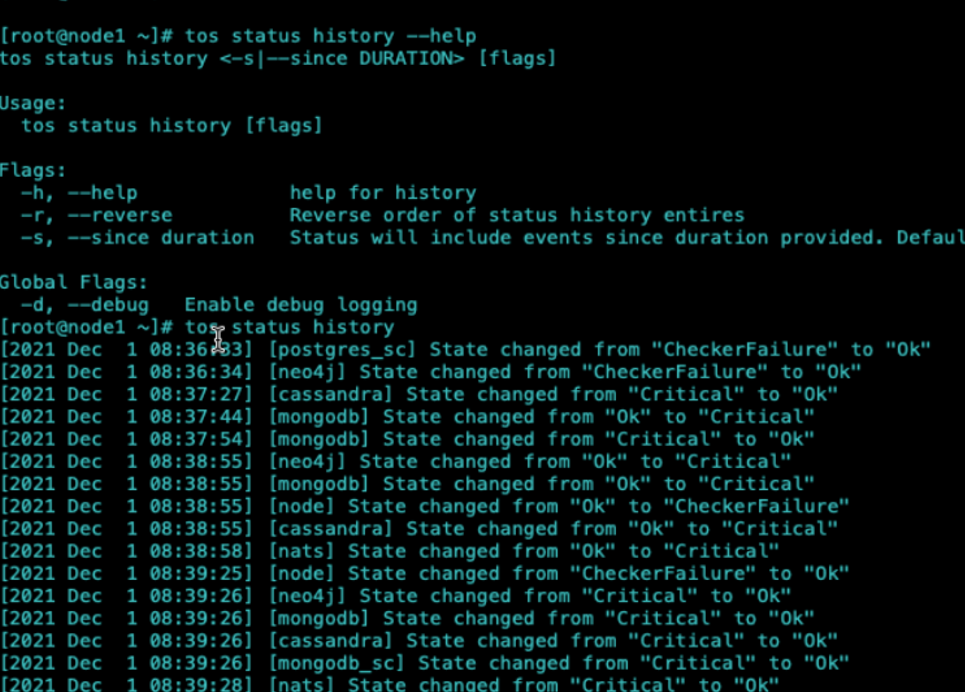
sudo tos status history
Description
List cluster events, similar to sudo tos report.
Syntax
[<ADMIN> ~]$ sudo tos status history [-r|--reverse] [-s|--since <HMS>]Parameters
|
Parameter |
Description |
Required/Optional |
|---|---|---|
|
|
Specifies to list the events in reverse chronological order (from most recent to oldest). If not included, the events will be listed from the oldest to the most recent. |
Optional |
|
|
Indicates that you will provide an age limit for the events to be included. |
Optional |
|
|
Age limit for events to be included, in the format |
Required when |
Examples
[<ADMIN> ~]$ sudo tos status history --reverse
[<ADMIN> ~]$ sudo tos status history -s 12h30m0s
[<ADMIN> ~]$ sudo tos status history
sudo tos stop
Description
Stop all TOS services. This process may take time and while it is running you will be unable to use the CLI. Progress is displayed in the output.
To prevent corrupted backup files, tos stop cannot be run while a backup is in progress. If you force the command, the backup file will be deleted.
Syntax
[<ADMIN> ~]$ sudo tos stop [--confirm] [--force] [--app-only]Parameters
|
Parameter |
Description |
Required/Optional |
|---|---|---|
|
|
Suppresses warning messages and confirmation prompts. |
Optional |
|
|
If this parameter is included, no warning messages appear before files are deleted. |
Optional |
|
|
Stops application services only. |
Optional |
sudo tos uninstall
Description
Uninstalls TOS on the primary data node. After TOS is uninstalled, certain TOS directories, including data, backup files and log files will remain on the machine. These files and directories will be deleted if TOS is reinstalled.
If high availability is enabled, disable it first and if the cluster contains worker nodes, remove them first.
For the full procedure, see Uninstalling TOS.
Syntax
sudo tos update
Description
Update TOS from an earlier version of TOS. For the full procedure, see Update TOS.
Syntax
Parameters
|
Parameter |
Description |
Required/Optional |
|---|---|---|
|
|
During an upgrade, TOS checks that a successful backup was created within the past number of |
Optional |
Examples
[<ADMIN> ~]$ sudo tos status history --validate-backup=24
sudo tos update abort
Description
Aborts the TOS update and reverts to the CLI that was previously installed. Only relevant if the update failed at a stage in which it can be aborted.
For more information on update errors, see Update TOS.
Syntax
sudo tos update continue
Description
Continues the TOS update from the point where it failed. Command should be run after resolving the issue which caused the update to fail. Only relevant if the update failed at a stage in which it can be continued.
Syntax
sudo tos update pre-check
Description
Checks that the system is compatible with the TOS version to which you want to update. TOS is not updated by running this command. If an issue is encountered, the pre-check stops and the issue is printed to the output.
After the issue is resolved, run the pre-check again and verify that no issues are detected. All issues must be resolved before updating TOS.
Syntax
sudo tos update show
Description
Shows all the steps that are going to be performed during a TOS update.
On some of the steps, if the update fails, you will have the option of aborting the update and going back to your old TOS version, or continuing after you fix the problem.
These steps will have the label: upgrade.tufin.com/abort-allowed: "true"
Syntax
sudo tos upgrade
Description
An alias for sudo tos update.
Syntax
sudo tos version
Description
Get information about the TOS and supporting software installed on your system.
- TOS
- Helm
- Kubernetes
- CLI - TufinOS command line interface
Syntax
Parameters
|
Parameter |
Description |
Required/Optional |
Possible Values |
|---|---|---|---|
|
|
Provides additional information about Kubernetes core services including image path, tags, and build details. |
Optional |
|
|
|
Specifies the output format. |
Optional |
text (default) json yaml |
Module management
A subset of commands to add, remove and list active modules of TOS.
Subset includes commands:
There are 3 types of modules:
-
SecureTrack (ST)
-
SecureChange (SC)
-
Remote Collector (RC)
sudo tos modules add
Description
Add a module to TOS. In the current release, only the SecureChange module can be added.
Syntax
sudo tos modules list
List the active TOS modules. The alias ls can be used instead.
sudo tos modules remove
Description
Remove a module from TOS. In the current release, only the SecureChange module can be removed. When you remove a SecureChange module, both SecureChange and SecureApp data is removed. The alias rm can be used instead.
Syntax
Script management
This is a subset of commands that allows you to manage SecureChange scripts.
sudo tos scripts sc list
Description
List files and directories containing the SecureChange scripts you have uploaded.
Syntax
[<ADMIN> ~]$ sudo tos scripts sc list [relative path on SecureChange] [--detailed]Include -l or [--detailed] to include details of the files, for example:
$ sudo tos scripts sc list --detailed
-rwxrwxr-x 1 1000 1000 35 Dec 15 11:17 basic.yaml
-rwxr-xr-x 1 1000 1000 267346 Dec 15 11:17 metrics
-rwxr-xr-x 1 1000 1000 292 Dec 15 11:17 promui.yaml
-rwxr-xr-x 1 1000 1000 298 Dec 15 11:15 promui1.yaml
drwxr-xr-x 2 root root 23 Dec 15 11:17 myfile
-rwxr-xr-x 1 1000 1000 11 Dec 15 11:17 myfile.txt
sudo tos scripts sc pull
Description
Download SecureChange scripts from SecureChange.
Syntax
[<ADMIN> ~]$ sudo tos scripts sc pull <path on local host> <relative path on SecureChange> [--overwrite]Parameters
|
Parameter |
Description |
Required/Optional |
|---|---|---|
|
|
Path of a directory. |
Required |
|
|
Path of a single file or a directory. In the case of a directory, all sub-directories will be included. If provided, is relative to the default SecureChange script location. If not provided, the default SecureChange script location is used. |
Optional |
|
|
Overwrite any existing files and directories with the same names, without additional prompts. If the [--overwrite] parameter is not included, an error will be generated if there are existing files or directories with the same name. |
Optional |
Copies files and directories, including sub-directories from the SecureChange node to a local directory.
sudo tos scripts sc push
Description
Upload SecureChange scripts to SecureChange.
The default SecureChange script location is /opt/tufin/data/securechange/scripts/.
Syntax
[<ADMIN> ~]$ sudo tos scripts sc push <path on local host> <relative path on SecureChange> [--overwrite]Parameters
|
Parameter |
Description |
Required/Optional |
|---|---|---|
|
|
Path of a single file or a directory. In the case of a directory, all sub-directories will be included. |
Required |
|
|
Path of a directory. If provided, it is relative to the default SecureChange script location. If not provided, the default SecureChange script location is used. |
Optional |
|
|
Overwrite any existing files and directories without additional prompts. |
Optional |
sudo tos scripts sc remove
Description
Deletes files and directories, including sub-directories in the designated SecureChange script directory.. The aliases rm and delete can be used instead.
If the [--force] parameter is not included, a warning message will appear before files are deleted.
Syntax
[<ADMIN> ~]$ sudo tos scripts sc remove [relative path on SecureChange] [--force]Parameters
|
Parameter |
Description |
Required/Optional |
|---|---|---|
|
path |
Script directory on SecureChange |
Optional |
|
|
If this parameter is included, no warning messages appear before files are deleted. |
Optional |
sudo tos vacuum
Description
Runs a full vacuum operation on the local postgres database, which could be SecureTrack or SecureChange. In the case of the RC database, the postgres database name (and the tos vacuum command) is the same as SecureTrack. Therefore:
-
If you run
tos vacuumfrom the SecureTrack server, it will run on the postgres database of SecureTrack. -
If you run
tos vacuumfrom the RC server, it will run on the postgres database of RC.
For more information on when to run the command, see The tos vacuum Command.
Syntax
Parameters
|
Parameter |
Description |
Mandatory/Optional |
Possible Values |
|---|---|---|---|
|
|
Specify one or more modules to vacuum. If not specified, the default is |
Optional |
|
|
|
Vacuum one or more SecureTrack tables only. Limits the operation to the specified tables instead of the entire SecureTrackdatabase. |
Optional |
<table1><table2>...: names of the tables being vacuumed. The table name cannot include a prefix. |
|
|
Vacuum one or more SecureChange tables only. Limits the operation to the specified tables instead of the entire SecureChange database. |
Optional |
<table1><table2>...: names of the tables being vacuumed. The table name cannot include a prefix. |
Example
[<ADMIN> ~]# tos vacuum --modules=ST,SC
[<ADMIN> ~]# tos vacuum --st-tables=last_processed_device_statuses
Tufin Extensions
These commands are used for the management of Tufin extensions and Professional Services (PS) solutions. Installation and upgrading of Tufin extensions will normally be done by executing the downloaded run file as explained in the appropriate Tufin Extensions KC.
sudo tos apps list
Description
List all installed Tufin extensions and Professional Services solutions.
Syntax
Parameters
|
Parameter |
Description |
Required/Optional |
Possible Values |
|---|---|---|---|
|
|
Specifies that the output will be yaml/json format instead of plain text. |
Optional |
|
<type>
|
Format of the output if the output flag is used. |
Optional |
json yaml |
Examples
[tufin-admin@TufinOS ~]$ sudo tos apps list
NAME          TITLE                    STATUS     PROVIDER   VERSION   INSTALLATION DATE
qa-test-app   PS Customizations test   Deployed   ps         1.2.5     2021-09-14
ps-proxy      PS Proxy                 Deployed   ps         1.0.0     2021-09-14

[tufin-admin@TufinOS ~]$ sudo tos apps list -o yaml
items:
- name: qa-test-app
  title: PS Customizations test
  status: Deployed
  provider: ps
  version: 1.2.5
  creationTimestamp: "2021-09-14"
- name: ps-proxy
  title: PS Proxy
  status: Deployed
  provider: ps
  version: 1.0.0
  creationTimestamp: "2021-09-14"
sudo tos apps install
Description
This is meant for installing a PS solution from a .tar file. It is not normally used for Tufin extensions, which are installed by executing the downloaded run file as explained in the Tufin Extensions KC.
Syntax
Parameters
|
Parameter |
Description |
Required/Optional |
|---|---|---|
|
|
Full path of the installation file that you have placed on your server. |
Required |
|
|
If specified, the installation will run in the background, freeing up the command line. |
Optional |
sudo tos apps upgrade
Description
This is meant for upgrading a PS solution from a .tar file. It is not normally used for Tufin extensions, which are installed by executing the downloaded run file as explained in the Tufin Extensions KC.
Syntax
Parameters
|
Parameter |
Description |
Required/Optional |
|---|---|---|
|
|
Full path of the installation file that you have placed on your server. | Required |
sudo tos apps uninstall
Description
Remove an installed Tufin extension.
Syntax
Parameters
|
Parameter |
Description |
Required/Optional |
|---|---|---|
|
|
Name of the extension as it appears in the output of sudo tos apps list. |
Required |
Was this helpful?
Thank you!
We’d love your feedback
We really appreciate your feedback
Send this page to a colleague