On this page
Prepare an AWS Instance
Overview
This procedure explains how to prepare AWS instances for TOS deployments using the Tufin AMI. The Tufin AMI runs TufinOS, which is based on Rocky Linux.
Some of the sections in this procedure only need to be done once. Others need to be repeated each time you add a worker node to the deployment.
High availability (HA)
High availability is not supported in this release.
Remote collectors (RCs)
Remote collectors can be deployed on AWS.
Prerequisites
General requirements
-
This procedure must be performed by an experienced AWS administrator with knowledge of deploying on that platform.
-
Verify that you have sufficient resources (CPUs, disk storage and main memory) to run TOS. The required resources are determined by the size of your system. See Sizing Calculation for a Clean Install.
-
We do not recommend installing on your server 3rd party software not specified in the current procedure. It may impact TOS functionality and features, and it is your responsibility to verify that it is safe to use.
- All nodes in the cluster must be running the same operating system.
- The node's network IP must be on the same subnet as the cluster primary VIP.
-
The CPU architecture must be X86_64 with the AVX instruction set.
Network requirements
-
You must allow access to required Ports and Services on the firewall.
-
Allocate a 24-bit CIDR subnet for the Kubernetes service network and a16-bit CIDR subnet for the Kubernetes pods network (10.244.0.0/16 is used by default).
The pods and services networks must be inside the following private networks: 10.0.0.0/8, 172.16.0.0/12, 192.168.0.0/16. In addition, ensure that the dedicated CIDR for the service network and pods network don't overlap with:
-
Each other
-
The physical addresses of your TOS servers (see below)
-
Your external load balancer IP(s)
-
Any other subnets communicating with TOS or with TOS nodes
-
-
All TOS nodes need to be on the same subnet
-
DNS hostnames must be enabled on your VPC - see Modify the DNS attributes for your VPC (Amazon official documentation)
Tufin Orchestration Suite must only be installed in an appropriately secured network and physical location. Only authorized users should be granted access to TOS products and the operating system on the server.
Create security groups
If not already done, create two security groups: for the EC2 instance and for the network load balancer.
Load balancer security group
-
Navigate to EC2 > Security Groups.
-
Click Create Security Group.
-
In the Basic Details section, enter a name and description for the security group, and select the VPC being used for the EC2 instance.
-
In the Inbound Rules section, create rules for the following ports:
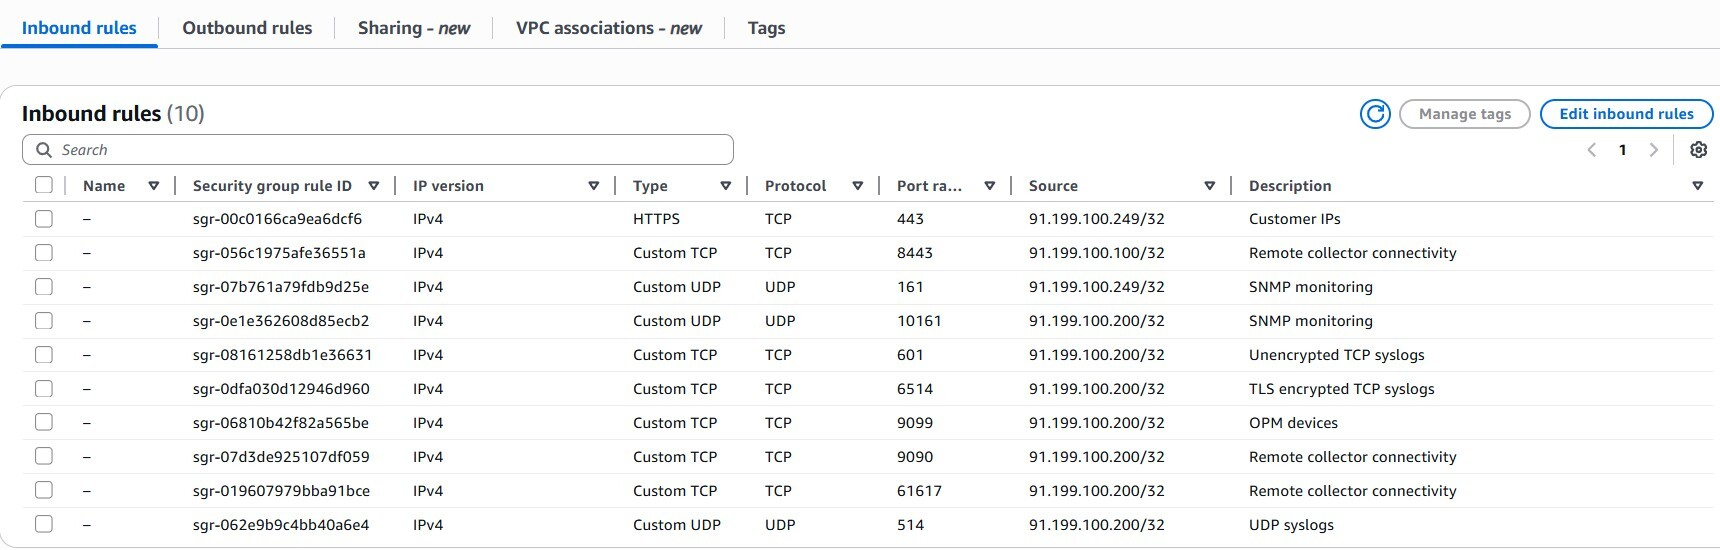
Central cluster
Type
Protocol
Port range
Source
Source IP
Description
HTTPS TCP 443 Custom Client source IP address UI Access HTTPS TCP 443 Custom Remote collector cluster node addresses Remote collector cluster connectivity Custom TCP TCP 61617 Custom Remote collector cluster node addresses Remote collector cluster connectivity Custom TCP TCP 9099 Custom Client source IP address OPM devices Custom TCP TCP 8443 Custom Remote collector cluster node addresses Remote collector cluster connectivity Custom TCP TCP 9090 Custom Remote collector cluster node addresses Remote collector cluster connectivity Custom TCP TCP 601 Custom Client source IP address Unencrypted TCP syslogs Custom TCP TCP 6514 Custom Client source IP address TLS encrypted TCP syslogs Custom UDP UDP 514 Custom Client source IP address UDP syslogs Custom UDP UDP 161 Custom Client source IP address SNMP monitoring -
Do not change the default outbound rule for allowing all traffic.
-
Click Create Security Group.
|
Remote collector cluster |
|||||
|---|---|---|---|---|---|
|
Type |
Protocol |
Port range |
Source |
Source IP |
Description |
| Custom TCP | TCP | 9099 | Custom | Client source IP address | OPM devices |
| Custom TCP | TCP | 8443 | Custom | Central cluster node addresses | Central cluster connectivity |
| Custom TCP | TCP | 601 | Custom | Client source IP address | Unencrypted TCP syslogs |
| Custom TCP | TCP | 6514 | Custom | Client source IP address | TLS encrypted TCP syslogs |
| Custom UDP | UDP | 514 | Custom |
Client source IP address |
UDP syslogs |
No additional outbound rules need to be created.
EC2 security group
-
Navigate to EC2 > Security Groups.
-
Click Create Security Group.
-
In the Basic Details section, enter a name and description for the security group, and select the VPC being used for the EC2 instance.
-
In the Inbound Rules create rules for the following ports:
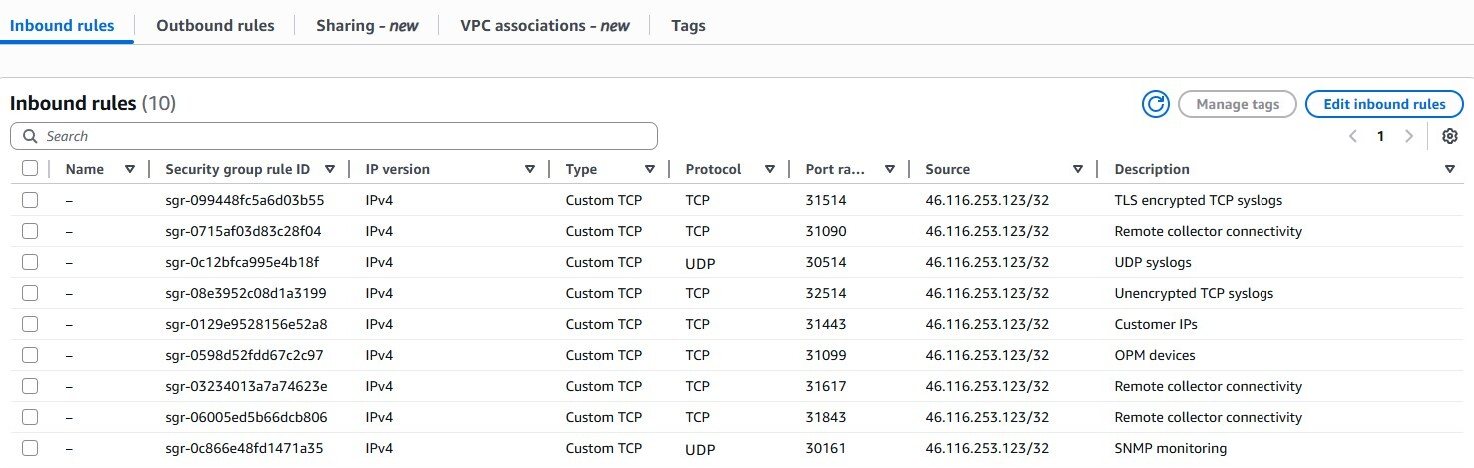
Central cluster
Type
Protocol
Port range
Source
Source IP
Description
Custom TCP TCP 31443 Custom Client source IP address UI Access Custom TCP TCP 31443 Custom Remote collector collector node addresses Remote collector cluster connectivity Custom TCP TCP 31443 Custom Load balancer security group ID Health check Custom TCP TCP 31617 Custom Remote collector cluster node addresses Remote collector cluster connectivity Custom TCP TCP 31617 Custom Load balancer security group ID Health check Custom TCP TCP 31099 Custom Client source IP address OPM devices Custom TCP TCP 31099 Custom Load balancer security group ID Health check Custom TCP TCP 31843 Custom Remote collector cluster node addresses Remote collector cluster connectivity Custom TCP TCP
31843 Custom Load balancer security group ID Health check Custom TCP TCP 31090 Custom Remote collector cluster node addresses Remote collector cluster connectivity Custom TCP TCP 31090 Custom Load balancer security group ID Health check Custom TCP TCP 32514 Custom Client source IP address Unencrypted TCP syslogs Custom TCP TCP 32514 Custom Load balancer security group ID Health check Custom TCP TCP 31514 Custom Client source IP address TLS encrypted TCP syslogs Custom TCP TCP 31514 Custom Load balancer security group ID Health check Custom UDP UDP 30514 Custom Client source IP address UDP syslogs Custom UDP UDP 30161 Custom Client source IP address SNMP monitoring -
To enforce SSH access to the EC2 instance, add the following rule:
-
Do not change the default outbound rule for allowing all traffic.
-
Click Create Security Group.
-
In the Inbound Rules tab, click Edit Inbound Rules, and add the following rule:
Type
Protocol
Port range
Source
Source IP
Description
All traffic
All
All
Custom
EC2 security group ID
Communication between nodes
|
Remote collector cluster |
|||||
|---|---|---|---|---|---|
|
Type |
Protocol |
Port range |
Source |
Source IP |
Description |
| Custom TCP | TCP | 31099 | Custom | Client source IP address | OPM devices |
| Custom TCP | TCP | 31099 | Custom | Load balancer security group ID | Health check |
| Custom TCP | TCP | 31843 | Custom | Central cluster node addresses | Central cluster connectivity |
| Custom TCP | TCP | 31843 | Custom | Load balancer security group ID | Health check |
| Custom TCP | TCP | 32514 | Custom | Client source IP address | Unencrypted TCP syslogs |
| Custom TCP |
TCP |
32514 | Custom | Load balancer security group ID | Health check |
| Custom TCP | TCP | 31514 | Custom | Client source IP address | TLS encrypted TCP syslogs |
| Custom TCP | TCP | 31514 | Custom | Load balancer security group ID | Health check |
| Custom UDP | UDP | 30514 | Custom | Client source IP address | UDP syslogs |
|
Type |
Protocol |
Port range |
Source |
Source IP |
Description |
|---|---|---|---|---|---|
| SSH | TCP | 22 | Custom | Inbound IP address | SSH access |
No additional outbound rules need to be created.
Launch the instance
Repeat this section for each node in the cluster (data and worker) before proceeding to the next section.
-
Navigate to EC2 > Launch instance.
-
In the Name and tags pane, enter the name of the instance.
-
In Application and OS Images (Amazon Machine Image), search for Tufin.
-
Select the AWS Markeplace AMIs tab to view the results.
-
Do one of the following:
-
For the data node, select TufinOS.
-
For the worker node, select TufinOS Worker.
-
-
Subscribe to the AMI.
-
Edit the configuration details:
-
EC2 instance type: Select the instance type based on the type of node and the sizing requirements. See Sizing Calculation for a Clean Install.
-
In the Network Settings pane, click Edit, and enter/select the following details:
-
VPC settings: Select the relevant VPC.
-
Subnet settings: Select the relevant subnet.
-
Auto-assign public IP: We recommend selecting Disable.
-
Security group settings: Select the EC2 Security Group you created.
-
-
By default the TufinOS AMI includes two disks: 500 GB for the operating system, and 50 GB for ETCD. The disks use GP3 with 7500 IOPS. Do not change their configuration or size.
If you require additional storage for the data node, add an additional volume (worker nodes do not require additional storage):
-
In Storage (Volumes), click Advanced > Add New Volume, and enter the storage amount.
-
Copy the configuration settings from the primary volume.
-
-
Key pair settings: Create a new key pair or use an existing one. Both .pem and .ppk file formats are supported.
-
Click Launch Instance.
-
In the Key pair (login) pane, select the key pair you created.
-
Click Launch Instance.
-
(Optional) Change the permissions of the key file downloaded to your PC to prevent unauthorized users from running it. If your PC is running on a Linux-like operating system, run the command:
-
You can now log in to the instance via ssh, as user tufin-admin. This is the only way to log in to TufinOS on AWS - there is no user/password option.
where
-
<KEY FILE>is the name of the .pem/.ppk file downloaded previously from the AWS console -
<IP>is the private or public IP of the tufin-admin user
-
Create/Update target groups
If you are preparing AWS instances for the first time, you are going to need to create target groups for the ports needed. These ports are listed in the Target column in the table below. The target groups are rules that redirect traffic to the load balancer.
If you are adding a worker node to an existing deployment, you need to update the target groups with the new instance.
|
Central cluster |
||||
|---|---|---|---|---|
|
Protocol |
Listener |
Target |
Health Check Protocol |
Purpose |
| TCP | 443 | 31443 |
TCP |
UI access and remote collector cluster connectivity |
| TCP | 61617 | 31617 | TCP | Remote collector cluster connectivity |
| TCP | 9099 | 31099 |
TCP |
OPM devices |
| TCP | 8443 | 31843 |
TCP |
Remote collector cluster connectivity |
| TCP | 9090 | 31090 | TCP | Remote collector cluster connectivity |
| TCP | 601 | 32514 | TCP | Unencrypted TCP syslogs |
| TCP | 6514 | 31514 | TCP | TLS encrypted TCP syslogs |
| UDP | 514 | 30514 | TCP (31443) | UDP syslogs |
| UDP | 161 | 30161 | TCP (31443) | SNMP monitoring |
|
Remote collector cluster |
||||
|---|---|---|---|---|
|
Protocol |
Listener |
Target |
Health Check Protocol |
Purpose |
| TCP | 9099 | 31099 | TCP | OPM devices |
| TCP | 8443 | 31843 | TCP | Remote collector cluster connectivity |
| TCP | 601 | 32514 | TCP | Unencrypted TCP syslogs |
| TCP | 6514 | 31514 | TCP | TLS encrypted TCP syslogs |
| UDP | 514 | 30514 | TCP (31843) | UDP syslogs |
Create a target group
Repeat this procedure for each port you need.
-
In your AWS console, navigate to EC2 > Target Groups.
-
Click Create target group.
The Step 1 - Specify group details tab appears.
-
Enter/select the following:
-
Target type: Instances
-
Target group name: A name of your choice
-
Protocol/Port: The protocol and source port . For example: TCP / 443
-
IP Address Types: IPv4
-
VPC: The VPC being used for the EC2 instance
-
Health checks: TCP
-
-
If you are creating a target group for a UDP protocol:
-
Expand the Advanced health check settings pane.
-
Select Override.
-
Enter port 31443.
-
-
Click Next.
-
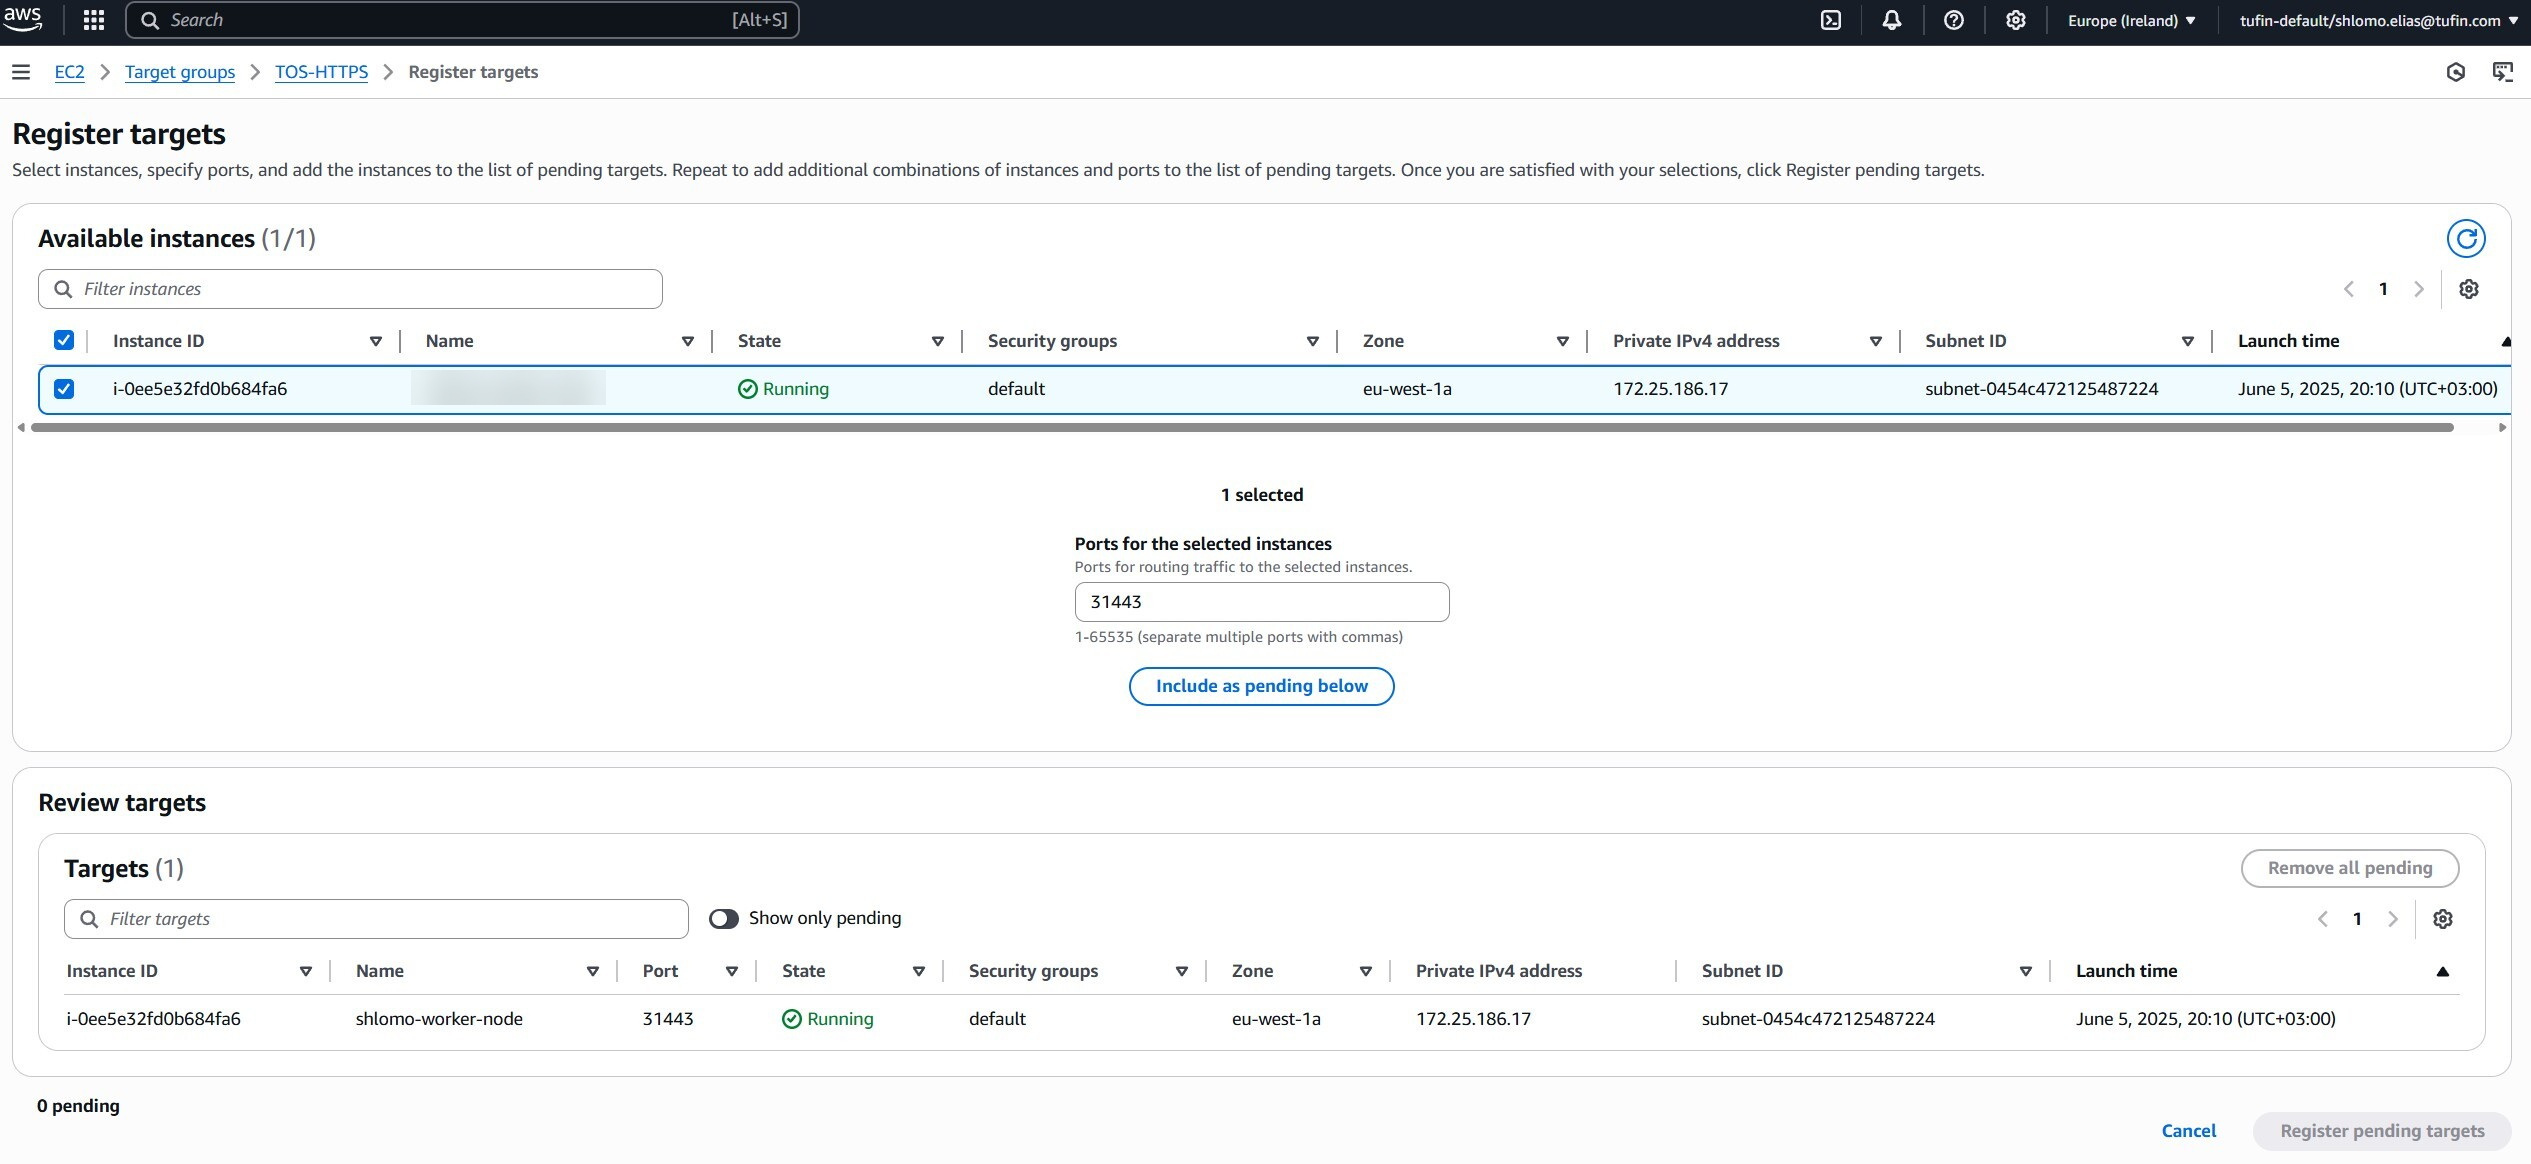
Select the instances you created in the previous section.
-
Enter the target port. For example: 31443.
-
Click Include as pending below.
-
Click Create target group.
-
In the target group, go to the Attributes tab and verify that Preserve client IP addresses is On. If not, click Edit and change this attribute to On.
The Step 2 - Register Targets tab appears.
Update target group
Repeat this procedure for each target group.
-
In your AWS console, navigate to EC2 > Target Groups. All targets groups are listed.
-
Select the target group.
-
Click Register Target.
-
Select the instance you created in the previous section.
-
Enter the target port. For example: 31443.
-
Click Include as pending below.
-
Click Register pending targets.
Create a load balancer
Create a load balancer for distributing traffic to the instances (data node and worker nodes). The load balancer is going to have listeners - one for each of the target group ports from the previous section. The load balancer is only created once and not each time you prepare a new AWS instance.
-
In your AWS console, navigate to EC2 > Load Balancers.
-
Click Create Load Balancer.
-
Click Create for Network Load Balancer.

-
Enter/select details:
-
Load balancer name: A name of your choice
-
Scheme: Select the relevant scheme
-
VPC: The VPC you are using with the EC2 instance.
-
-
Select the relevant availability zones and subnets you are using.
-
In the Security Groups section, select the security group you created for the load balancer.
-
Add a listener for each target port.
To add a listener,
-
Enter/select:
-
Protocol: Protocol. For example: UDP
-
Port: Listener port. For example: 514
-
Target group: Name of the appropriate group created in Create Target Groups.
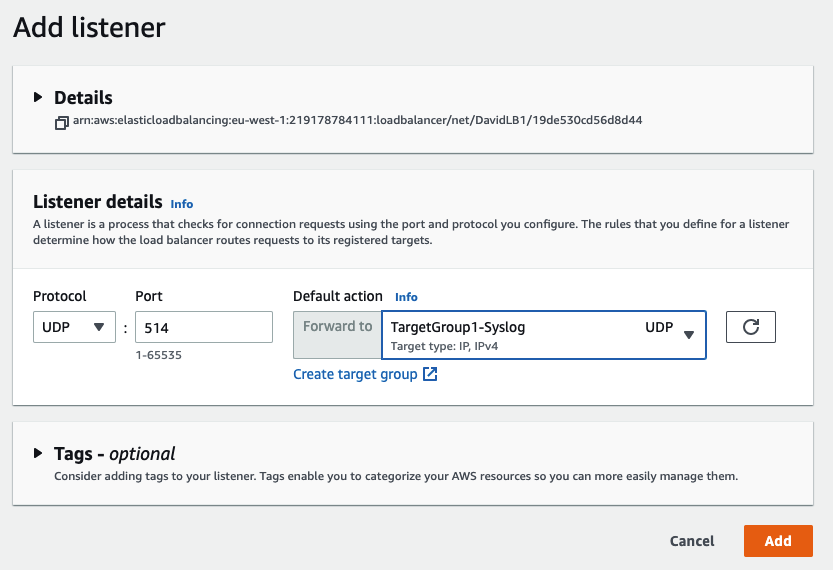
-
-
Click Add listener.
-
-
Click Create load balancer.
The load balancer will be added to the list of load balancers
-
Select the newly created load balancer from the list of load balancers and note the DNS name. This will be the URL of TOS when it is installed.
(Optional) extend /opt partition size
If you added a new volume to the instance for the data node, you need to extend the /opt partition size before installing TOS.
-
Log into the instance CLI using SSH with the pem key you created.
-
Run the following command to view the existing file system.
-
Create a new physical volume to associate with the one that you previously created.
Replace <vol name> with the name of the new volume. For example: nvme1n1.
-
Extend the volume.
-
Extend the /opt partition.
Replace <vol group> and <log vol> with the volume group and logical volume that the /opt partition is mapped to.
Example:
-
Verify that the storage space was added to the /opt partition.
You can see that the storage for /opt has now been increased.
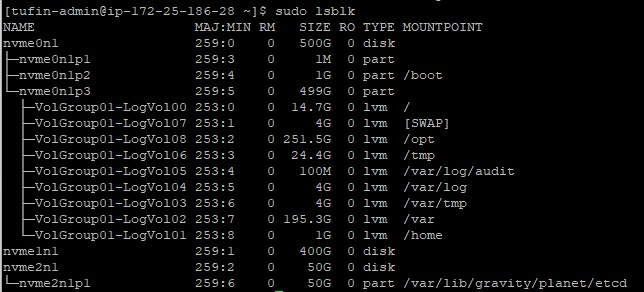
In the image above, the new volume that was added is nvme1n1. It may have a different name in your environment.
What next?
-
For a first time install, see Install TOS
-
If you need to add a worker node to your existing deployment, see add a worker node
Was this helpful?
Thank you!
We’d love your feedback
We really appreciate your feedback
Send this page to a colleague