On this page
Modifying Groups
Overview
In a Group Object request workflow, you can add or modify groups.
What can I do here?
Create a group
In a Group Object Request task, the Modify Group field can be in the first or any other step in the workflow so that a requester or handler can create new groups or design group object changes as follows:
-
Click
 . The New Group Properties window opens.
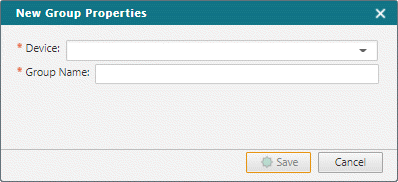
-
Select the device which is to contain the new group and enter a unique name. (object name validation is case sensitive, using the name "bob" and "Bob" will create duplicate objects and may cause an error during Provisioning). Click Save.
The created group is added to list of groups and is indicated with a
 label. (Groups which have been modified are indicated with a
  label)
 -
Click Edit Group to modify an existing group or a new group. The Select Network Object window opens.

Search the groups by either the group name or by the device that contains it. Click
 next to the group you want to change and click OK.
Note the following:
-
To locate and modify a global object, select the associated device for that object.
-
To locate and modify a global object in a hierarchical environment (such as Palo Alto Panorama or Fortinet FortiManager), select the associated device for that object.
-
To select an MDS group, you must select MDS from the Device dropdown list.
-
-
Modify the group members list. Click the menu item
 for the following options:
-
Create New Object: Lets you create a new object and add it to the group. Ensure the object name is unique, (object name validation is case sensitive, using the name "bob" and "Bob" will create duplicate objects and may cause an error during Provisioning). New objects are shown in bold with the
 icon. The object is created on the target device when the Modify Group changes are implemented.
You can create the following object types:
-
Host: An object with a specified IP address
-
Network: An object with a network address and netmask
-
Address Range: An object with a start address and end address
We recommend that a single ticket should not contain more than 20 groups, and each group should not contain more than 10 objects. For a very large number of changes, it is recommended to create several tickets.
If these recommendations are exceeded, some performance issues may be observed. -
-
Select existing object: Lets you add or remove an existing object from the same device to the group. Added objects are shown in bold with the
 icon.
icon.You can only add or remove objects from the same device that the group is configured on. Removed objects are shown in gray and with a strike-through line.
To re-add removed members to the group before you apply the changes, click
 .
. -
Remove group from ticket: Lets you remove the group and all its objects from the ticket.
The delete button
 within the group table, lets you remove a single object from the group.
Click Save draft to save the changes to the request, or click Done to move the ticket to the next step in the workflow.
-
Approve the group object change
The Modify Group field and the Approve/Decline field can be in the next step so that the next handler can approve or reject the requested changes as follows:
- Review the group object changes.
If you select Read-Only in the field configuration for this step, the handler can only see the table designed in the previous step but cannot make any changes to it. If you do not select Read-Only for this step, the handler can also add or remove members.
- Select Approve or Reject and enter a reason for the decision.
- Click Done to move the ticket to the next step in the workflow.
Provision group object changes (for supported devices)
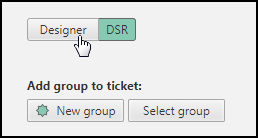
The handler can use the Designer to review how the requested Modify Group changes affect the various devices:
-
Click Designer:
-
Review the Designer instructions.
The instructions can include:
- Remove an object from a group
- Add a existing object to a group
- Create a new object (host, subnet or address range) and add it to a group
Review the Modify Group suggested changes for each device.
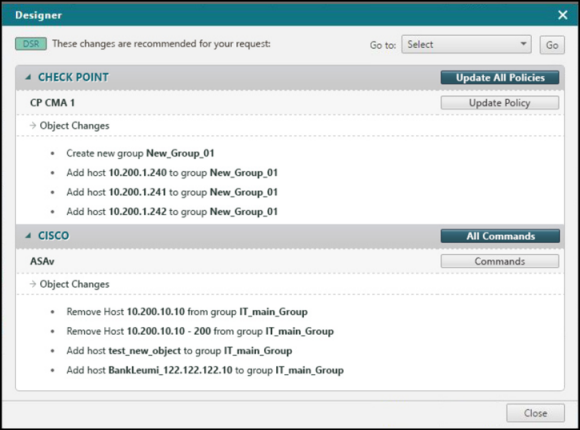
- Manually follow the instructions suggested by the Designer.
For devices where Provisioning is supported, Designer can implement these changes.
How do I get here?
SecureChange > ![]() Workflows
Workflows
Was this helpful?
Thank you!
We’d love your feedback
We really appreciate your feedback
Send this page to a colleague