On this page
APG Customization
Overview
To reduce the complexity of APG results, you can use the apg_ui_conf.xml XML file in /usr/local/st/conf that customizes the results according to your needs. When you modify the parameters in the XML file, you can create more efficient rule sets for to match the traffic in your environment.
Before you can access directory /usr/local/st/conf, you must run the following command:
The XML file contains all of the tags necessary to customize the APG results. Remove the comment notation (!--) from commented tags that you want to use.
Supported objects and functionality
APG customization supports:
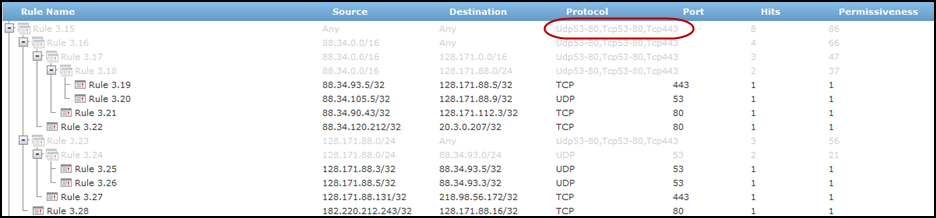
- Service groups: Service groups are a list of services that are always grouped together in the results. For example, for traffic on services UDP 53-80, TCP53-80, and TCP143, you can define a "UDP53-80,TCP53-80,TCP143" service group with those ports so that hits from a source subnet to a destination subnet on any of these ports are included in one rule with all three services.
To define service groups, list the service groups in the XML file according to the XML syntax. The Unassigned service group is already defined in the XML file to include all ports that are listed as unassigned by IANA. To enable this service group, remove the comment notation (!--) from the <group> tag of the Unassigned group.
You can use service groups in the engaged service groups or in predefined rules.
- Engaged service groups: Engaged service groups are used to aggregate all hits that include services that match the services in a service group.
After you define a service group, you can add it to the list of engaged service groups in
<engaged_service_groups>, for example:<engaged_service_groups><group_name>UDP53-80,TCP53-80,TCP143</group_name></engaged_service_groups>In the example below, rules are generated to aggregate hits that use the services in the service group "UDP53-80,TCP53-80,TCP143". In addition, rules are generated for the hits that do not match this service group.
- Predefined rules: You can define specific rules that you know are required for your device so that analysis runs on all of the traffic that does not match the predefined rules.
To use predefined rules, list the predefined rules in the XML file according to the XML syntax.
In the example below, the first two rules are defined in the XML so that rules are only generated for the hits that do not match the predefined rules.
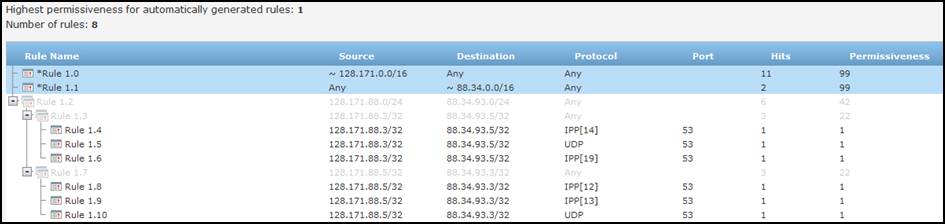
- Service aggregation: You can set APG to automatically group results by service:
- Intelligent service grouping - This is the most efficient method of creating a restrictive policy according to the network traffic. This is the default method for service aggregation:
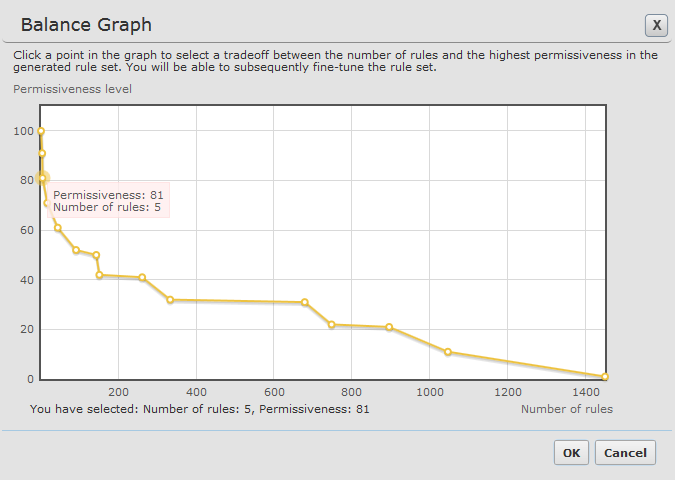
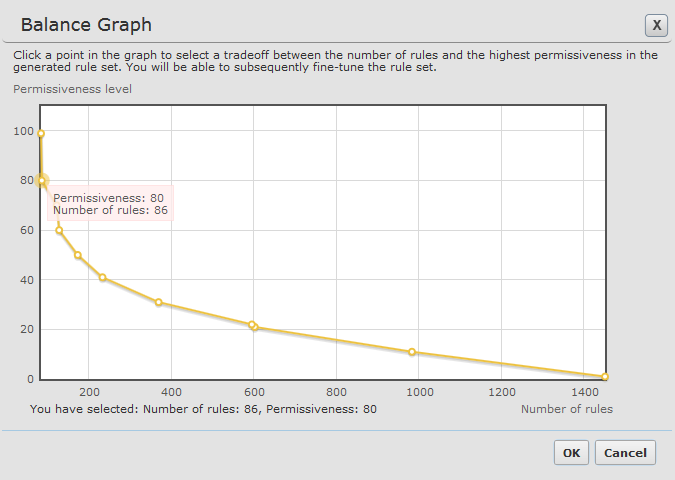
<unify_service>1</unify_service>This setting starts with permissiveness 100 (For example, ANY ANY ANY). It finds the segment with the most hits by defining to common source subnet, destination subnet or service and suggests a rule for that. Then it does the same analysis for the remaining rules. The lowest level suggestion will be a rule for each hit.
- Basic service grouping: To do this, add the line:
<unify_service>2</unify_service>This setting starts with a rule with permissiveness 80 (For example, ANY ANY <specific service>). It finds the segment with the most hits by defining a common source subnet or destination subnet and suggests a rule for that. The process is repeated for all of the remaining rules. The lowest level suggestion will be a rule for the source, destination and service of each hit.
Aggregates all services for specific source and destination subnets to ANY. You can expand the results to get rules with specific service values.
- No service grouping: This is the legacy method of calculating rules. To do this, add the line:
<unify_service>0</unify_service>This setting starts with a rule with permissiveness 80 (For example, ANY ANY <specific service>). It finds the segment with the most hits by defining a common source subnet or destination subnet and suggests a rule for that. The process is repeated for all of the remaining rules. The lowest level suggestion will be a rule for the source, destination and service of each hit.
- Intelligent service grouping - This is the most efficient method of creating a restrictive policy according to the network traffic. This is the default method for service aggregation:
- Rerun job with new XML parameters: After you save the XML file with your customized settings, you can run the APG job to see the results. If you want to change the XML file to see different APG results, you can edit the XML file and click the Rerun Job button
 for the job in the APG Jobs list.
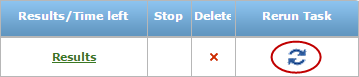
- Create XML for specific job: You can also create specific XML files that are used for specific jobs. To do this, run the job and find the
/var/log/st/apg_calc.Xfile that ran last. The X is the job ID for the APG job. Then, create an xml file and save it in the format: apg_ui_conf_<job_ID>.xml.Before you can access this directory, you must run the following command:
For example, if you run a job and see that
/var/log/st/apg_calc.10is the last job to run, duplicate the apg_ui_conf.xml file toapg_ui_conf_10.xml. Customize the XML file and click to rerun the job.
Was this helpful?
Thank you!
We’d love your feedback
We really appreciate your feedback
Send this page to a colleague