On this page
Configuring Assignment Mode
|
|
This topic is intended for SecureChange workflow owners, who are responsible for creating and maintaining workflows. |
Overview
Assignment mode lets you determine how each step in the workflow is assigned to a handler. (Click the step and click the Assignments tab). Supported assignment modes are:
-
Self-assigned: The task is shown to all participants. The handler of the ticket varies according to the subsequent action performed on a ticket:
-
Standard ticket progression: Any participant can accept the task to be the handler.
-
Reopened ticket: The participant is the last person who handled the ticket before it was closed.
-
Redo ticket: The participant is the handler of any previous step, including the requester of the ticket.
-
-
Auto-assigned: SecureChange assigns tasks to each participant in turn. You can select Prefer previous handler to automatically assign the task to the handler of the previous task.
-
Manually assigned: The assigner specified for the task assigns the task to a specific handler. Then, click Select Assigner to browse and select a SecureChange user to be the designated assigner for this task. This assigner will receive a task of assigning the task for this step to a step participant:

-
Dynamic Assignment: For multiple (parallel and/or conditional) tasks within this step. After selecting this option, configure the Assignment table.
-
Manager Assignment: Assigns the task to the requester's manager or you can select a SecureChange user to be the default manager for the step. To let the requester define the manager, you must add the Manager field to the first step of the workflow.
For the first step only, you can select Any Participant.
What can I do here?
Use a pre-assignment script
Pre-assignment scripts in workflows automatically run a script when the workflow process has entered a step but before the task has been assigned. They are typically used to fill fields with required values before the task is assigned to a handler.

To use a pre-assignment script, check the Pre-assignment script box and enter the full path to the script.
This option is available from the second step of a workflow. It cannot be enabled if the step mode is set to auto or if the assignment mode is set to dynamic assignment.
Skip a step
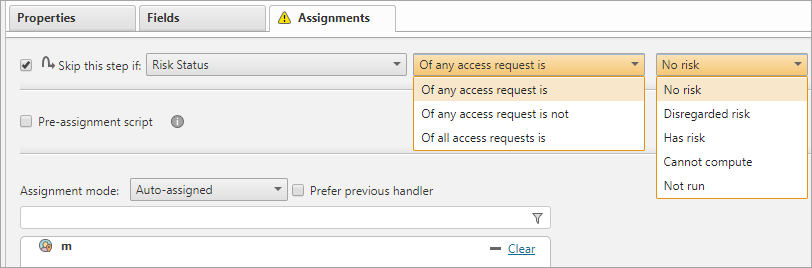
A step can be skipped based on conditions you select. To do this, check Skip this step if and specify the relevant conditions, depending on the workflow type. If the step meets the specified conditions, the ticket will automatically move to the next step.
For tickets containing multiple access requests, the step will be skipped if the condition is met in any one of them, unless the condition selected specifically states that it applies to all access requests in the ticket. This option is available only on some types of conditions (e.g. Risk Status,Target, and Verifier Status).
Example

Use  to add further conditions. From the drop-down menu, select the relevant operator:
-
And
-
Or

You can add up to 40 conditions. The operator you choose (And or Or) applies for all subsequent conditions.
Conditions can be based on access request or ticket details, including any predefined field (such as Approve/Reject), SLA or verification status, a mediator script, or these customizable fields: checkbox, dropdown, text area, text field:
-
For a custom field (such as checkbox, drop-down, text area, or text field) - You can select a custom field from a previous step. The fields of previous steps are listed with the step name and field name. You can specify or negate if:
-
Whether a checkbox is selected or not
-
Which drop-down option is selected
-
Whether the text field or area contains specified text, does not contain specified text, or matches a specified text exactly.
-
-
For an access request, you can run the Risk tool or Verifier tool and skip the step in one of the following scenarios:
Of any request is: after running the tool, at least one access request's status matches the status you select
Of any request is not: after running the tool, at least one access request does not have the status you select
Of all access requests is: after running the tool, all of the access requests' statuses match the status that you select
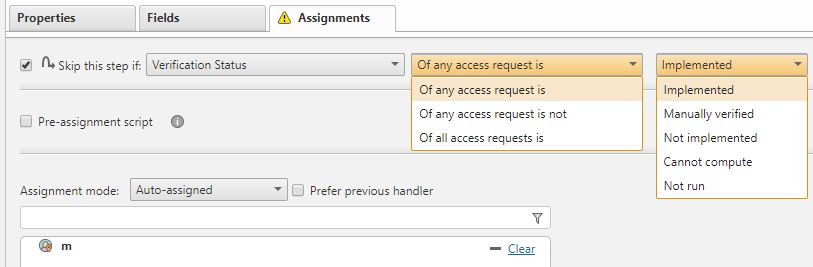
The Verifier tool has the following possible results:
- Implemented: The access request was verified (Green status)
- Manually verified: The access request was manually verified
-
Not implemented: The access request was not verified (Red status)
If you select Skip this step if the Verification Process is Not Implemented, the workflow will skip the step whether the access request is verified or not (the status is either Green or Red).
- Cannot compute: The verification process was unable to complete
- Not run: The verification process was not set to run
-
For a mediator script: You can enter the name of a script that you uploaded to the TOS server and base the condition on whether the result of the script is true or false.
-
Enter the full path to the script, for example:
/opt/tufin/data/securechange/scripts/script -
SecureChange passes the ticket ID to the script
-
The script result must be in the format:
<response> <condition_result> true </condition_result> </response> -
You must give the
tomcatuser execution permission to the script -
If the script writes data to disk, you must give the
tomcatuser write permission to the location
-
Examples
To skip a Business Owner Approval step when the target of the request is a specified device in the internal IT segment, select the Skip this step if: option, select the Target and Of request matches and select the device.
For a Rule Modification workflow, you might use the Skip this step if: option in a Designer or Provisioning step to deal with a request that includes a target device that is not supported for the workflow.
How do I get here?
SecureChange > ![]() Workflows
Workflows
Was this helpful?
Thank you!
We’d love your feedback
We really appreciate your feedback
Send this page to a colleague