On this page
Increasing The /opt Partition Size
Overview
This procedure describes how to increase the size of the /opt partition on virtual machines, Tufin Appliances and AWS instances running TOS after adding a new disk.
Procedure
-
Log into the TOS CLI as a user with root privileges.
-
Perform a TOS Backup.
-
If not already done, add the new virtual disk to the virtual machine.
-
 Stop all TOS services.
-
Run the command:
This process may take time.
- Check that all processes have been stopped successfully. Run the command:
-
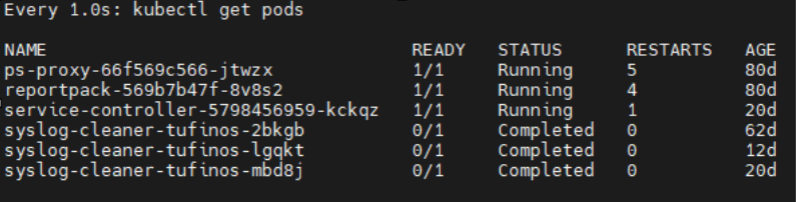
Wait until all the pods, with the exception of the service controller, ps-proxy, and reportpack pods, have disappeared from the list or reached a status of Completed. The service controller, ps-proxy, and reportpack pods which can continue running.
All TOS processes are now stopped on all the data nodes in the cluster.
A list of all pods is displayed.
Example
-
-
Once all the pods have been terminated, verify the new disk is recognized by the operating system. If the new disk does not appear, you may need to reboot your system.
-
Create a new physical disk to associate with the one that you previously created.
Replace <vol name> with the name of the new disk. For example: sdc.
-
Extend the disk.
-
Extend the /opt partition.
Replace <vol group> and <log vol> with the volume group and logical volume that the /opt partition is mapped to.
Example:
-
Verify that the storage space was added to the /opt partition.
You can see that the storage for /opt has now been increased.
-
Restart the TOS services.
[primary data node]# sudo tos start
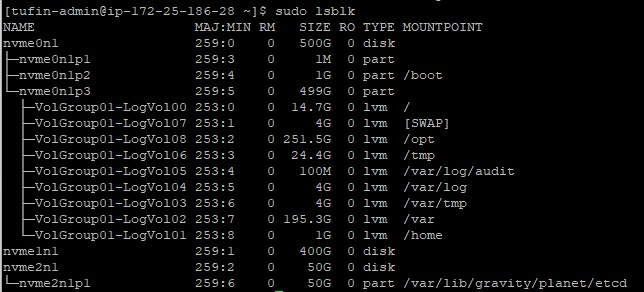
In the image above, the new disk that was added is nvme1n1. It may have a different name in your environment.
Was this helpful?
Thank you!
We’d love your feedback
We really appreciate your feedback
Send this page to a colleague