On This Page
Overview
When creating an integration between a SecureChange workflow and an external system, you need to define the outbound server to which Workflow Integrator (WI) sends requests.
If you are integrating with a single external system, you only define a single default outbound server for the workflow you are integrating. If you are integrating with multiple external systems, in addition to the default outbound server, you need to define the instances when WI should send requests to a different outbound server.
Each of these outbound servers must be configured in WI before you can use them when setting up an integration with a SecureChange workflow.
The outbound servers are configured in the Server ( ) menu.
Configure an Outbound Server
-
Click
. -
From the Actions (
 ) list, select New Server.
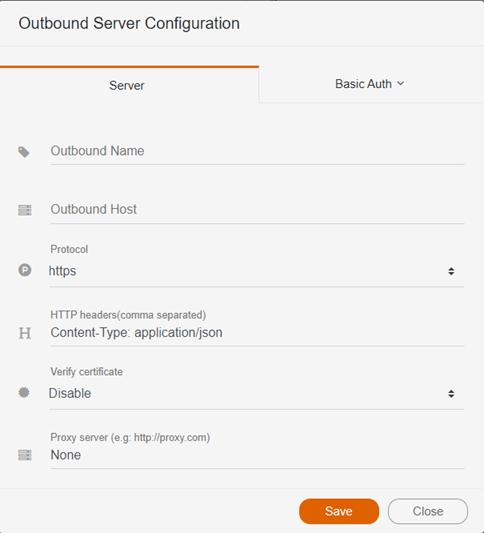
 - In the Server tab, enter the following information:
- In the Basic Authentication tab, select the API authentication method, and enter the access credentials:
-
Login user name
-
Login password
-
Resource Owner Password Credentials: Fields include:
-
Access Token URL
-
Login user name
-
Login password
-
Client ID
-
Client Secret
-
Scope: (Optional) Text that you can use to control the data that is sent to the specified user.
-
- Refresh Token: The Refresh Token replaces Login user name/password.
This token should not be expired.
Access Token URL
Refresh Token
Client ID
Client Secret
Scope: (Optional) Text that you can use to control the data that is sent to the specified user.
If the token is expired, you must create a new refresh token. The integration will stop working until a new refresh token is applied.
-
Token
-
Token Script: The script needs to retrieve the token from the remote server.
- Click Save.
The Outbound Server Configuration dialog box appears.
|
Field |
Description |
|---|---|
| Outbound name | Name of the outbound server |
| Outbound Host | IP address of the outbound server |
| Protocol | HTTP or HTTPS |
| HTTP headers (comma separated) | Enter: Content-Type: application/jsonYou can add additional HTTP headers separated by commas. |
| Verify certificate |
Disable is the default. Enable should only be selected if communication is being secured by a certificate is provided by a well-known company. If you have a self-sign certificate, select Certificate and browse to select it. |
| Proxy server | If relevant, enter the address of the proxy server. |
|
Authentication Method |
Description |
Access Credentials |
|---|---|---|
|
Basic |
Verified using user name and password |
|
|
Oauth 2.0 |
Verified according to the Oauth 2.0 standard. |
Grant type: WI supports two grant types: Fetch Token: Use this button to verify that WI can retrieve a new token based on the data provided in the fields. |
|
Bearer Token |
Verified using token |
Options include: Enter the full path to the script’s location in the SecureTrack server. For example: /var/tmp/token_script.sh After the script retrieves the token, it needs to send the token - and only the token - to STDOUT so that the WI script can read it. (STDOUT (standard output) is the stream to which a program writes its output data.) If providing both a token and token script, the token take precedence over the token script. |
