On This Page
Overview
Workflow Integrator (WI) enables you to integrate a SecureChange workflow with an external system using REST API requests and responses. To integrate the SecureChange workflow, you must define when and/or where in the workflow an API request should be sent to the external system, and which payload should be sent.
There is an integration point in each instance in the workflow that SecureChange needs to connect with an external system. You can define multiple integration points in a single workflow.
The integration points can be created for:
-
a step in the SecureChange workflow.
-
a general trigger that applies to the entire workflow.
Integrating the workflow includes the following stages:
-
Selecting the SecureChange workflow and default outbound server.
-
Selecting whether the API request should be sent for a Step or a general Trigger in the workflow.
-
Selecting the step or trigger.
-
For steps only, selecting where to create the integration point from the following:
-
Inbound: The integration point takes place when actions first become available in the workflow step.
-
Outbound: The integration point takes place when actions are no longer available for the workflow step.
-
Step Trigger: The integration point takes place when a specific trigger occurs in the step.
-
-
Configuring the settings for the integration point.
Steps 2-5 need to be repeated for each integration point.
If there is a conflict between a general trigger and a step trigger, WI sends the payload defined for the step trigger.
After you define and save the workflow, WI does the following steps each time an integration point is triggered in SecureChange:
-
Performs the actions defined for the integration point.
-
Sends the SecureChange information to the external system as a JSON template.
-
Updates the relevant fields in the SecureChange workflow with the response from the external system.
Steps 2 and 3 depend on the integration point you created. You can also create an integration point in which SecureChange performs a set of predefined actions before and/or after the step, but does not contact an external system, such as not sending the request if the previous step was skipped or only sending an email to the ticket requester.
Workflows are integrated in the Workflow menu.
Prerequisites
Before you can integrate a SecureChange workflow, you must have the following:
-
The SecureChange workflow you want to integrate.
-
At least one external system with which to integrate. The external system needs to be able to receive requests and send responses in JSON format.
You also need to do the following:
- Map the SecureChange placeholders to the external systems. You will use this mapping to create the payload that WI sends to the external systems. The Helper Placeholders page in the app lists all non-field related placeholders and placeholders associated with complex field data. In addition to the placeholders, you can also use field names as placeholders.
Integrate a SecureChange Workflow with an External System
-
Click
 .
. -
From the Actions (
 ) list, select New Workflow.
 -
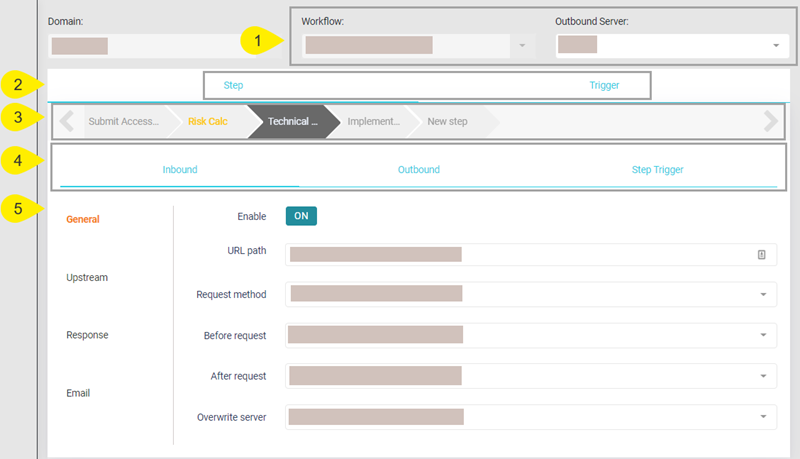
Select the following:
-
Workflow: The SecureChange workflow you want to integrate.
-
Outbound Server: The default outbound server to which WI should send the API requests. If you are integrating the workflow with multiple external systems, you can override this server when configuring the individual integration points.
-
-
Create an integration point:
- Select which type of integration point you want to create:
- Step
- Trigger
OR
-
Select the workflow trigger or the workflow step.
The workflow triggers include the following:
-
If you selected Step, select where to create the integration point from the following:
-
Inbound
-
Outbound
-
Step Trigger
-
-
In the General row, configure the following settings:
-
POST: Creates a request.
-
PUT:Updates a request.
-
GET:Retrieves data and adds it to the ticket. Only available for Inbound. -
In the Upstream
WI recognizes placeholders because they are wrapped with hashtags (#). WI tries to resolve all placeholders, but if it does not find the value for a given placeholder, it sends the JSON payload, including the hashtags, to the remote server.
-
If you are creating a step integration point that is inbound, in the
-
In the Email row, create an email template. This is the email that will be sent if you defined sending an email as an action in the Before request and After request fields in the General row. For more information on how to build an email template, click the Read More link.
- Go to the General row and toggle the Enable switch to On.
-
Repeat step 3, for each integration point you want to create.
-
Click Save.
The following page appears.

|
Trigger |
Description |
|---|---|
|
Autoclose |
Custom trigger activated when the ticket is closed, but has not reached the last step of the ticket. This usually happens when the rule is fully implemented. |
| Close | Ticket is closed. |
| Cancel | Ticket is canceled. |
| Reject | Ticket is rejected. |
| Redo | Ticket is sent back to the previous step in the workflow. |
| Reopen | Ticket is reopened. |
| Pre-assignment script |
Integration point is triggered before the step is assigned to a user. If you select this option, copy the following script to the Assignments tab of the relevant step in SecureChange: |
| Automation failed | An automatic step fails. |
|
Field |
Description |
|---|---|
| Trigger Type |
Only available for step triggers. Select the trigger for sending the API request to the external system. If the step trigger conflicts with the workflow trigger, WI sends the payload defined for the step trigger See step 3b for trigger descriptions. With automatic steps, you can only select Automation Failed as the step trigger. |
| URL path |
The URL to path to the external system If you do not want to send a request to an external system, leave this field empty. |
| Request method |
The REST API request type: If you do not want to send a request to an external system, leave this field empty. |
| Before request |
Select the actions that you want SecureChange to perform before the request is sent to the external system. You can also select actions to perform even if there is no request to send to the external system, such as sending an email or advancing to the next step. If you selected sending an email as a template, you will need to create an email template in the Email row (g in the image). |
| After request | Select the actions that you want SecureChange to perform after the request is sent to the external system. |
| Overwrite server |
If you want the payload to be sent to a different outbound server than the one you defined as the default outbound server, in step 2, select the server to which the API request should be sent. This is relevant if you are working with multiple external systems. |
For example:
{
"risk_results": "#risk_status#",
"ticket_number": "#Enter your request#",
Click the Read more link for more information on building the JSON template.
