On This Page
Adding a Worker Node - TufinOS
Overview
This procedure is for adding a worker node to an existing TOS Aurora cluster running on TufinOS. If you have not yet installed TOS Aurora, on the primary data node, start with the appropriate clean install procedure.
-
Clean Install of TOS Aurora/TufinOS 4.70 on a Tufin Appliance via USB
-
Clean Install of TOS Aurora/TufinOS 4.70 on a Tufin Appliance via iDRAC (Gen 4.5)
- Clean Install of TOS Aurora/TufinOS 4.70 on a Tufin Appliance via RMM (Gen 4)
-
Clean Install of TOS Aurora/TufinOS 4.70 on a Tufin Appliance via RMM (Gen 3.5)
-
Clean Install of TOS Aurora/TufinOS 4.70 on a VMWare ESXi Machine
For all other installation paths such as upgrade or other platforms, see the menu for the appropriate procedure.
You do not need to install TOS on the worker nodes.
Prerequisites
General Requirements
-
This procedure must be performed by an experienced Linux administrator with knowledge of network and storage configuration.
-
To ensure optimal performance and reliability, the required resources need to be allocated exclusively to TOS. If resources become unavailable, this will affect TOS performance. Do not oversubscribe resources.
-
Your primary data node must also be deployed on TufinOS.
-
You must know the resources you will need - CPU cores, RAM, disk space and the load-model parameter, provided by your account team based on the procedure Calculate resources - clean install.
-
(On-premises deployments only) The node's network IP must be on the same subnet as the cluster primary VIP.
-
Give the node a unique hostname in the cluster - use the command below, replacing <mynode> with your preferred name:
-
If you intend to use syslog, allocate a syslog VIP on the same subnet as your primary VIP.
- The Virtual Machine Operating System guest family must be Linux, and the operating system guest version must be RHEL 8.x
Tufin Appliance Requirements
-
Your appliance must be one of: T-820, T-1220, T-800, T-1200, T-1100, T-1100XL. For more information, see Tufin Appliance Lifecycle.
-
Complete the preliminary set up described in the quick-start guides: T-820/T-1220, T-800 / T-1200 or T1100XL / T-1100.
VMware Requirements
- The ESX host must be running VMware ESXi 6.5, 6.7, 7.0 or 8.0 only. ESXi 8.0 requires TufinOS 4.20 or later
- Disks:
- Select a storage type of SSD. Take into consideration that TOS requires 7,500 IOPS and the throughput expected will average 250MB/s with bursts of up to 700MB/s.
- Storage size of disk is determined by the sizing calculation. Minimum: 400 GB.
-
Secure boot must be disabled.
Downloads
This section is only relevant for VMWare. Tufin appliances come pre-installed with TufinOS. If you wan to update TufinOS to the latest version, see Update TufinOS 4.x to 4.70
-
Download the TufinOS 4.70 installation package from the Download Center.
- Extract the TufinOS image from its archive.
-
Verify the integrity of the TufinOS installation package.
[<ADMIN> ~]# sha256sum -c TufinOS-X.XX-XXXXXX-x86_64-Final.iso.sha256sha256sum -c TufinOS-X.XX-XXXXXX-x86_64-Final.iso.sha256[<ADMIN> ~]# sha256sum -c TufinOS-X.XX-XXXXXX-x86_64-Final.usb.img.sha256sha256sum -c TufinOS-X.XX-XXXXXX-x86_64-Final.usb.img.sha256The output should return OK
The downloaded files are in .tgz format <FILENAME>.tgz.
The run file name includes the release, version, build number, and type of installation.
TufinOS ISO file example: TufinOS-4.70-4368238-x86_64-Final.iso
TufinOS USB file example: TufinOS-4.70-4368238-x86_64-Final.usb.img
Procedure
Before you proceed, read and understand Prerequisites - this may prevent unexpected failures.
-
 VM only. Install TufinOS.
-
Place the TufinOS ISO image file on the datastore of vSphere. For local installation on a VMware machine, locate the extracted ISO image file.
-
Confirm that in your virtual machine settings, Boot Options is configured to use BIOS. If you are using EFI, the procedure will not work.
-
Edit the properties of the virtual CD/DVD drive, and do one of the following:
Using vSphere:
-
As Device Type select Datastore ISO file, and browse to the TufinOS ISO image.
-
Under Device Status, select Connect at power on.
Using a workstation:
-
Under Device Status, select Connect at power on.
-
Under Connection, select Use ISO image file, and browse to the TufinOS ISO image.
-
-
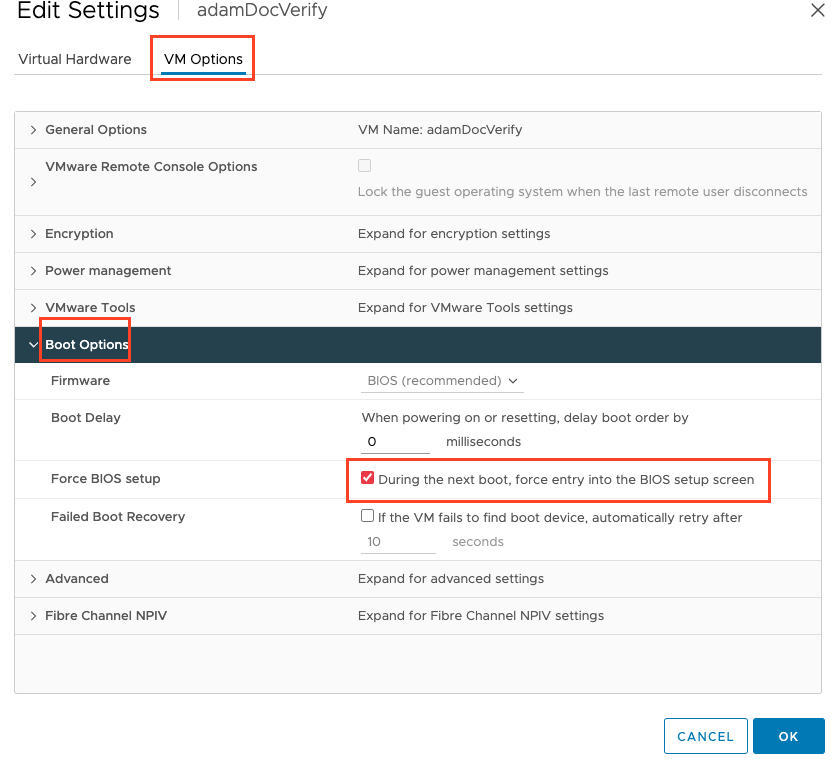
Set the VM to boot to BIOS configuration
Example using vSphere
- Navigate to VM settings > VM options.
- Check: During the next boot, force entry into the BIOS setup screen.
-
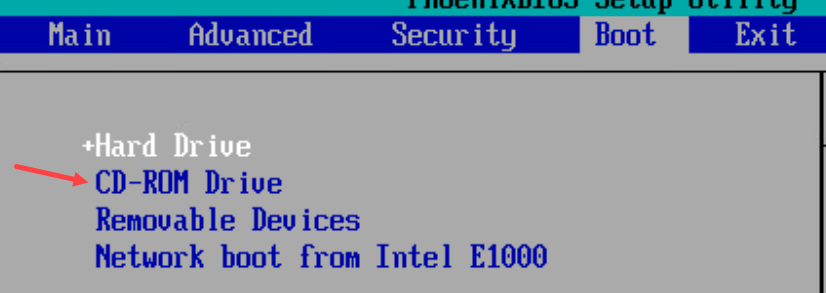
In BIOS > Boot, select CD-ROM Drive.
-
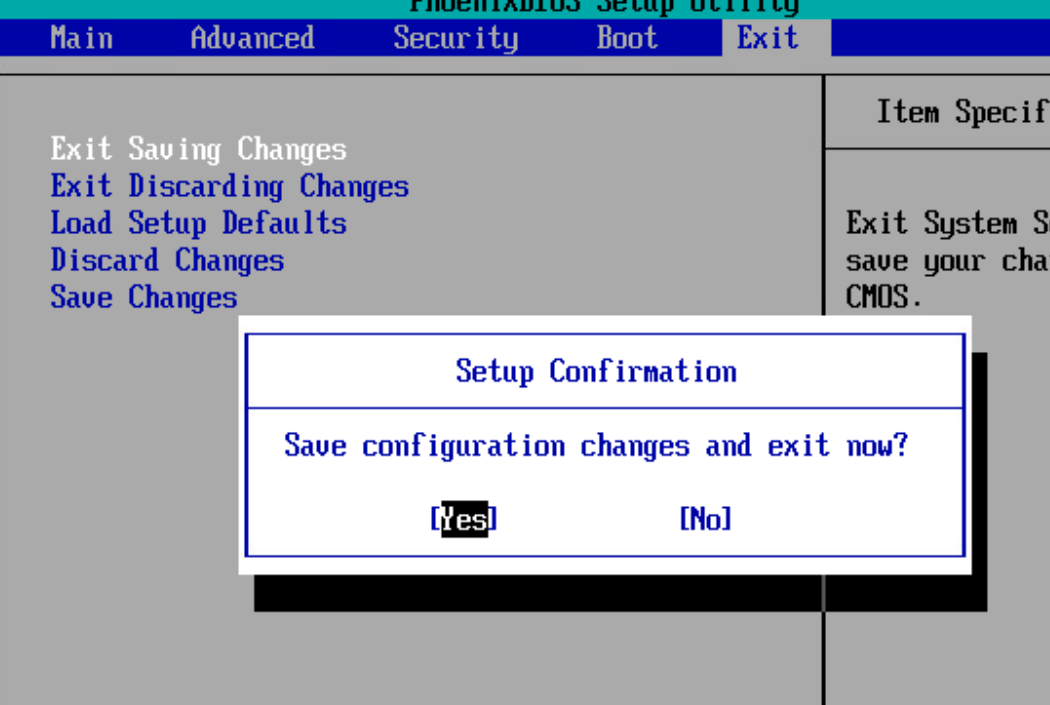
In BIOS > Exit, select Exit Saving Changes. Click Yes.
-
Save the settings.
- Restart the VM. TufinOS installation begins.
-
Select TufinOS 4.70 Installation for TOS Aurora.
-
When prompted, select Install TufinOS 4.70 for Worker Node:
-
When prompted, confirm and choose Yes.
-
When the installation is complete, reboot the virtual machine.
-
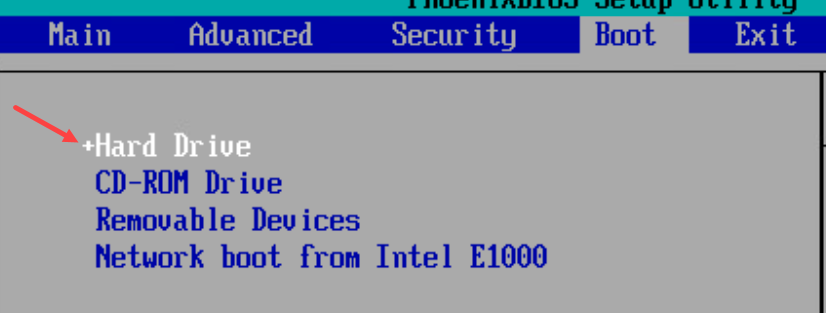
When BIOS launches, change the Boot option to Hard Drive.
-
In BIOS > Exit, select Exit Saving Changes. Click Yes.
-
Log in using the default admin user credentials:
username: tufin-admin
password: admin (you will be prompted to change this on first log in)
IP address: assigned by DHCP
-
-
Set up TufinOS.
-
If you want to reset the host name or IP of the machine, do so now. It cannot be done at a later stage. See Changing IP Address/Host Names.
-
Configure the server timezone.
where
<timezone>is in the format Area/Location. Examples: America/Jamaica, Hongkong, GMT, Europe/Prague.To view a list of the time-zone formats that can be used, run:
Ukraine only. Since the change in timezone name from Kiev to Kyiv, not all software products have been adjusted. We therefore recommend avoiding these names and instead using an alternative city in the same timezone such as Europe/Tallinn. -
Synchronize your machine time with a trusted NTP server. Follow the steps in Configuring NTP Using Chrony. In an HA deployment, all servers need to be synchronized to the same time.
-
Configure the IP address and DNS, where
<Interface Name>is the name of the interface you are using (for example, ens32). If you have several network interfaces, configure the first one. -
To assign a static IP address:
-
Run the command:
- Set IPv4 CONFIGURATION to Manual
- Set Addresses for the physical IP, together with the chosen subnet
- Set Gateway and DNS Servers to the IPs used by your organization
- Restart the network service.
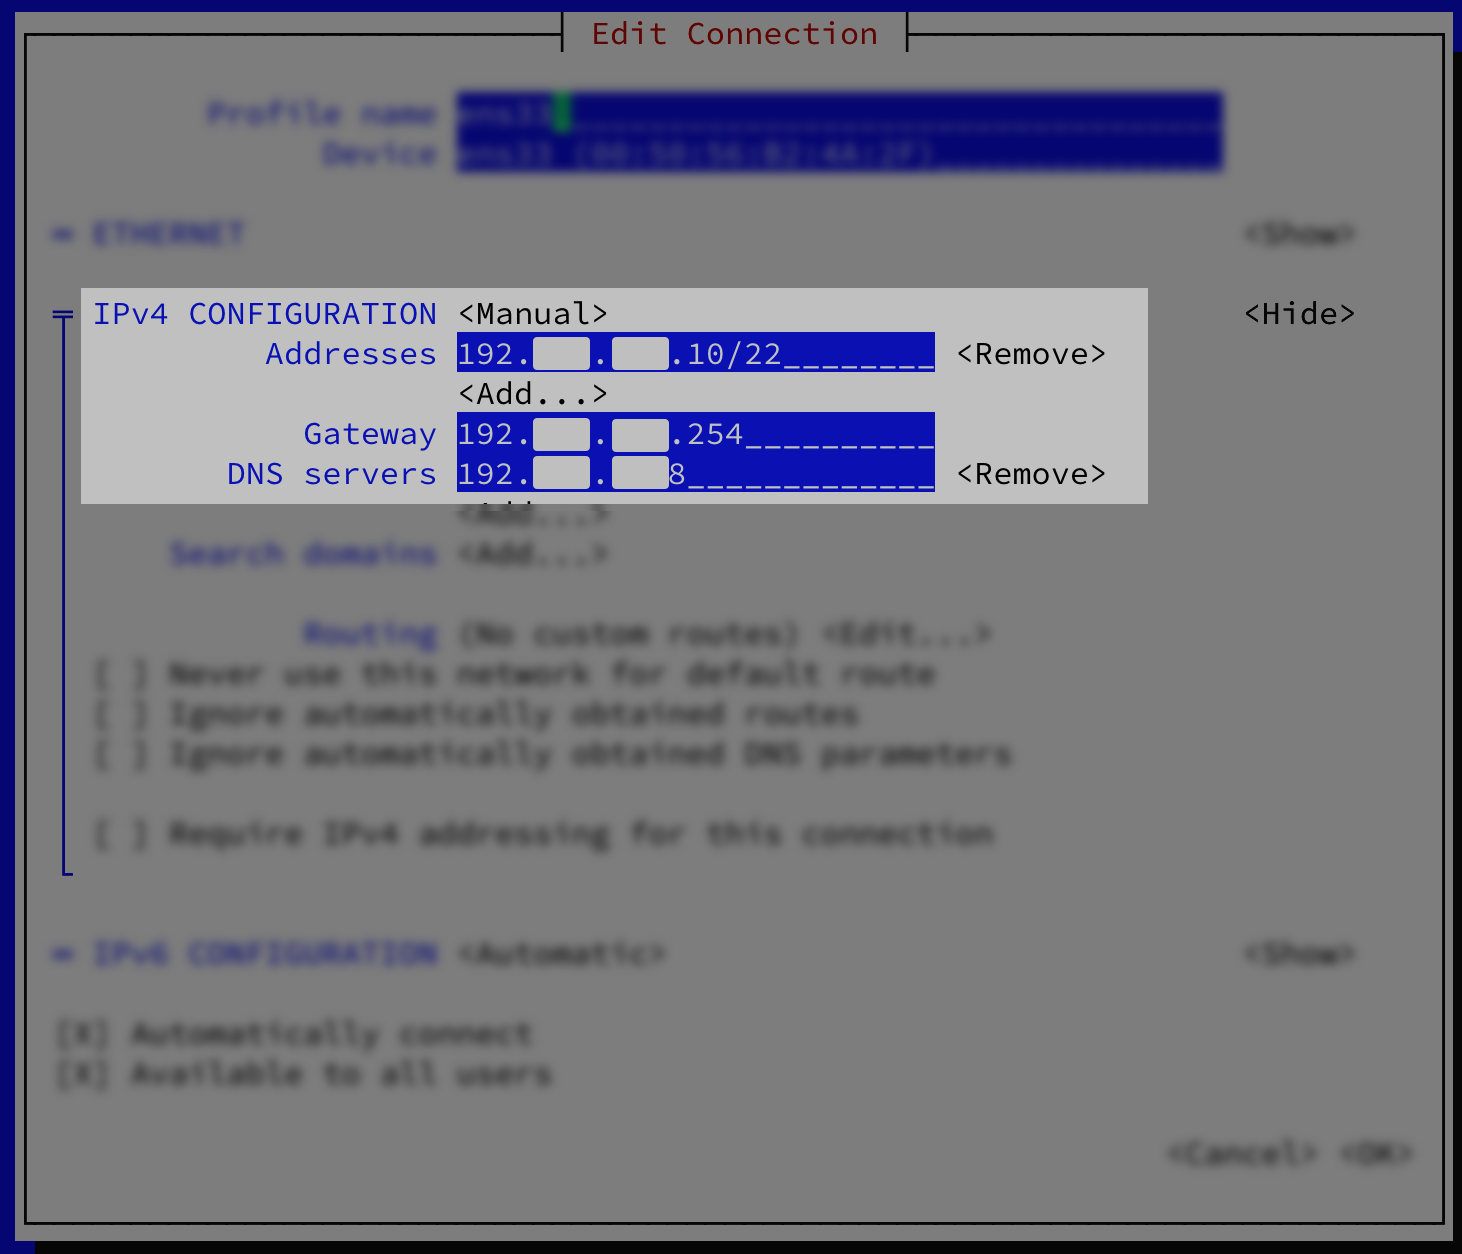
and set the following parameters in the window:
-
- Verify that the DNS server can resolve its own address using a reverse lookup
Run:
If the name of the server is displayed, the DNS server can resolve its own address using a reverse lookup.
Example Output
[<ADMIN> ~]$ sudo nslookup  1.2.3.4
4.3.2.1.in-addr.arpa	name=EXAMPLE.company.com
If the name of the server is not displayed, set it using a reverse lookup entry at /etc/hosts.
Example Output where
1.2.3.4 4.3.2.1.in-addr-arpawas added.[<ADMIN> ~]$ sudo cat /etc/hosts 127.0.0.1 localhost localhost.localdomain localhost4 localhost4.localdomain4 ::1 localhost6 localhost6.localdomain6 1.2.3.4 admin.company.com admin 2.3.4.5 5.4.3.2.in-addr-arpa
-
-
Add the node to the cluster.
-
Log in to the primary data node.
-
On the primary data node:
On completion, a new command string is displayed, which you will need to run on the new node within 30 minutes. If the allocated time expires, you will need to repeat the current step.
-
Copy the command string to the clipboard.
-
Log in to the new node.
- On the new node, paste the command string copied previously and run it. If the allocated time has expired, you will need to start from the beginning.
- Verify that the node was added by running sudo tos cluster node list on the primary data node.
-
-
Check the TOS status.
-
On the primary data node, check the TOS status.
-
In the output, check if the System Status is Ok and all the items listed under Components appear as Ok. If this is not the case, contact Tufin Support.
Example output for a central cluster data node:
[<ADMIN> ~]$ tos status
[Mar 28 13:42:09]  INFO Checking cluster health status
TOS Aurora
Tos Version: 24.2 (PRC1.1.0)

System Status: "Ok"

Cluster Status:
   Status: "Ok"
   Mode: "Multi Node"

Nodes
  Nodes:
  - ["node1"]
    Type: "Primary"
    Status: "Ok"
    Disk usage:
    - ["/opt"]
      Status: "Ok"
      Usage: 19%
  - ["node3"]
    Type: "Worker Node"
    Status: "Ok"
    Disk usage:
    - ["/opt"]
      Status: "Ok"
      Usage: 4%

registry
  Expiration ETA: 819 days
  Status: "Ok"

Infra
Databases:
- ["cassandra"]
  Status: "Ok"
- ["kafka"]
  Status: "Ok"
- ["mongodb"]
  Status: "Ok"
- ["mongodb_sc"]
  Status: "Ok"
- ["ongDb"]
  Status: "Ok"
- ["postgres"]
  Status: "Ok"
- ["postgres_sc"]
  Status: "Ok"

Application
Application Services Status OK
Running services 50/50

Remote Clusters
Number Of Remote Clusters: 2
  - ["RC"]
     Connectivity Status:: "OK:"
  - ["RC2"]
     Connectivity Status:: "OK"

  Backup Storage:
  Location: "Local
s3:http://minio.default.svc:9000/velerok8s/restic/default "
  Status: "Ok"
  Latest Backup: 2024-03-23 05:00:34 +0000 UTC
Example output for a remote cluster data node:
[<ADMIN> ~]$ tos status [Mar 28 13:42:09] INFO Checking cluster health status TOS Aurora Tos Version: 24.2 (PRC1.0.0) System Status: "Ok" Cluster Status: Status: "Ok" Mode: "Single Node" Nodes Nodes: - ["node2"] Type: "Primary" Status: "Ok" Disk usage: - ["/opt"] Status: "Ok" Usage: 19% registry Expiration ETA: 819 days Status: "Ok" Infra Databases: - ["mongodb"] Status: "Ok" - ["postgres"] Status: "Ok" Application Application Services Status OK Running services 16/16 Backup Storage: Location: "Local s3:http://minio.default.svc:9000/velerok8s/restic/default " Status: "Ok" Latest Backup: 2024-03-23 05:00:34 +0000 UTC -
After the node is added, we recommend stopping tos and then starting it to enhance the node's performance. This will require downtime.
