On this page
Implementing Connections with SecureChange
If you have a license for SecureChange, you can create a SecureChange ticket to implement the changes to the ticket that you made on a connection since the last time you created a SecureChange ticket. After you build the connections for your applications, you can create tickets to implement the connections on your firewalls directly from SecureApp. SecureApp enters the technical details of the connections into a SecureChange ticket so that the network and security teams know exactly what changes need to be made to the connections.
You can follow the progress of the tickets in SecureChange. After the tasks in the ticket are completed, the connection status indicates that the connection is connected properly. If the ticket is rejected, you can choose to revert the requested changes so that the SecureApp connections match the firewall rules, or you can resubmit the changes in a new ticket and modify the changes so that the ticket is not rejected.
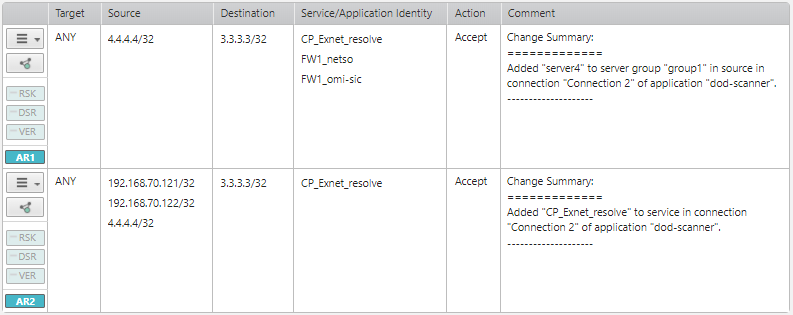
The Access Requests in the SecureChange tickets list the changes that were done on the connection since the previous ticket was created on the application. This can lead to situations where the Access Request does not look like the connection after the change was implemented (because the Access Request contains only the delta). To address this gap, and make the ticket more self-explanatory, each access request in the ticket also contains a comment explaining the context of the change.
For example, in the image below there are two access requests:
-
Add server 4 (4.4.4.4/32) to the server group group 1 in the source of Connection 2
-
Add CP_Exnet_resolve to the service in Connection 2
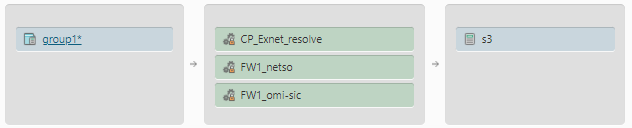
This is how the connection appears in SecureApp.
The Change Summary in the ticket comment explains the change, allowing you to better understand what was done.
Was this helpful?
Thank you!
We’d love your feedback
We really appreciate your feedback
Send this page to a colleague