On This Page
Overview
The Cloud Accounts screen displays the cloud service provider accounts SecureCloud is currently monitoring, and their credentials. The information is separated into Cloud Accounts and Credentials.
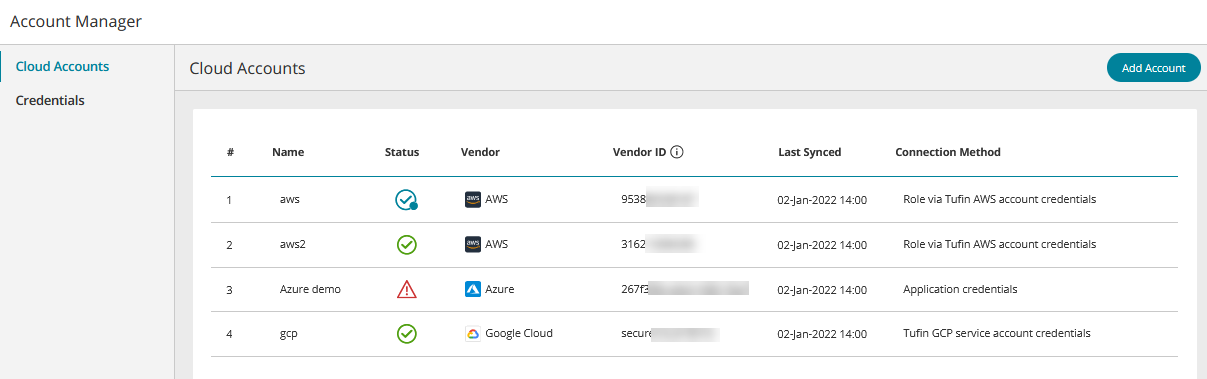
Each line under Accounts represents one cloud vendor account and displays account information with an indication of the status for that account. Status values are:
![]() Connected - the credentials are valid and all required permissions have been given
Connected - the credentials are valid and all required permissions have been given
![]() Connected with warnings - the credentials are valid but some or all permissions have not been given to SecureCloud and this will impair functionality.
Connected with warnings - the credentials are valid but some or all permissions have not been given to SecureCloud and this will impair functionality.
![]() Not connected due to errors - the credentials are invalid
Not connected due to errors - the credentials are invalid
If there are warnings or errors, more details can be seen by clicking on the icon. After you have corrected the credentials or given the required permissions, try again by syncing the account.
Click on the icon to view any errors or warnings
Each line under Credentials represents one set of user credentials that can assume a role to access one or more accounts under Accounts as an alternative to defining credentials at the account level.
You must define appropriate permissions in your cloud accounts to allow SecureCloud to monitor them. See AWS Permissions, Azure Permissions, Google Cloud Permissions.
What Can I Do Here?
- Add an AWS account
- Add an Azure account
- Add a Google Cloud account
- Remove an account
- Edit an account
- Sync an account
- Add a credential
- Remove a credential
- Edit a cross-account credential
- Change the account polling interval
Add an Amazon AWS Account to SecureCloud
The required account must already exist on the cloud environment and have the required permissions.
-
Make sure Cloud Accounts is selected in the menu.
-
Click Add Account. The Choose Vendor Window appears.
-
Select AWS.
-
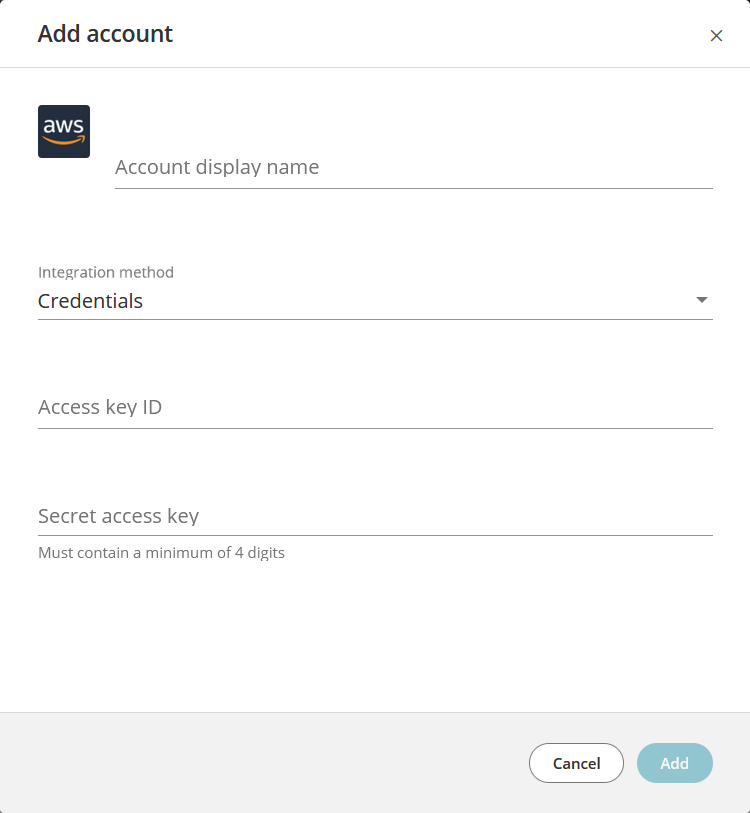
Enter Account Display Name. This is for your convenience only and can be any value you choose.
-
Set up the connection method.
There are three different ways you can give SecureCloud access to your AWS account:
- Use the credentials of a user in the account
- Give access to a user in another account via a role
- Give access to SecureCloud's own AWS account, via a role
To use the credentials of a user in the account:
- Select Integration Method = Credentials .
- Enter Access key ID and Secret Access Key for the designated user in your AWS account.
To give access to a user in another account via a role:
- Select Integration Method = Cross-Account Credentials
- Enter the ARN Role (Amazon Resource Name) of the designated role in the target account that can be assumed by an authorized user from your other AWS account. Example: arn:aws:iam::006755140343:role/AssumRoleAdmin.
- Enter the external ID if specified in the role permissions for the account that will use the role.
- Select the Credential Name of the account that will use the role. This must be first saved - see Add a Credential.
To give access to SecureCloud's own AWS account, via a role:
- Select Integration Method = Use Tufin Account.
- Enter the desired ARN Role Name. Example: arn:aws:iam::006755140343:role/AssumRoleAdmin.
- Enter the external ID if specified in the role permissions for the SecureCloud account.
- Click Add to save.
The account you have added will appear in the list of accounts with the appropriate connection status icon:
![]() Connected - the credentials are valid and all required permissions have been given
Connected - the credentials are valid and all required permissions have been given
![]() Connected with warnings - the credentials are valid but some or all permissions have not been given to SecureCloud and this will impair functionality.
Connected with warnings - the credentials are valid but some or all permissions have not been given to SecureCloud and this will impair functionality.
![]() Not connected due to errors - the credentials are invalid
Not connected due to errors - the credentials are invalid
If there are warnings or errors, more details can be seen by clicking on the icon. After you have corrected the credentials or given the required permissions, try again by syncing the account.
Add a Microsoft Azure Account to SecureCloud
The required subscription must already exist on the cloud environment and have the required permissions.
-
Make sure Cloud Accounts is selected in the menu.
-
Click Add Account. The Choose Vendor Window appears.
-
Select Azure.
-
Enter Account Display Name. This is for your convenience only and can be any value you choose

-
Set up the connection method
There are two different ways you can specify the credentials needed by SecureCloud to access your Azure subscription:
- Enter the application credentials
- Specify previously saved credentials
To enter the application credentials
- Select Connection Method = Credentials .
- Enter your Azure Subscription ID.
- Enter Tenant from your Azure active directory.
- Enter Application ID from your application registration.
- Enter Application Secret - a client secret from your application registration
To specify previously saved credentials:
- Select Connection Method = Cross-Account Credentials .
- Enter your Azure Subscription ID.
- Enter Tenant from your Azure active directory.
- Select the desired Credential Name from the credentials you have saved previously - see Add a Credential.
- Click Add to save.
The account you have added will appear in the list of accounts with the appropriate connection status icon:
![]() Connected - the credentials are valid and all required permissions have been given
Connected - the credentials are valid and all required permissions have been given
![]() Connected with warnings - the credentials are valid but some or all permissions have not been given to SecureCloud and this will impair functionality.
Connected with warnings - the credentials are valid but some or all permissions have not been given to SecureCloud and this will impair functionality.
![]() Not connected due to errors - the credentials are invalid
Not connected due to errors - the credentials are invalid
If there are warnings or errors, more details can be seen by clicking on the icon. After you have corrected the credentials or given the required permissions, try again by syncing the account.
Add a Google Cloud Account to SecureCloud
If your project is a shared VPC, i.e. a service project attached to a host project, you must repeat the steps below for both the service and host projects. Otherwise, SecureCloud will not have access to all the information in the VPC.
The required project must already exist on the cloud environment and have the required permissions. In the case of a shared VPC, this applies to both the service and host projects.
-
Make sure Cloud Accounts is selected in the menu.
-
Click Add Account. The Choose Vendor Window appears.
-
Select Google Cloud. The Add Account window appears.
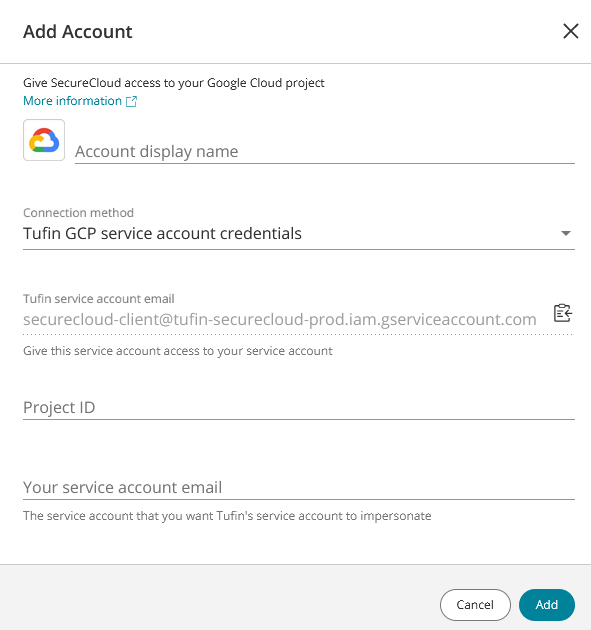
- Enter Account Display Name. This is for your convenience only and can be any value you choose.
-
Set up the connection method.
There are three different ways you can specify the credentials needed by SecureCloud to access to your Google Cloud account:
- Enter the credentials of your service account.
- Specify previously saved credentials of your service account.
- Give access to SecureCloud's own Google Cloud service account.
To enter the credentials of your service account :
- Select Connection Method = Service account credentials .
- Enter Project ID - the project name of your Google Cloud project.
- Select a json file on your device that contains the service account credentials.
To specify previously saved credentials of your service account:
- Select Connection Method = Saved service account credentials
- Enter Project ID - the project name of your Google Cloud project.
- Select the appropriate saved credentials from the list.
To give access to SecureCloud's own Google Cloud service account:
- Make sure you have allowed SecureCloud’s service account to access your service account as explained in permissions.
- Select Connection Method = Tufin GCP service account credentials
- Enter Project ID - the project name of your Google Cloud project.
- Enter your service account email - the full name of the service account you created in permissions.
- Click Add to save.
The account you have added will appear in the list of accounts with the appropriate connection status icon:
![]() Connected - the credentials are valid and all required permissions have been given
Connected - the credentials are valid and all required permissions have been given
![]() Connected with warnings - the credentials are valid but some or all permissions have not been given to SecureCloud and this will impair functionality.
Connected with warnings - the credentials are valid but some or all permissions have not been given to SecureCloud and this will impair functionality.
![]() Not connected due to errors - the credentials are invalid
Not connected due to errors - the credentials are invalid
If there are warnings or errors, more details can be seen by clicking on the icon. After you have corrected the credentials or given the required permissions, try again by syncing the account.
Remove an Account
- Click on options
 for the account you want to remove.
 - Select Remove account from the pop-up menu.
- The account will be removed from the display.
Edit an Account
- Click on the options button
 for the account you want to remove.
 - Select Edit Account from the pop-up menu.
- The Edit Account Window will be displayed. See Add an Account for more information.
- Make changes as necessary and click Save.
Sync an Account
The sync function brings up-to-date cloud environment information for a specific account into SecureCloud.
- Click on options for the accountyou want to sync.
- Select Sync account from the pop-up menu.
- The status tag icon on the account line will change to a syncing icon and once completed, the OK icon will be displayed. See Add an Account for more information.
Add a Credential
-
Make sure Credentials is selected in the menu.
-
Click Add Credentials. The Choose Vendor Window appears.
-
Select the vendor for which the account is to be added. The Add Credential Window is displayed.
- Enter Credentials Display Name. This is for convenience only and can be any value you choose.
-
Enter the remaining fields according to your vendor:
AWS
- Enter Access key ID and Secret Access Key for the designated user in your AWS account
Azure
- Enter Application ID - the application ID of your Azure application registration
- Enter Application Secret - a client secret from your application registration
Google Cloud
- Select a json file on your device that contains the service account credentials.
- Click Add to save.
Remove a Credential
- Click options for the credential you want to remove.
- Select Remove credentials from the pop-up menu.
- The credentials entry will be removed.
Edit a Credential
- Click options for the credential you want to change.
- Select Edit credentials from the pop-up menu.
- The Edit Credential Window will be displayed. See Add a Credential for more information.
- Make changes as necessary and click Save.
Change the Account Polling Interval
The account polling interval is the time between checking the status of your cloud accounts and receiving an updated picture of their assets.

This feature allows you to set the frequency at which SecureCloud syncs with your cloud vendor accounts.
- Click
 .
. - Select a polling frequency from the drop-down list
- Click Submit to save.
How Do I Get Here?
Main Menu > Account Manager
