On This Page
Monitoring Palo Alto Panorama Devices
Overview
TOS monitors Palo Alto Panorama devices for policy revision changes.
To see which TOS features are supported for your device, review the SecureTrack Features by Vendor.
To monitor a Palo Alto Panorama device (and its managed devices) in TOS, you must complete the following procedures:
-
Add the Palo Alto Panorama device to TOS.
-
Import the Device Groups (DGs) and devices managed by the Palo Alto Panorama device.
When you select the DGs and devices to be managed by the Palo Alto Panorama device, you can also select the Collect dynamic topology information option.
-
Edit the configuration of a managed Palo Alto Panorama firewall device, including enabling or disabling the option to Collect dynamic topology information.
If the device being added is an HA cluster of the managed firewall, TOS will only provision the changes to the active HA server.
Tufin enables you to configure Palo Alto Panorama Advanced Mode logging (see Configuring Panorama Logging for Provisioning New Rules).
Recommendations
-
TOS and the monitored devices must be synchronized with the correct date and time, either manually or automatically. We recommend that you also configure the devices to resolve DNS queries.
-
If you currently monitor your firewalls as standalone devices and you want to now monitor the firewall through the Palo Alto Panorama device that manages them, add the Palo Alto Panorama device and its firewalls as a new device and then disable your standalone firewalls (see Status). You can select the standalone devices from the device tree to see the historical device data. When the device data in the standalone firewalls is obsolete, you can remove the standalone firewall devices from TOS.
After you add a Panorama device for monitoring, you can see the list of policy templates on the Panorama and which devices use each template. To see this information, go to: Compare > select the Panorama device from the device tree > click the Panorama tab in the Policy pane > click the Templates tab > expand the Templates tree.
Panorama Prisma Access Policies
Prisma Access is managed by the Panorama device.
TOS supports Panorama Prisma Access Policies with these capabilities:
-
Policy Visibility: Compare Revisions, Rule Viewer, Reports (for Prisma Remote Networks and Mobile Users DGs only)
-
Automation: Access Request in non-topology mode, Clone Network Object Policy, Policy, Server Decommissioning, Rule Decommissioning, Rule Modification, Group Modification, Rule Recertification
-
Provisioning for Prisma Remote Networks and Mobile Users to all workflows (without commit and push).
Prerequisites
-
Create a user with the Superuser admin role for the Palo Alto Panorama device.
-
To support FQDN objects in SecureTrack, configure the relevant DNS on your Palo Alto Panorama device. For more information, refer to the Palo Alto documentation.
-
To monitor a Panorama with Prisma, TOS needs access to the following API functions:
-
https://api.prod.datapath.prismaaccess.com/getPrismaAccessIP/v2
-
https://api.lab.datapath.prismaaccess.com/getPrismaAccessIP/v2
-
Add a Device
-
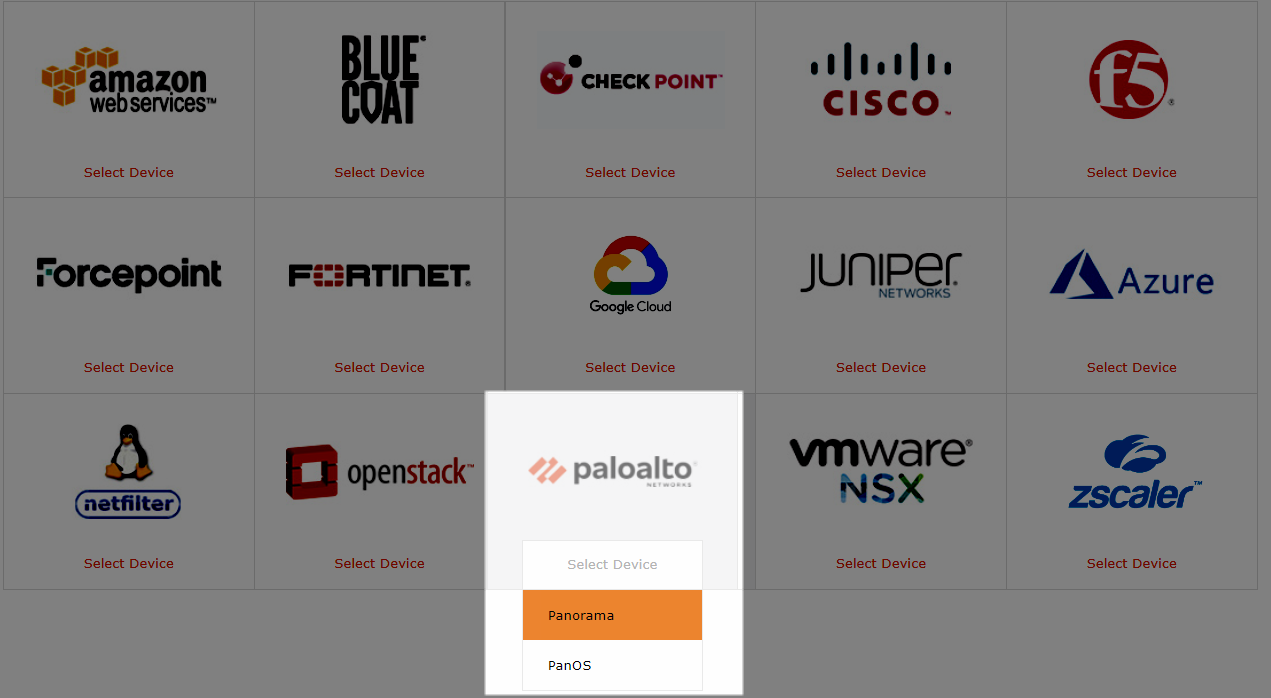
Select Palo Alto > Panorama:
-
Configure the device settings:
-
Name for Display
-
Domain: Available only if you have configured your system for managing multi-domains and All Domains is currently selected. Select the domain to which to add the device. The Domain can only be entered when adding a device; to change the Domain, you must migrate the device.
-
ST server: In a distributed deployment, select which TOS cluster monitors this device (not shown in image)
-
Get revisions from: One of the following:
-
IP Address: Revisions are retrieved automatically.
If your Panorama devices are configured for a High Availability deployment, enter the IP address of the primary (Active) Panorama server
-
Offline File: (If available) Revisions are manually uploaded to TOS for Offline Analysis
This option is disabled for Panorama devices.
-
Enable High Availability: Select this option if your Panorama devices are configured for a High Availability deployment with a primary (Active) and a secondary (Standby) Panorama server.
-
-
-
Click Next.
-
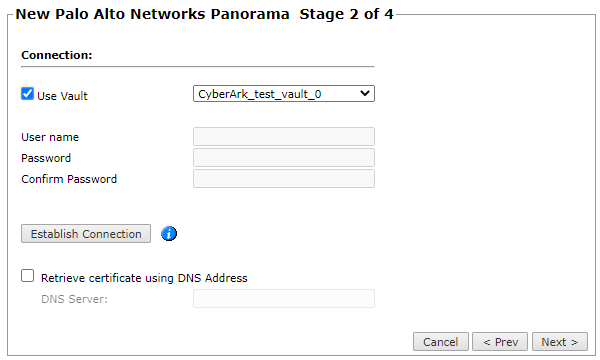
Configure the TOS connection to the Palo Alto Panorama device, according to the parameters required by the device. To use a vault server that contains access credentials, select Use Vault and select the server. For more information, see Configuring a Vault Server.
Enter the authentication details needed to connect to the Palo Alto Panorama device.
-
Click Establish Connection to retrieve the certificate.
This is mandatory if you selected Enable High Availability when you configured the device settings. -
Click Next.
-
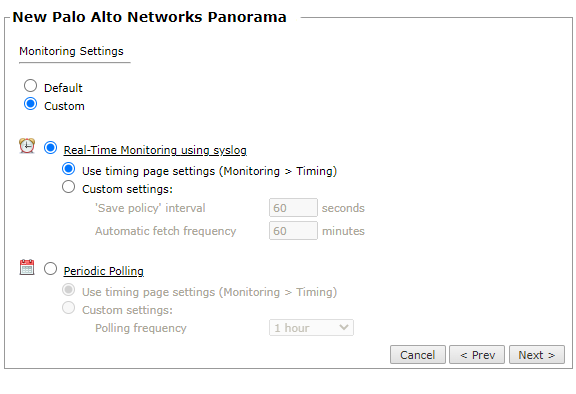
In Monitoring Settings, do one of the following:
- To use real-time monitoring and timing settings from the Timing page, select Default.
Otherwise, select Custom and configure the monitoring mode and settings.
-
Real-Time Monitoring: Applies only if syslogs (Configuring Devices to Send Logs) are configured. Select Custom settings and configure:
-
'Save policy' interval: When a Save Policy event is followed within this time interval by an Install Policy event for the same policy, TOS tries to combine the two events into a single revision. The default value is 60 seconds.
-
Automatic fetch frequency: Frequency (in minutes) for automatic fetch
-
-
Periodic Polling, select Custom settings and configure the Polling frequency: How often TOS fetches the configuration from each device.
If you select 1 day, you can then select the exact time (hour and minute) for the daily polling.
-
Click Next and then click Save.
The Palo Alto Panorama device now appears in the Monitored Devices tree.
-
To complete the configuration, do one of the following:
-
Click Done.
-
Click Import Managed Devices (or Import Administrative Domains and Managed Devices/Import Device Groups and Managed Devices if available), select all the managed devices to be added, and click Save or Import.
To import managed devices later, you can select the device and click Import Managed Devices (or Import Administrative Domains and Managed Devices/Import Device Groups and Managed Devices if available).
With HA clusters, standby devices are not imported. However, the serial ID of the standby devices are saved in the TOS database in case they are needed if the active cluster fails.
-
Add another device.

-
Topology options to collect routing information for building the network Map are configured when you import managed devices.
Configure a Monitored Device
After you add a device, further configuration options are available.
Options vary depending on your environment.
-
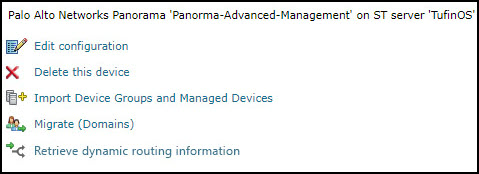
Edit configuration: Use the wizard to modify selected device settings. See Add a Device in this topic.
-
Delete this device: Type yes to confirm that you want to delete the device.
-
Migrate (ST servers): Available in distributed deployments. Select the server where the device will be monitored and click Migrate.
-
Migrate (Domains): Available in multi-domain deployments. Select the domain where the device will be monitored and click Migrate.
- Collect Dynamic Routing Information: Initiates retrieval of the dynamic routing information for all the firewalls managed by this device. You can manually change the collection configuration for each firewall later.
How Do I Get Here?
SecureTrack > Monitoring ![]() > Manage Devices
> Manage Devices


