On this page
View and Update a Change Window
Overview
During the configured change window, Tufin automatically commits the saved policies on the relevant firewalls. Each change window can be configured for multiple devices and a device can be configured in multiple change windows. The commit process only occurs for devices that are online, enabled, and running within the change window.
Support for automatic policy commit is provided for the following management systems/devices:
- Panorama Advanced mode (includes Device Groups at any level)
- FortiManager Advanced mode (ADOMs)
- Check Point R80.x CMA and MDS devices
When a change window runs, the latest policy version of each device is committed on the relevant firewalls:
- For a selected Device Group, the policy is installed on all the firewalls associated with that Device Group.
- For a selected management device–for example, a FortiManager device in Advanced mode–all of an ADOM's policies are installed on all the firewalls associated with that policy.
- For a selected CMA device, its policies are installed on all the firewalls associated with each policy.
Best practices
Change window creation date and recurrence
What can I see here?
What can I do here?
-
Configure a Change Window
-
Update a Change Window
Configure a change window for a firewall management console or specific device
-
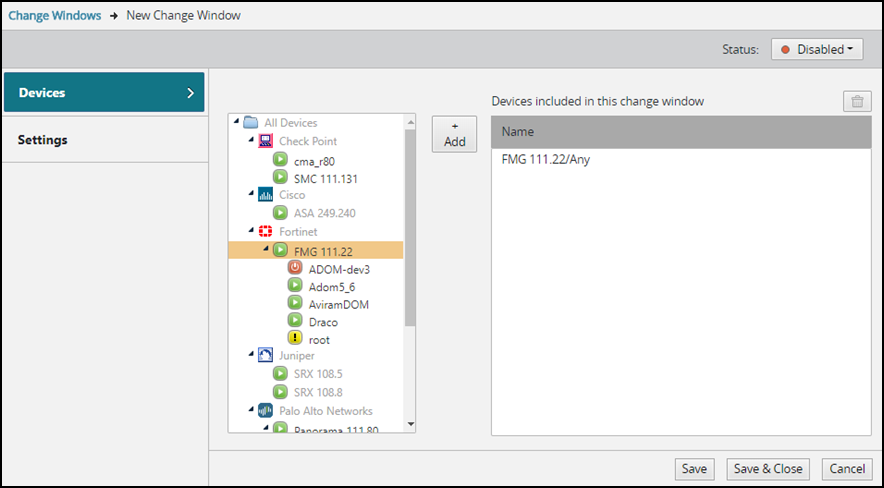
Select devices to add or remove them from a change window.
-
Configure the Settings for a change window - Title, Description, and Recurrence.
-
Configure the Status - Enable or Disable a change window.
Update a change window
-
In Devices, add or remove devices:
-
To add a device, select an available device for the Change Window and click
 to move it to the list of Devices included in this change window.
 -
To remove a device from the list of Devices included in this change window, select the device and click
 .
.
In MSSP mode, select a Domain and then add the relevant devices.
Use Ctrl + Shift to select multiple devices.
-
-
In Settings, configure the following parameters:
Change Window field
Description
Title
Mandatory text for the change window name
Description
Optional text
Recurrence
The change window will recur on the selected days of the week. A week is defined as Monday-Sunday.
Start time and End time
Recurrence: The day(s) of the week and time to start and end the change window execution
Day
The day(s) of the week to start or end the change window
Time
The time of day to start or end the change window
Start from
The starting date for the change window
Recur every_week(s)
Configure (in weeks) how frequently to run the change window
Time zone
Select the UTC time zone for the change window
Alerts Notification
Alerts are sent when the execution is completed and include a link to the SecureTrack report
Send when
Select Execution completed to enable email notifications
Alert severity
Select the severity for the alert: Low, Medium (default), High
Email addresses
Only SecureTrack users are allowed to access the link provided in the alert email
Only valid email addresses are accepted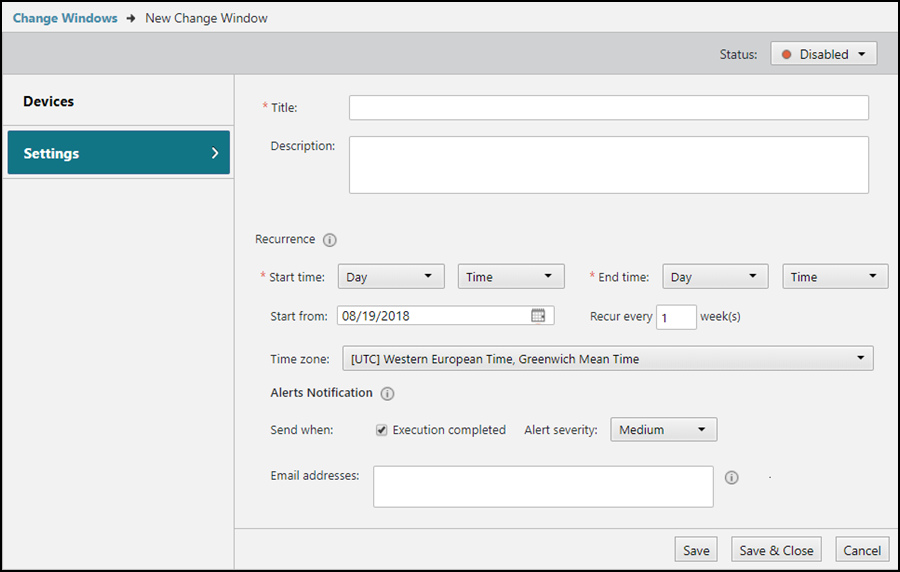
-
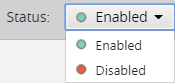
Status: Select Enabled or Disabled (default option) when you finish creating the new change window.
-
Enabled: The change window is active and will be executed at the relevant date and time
-
Disabled: The change window is not active and will not be executed
-
-
Click
 or
or  to save your changes.
The change window appears as a row in the Change Windows table.
How do I get here?
SecureTrack > Monitoring > Change Windows
Click New Change Window or click the title of an existing change window
Was this helpful?
Thank you!
We’d love your feedback
We really appreciate your feedback
Send this page to a colleague