On this page
Access Request Field
|
|
This topic is intended for SecureChange workflow owners, who are responsible for creating and maintaining workflows. |
Overview
When you configure workflow steps, the Display name and Description are the same for every step that the field is added to. All other settings apply only to the current step:
The source and destination IP addresses are validated when the request ticket is created.
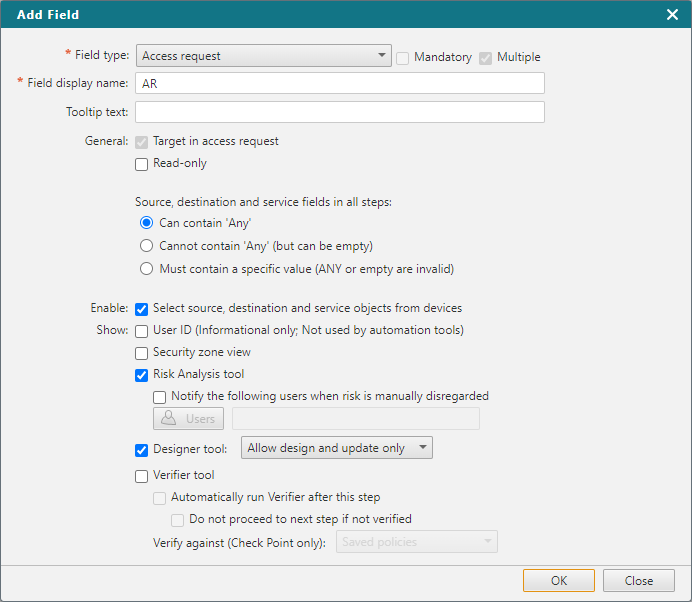
General
- Target in access request: Sets whether the Target column of the field is visible in this step.
- Read-only: The handler of this step can view the contents but not edit values of the field.
-
Source, destination and service fields in all steps:
- Can contain 'Any': Lets users enter ANY as a value in source, destination and service fields
- Cannot contain 'Any': Users cannot enter ANY as a value in source, destination and service fields, but users can leave the field blank for another user to enter a specific value
- Must contain a specific value Users cannot enter ANY as a value in source, destination and service fields and cannot leave the source, destination and service fields blank
Enable
- Select source, destination and service objects from devices: Enables using the Advanced Options to populate Source, Destination, and Service from firewall policy objects.
- Import access requests from other tickets: Enables searching for Access Requests in other tickets and importing them. This option is not supported for the Segregated Domains Multi-Domain mode.
Show
-
User ID Adds an additional Access Request field titled User, where you can add user names, in free-text, associated with this Access Request.
This field is informational only and is not used by automation tools. This field does not utilize the TOS User Identity functionality.
- Security zone view: View security zone information for the request's source and destination.
-
Risk Analysis tool: Opens the Risk Analysis tool, which shows the handler if the requested access violates corporate security policy configured in SecureTrack. This option is only available if the workflow has been configured to work with risk analysis.
In the properties of the step, you can set risk analysis to run as an auto step.
You can also select to Notify the following users when risk is manually disregarded. If a ticket is manually disregarded and then moved on despite existing risks, an email will be sent. To add a recipient, click Users and add SecureChange users from the list.
Designer tool: Lets the handler of the step use the Designer tool, which gives more precise recommendations for how to change a rulebase by using topology information and current rulebase data in SecureTrack. In the properties of the step, you can set the Designer to run as an auto step.
For each step for which you enable the Designer tool, you can allow the handler to:
- Allow all: Allow all Designer capabilities supported by this workflow.
- Allow design only: View the Designer recommendations for policy updates.
- Allow update only: Provision the Designer recommendations by saving the policy updates to devices. (For devices where Provisioning is supported)
- Allow commit only: Commit the current policy from the management device onto associated child firewall devices. (For management devices where Committing Changes is supported)
- Allow design and update only: Perform both design and update processes.
- Allow update and commit only: Perform both update and commit processes.
See SecureChange Features by Vendor for details of which devices are supported by Designer.
- Verifier tool - Lets the handler of the step use the Verifier tool, which shows the handler whether the request patterns in the field are implemented in actual device policies. In the properties of the step, you can set the Verifier to run as an auto step.
Verification
You can only configure these verification options if the Verifier tool (the option listed above) is selected.
-
Select Automatically run Verifier after this step to have SecureChange run the Verifier tool after you click Done, before moving to the next step.
-
Select Do not proceed to next step if not verified to not move to the next step until the request is either: successfully verified as implemented or not implemented but manually verified.
-
Verify against: For Check Point policies, select whether to verify how the changes were provisioned to the management devices.
-
Saved policies: Policies were changed as required.
-
Installed policies: Policies were changed as required and the changes were successfully installed on the relevant modules.
-
-
You can create a script to run when Designer fails in an auto step. The script can be configured to analyze the reason for the auto step failure and include a decision whether to advance to the next step based on the Designer error code and relevant criteria in the script.
How do I get here?
SecureChange > ![]() Workflows > Click the name of a workflow > Fields Tab > Add Field
Workflows > Click the name of a workflow > Fields Tab > Add Field
Was this helpful?
Thank you!
We’d love your feedback
We really appreciate your feedback
Send this page to a colleague