On this page
Monitoring Microsoft Azure
Overview
TOS monitors Microsoft Azure® Public Cloud and Azure Government for policy revision changes.
To monitor Azure, you must complete three setup tasks in the Azure portal:
- Register an app in Microsoft Entra ID
- Create a role (custom or existing)
- Assign the role to the app registration at the subscription or resource group level
To see which TOS features are supported for your device, review the SecureTrack Features by Vendor.
Classic rules are firewall rules that are configured directly on the device and are not part of Azure Firewall policies. These rules are not supported.
Adding Azure accounts
There are two ways to add Azure accounts:
-
Manually
Add every Azure account individually, as described here in Add a device.
-
Automatically
From 25-2 PHF1, you can configure a Cloud Organization and import its accounts according to a predefined schedule.
For detailed information, see Azure cloud organizations.
Account authentication
For TOS to authenticate with and monitor the Azure account, you need the account credentials. When adding a device, you can configure credentials in one of the following ways:
-
Associate with a predefined Cloud Organization
If you have configured Cloud Organizations, you can associate the device with the Cloud Organization and specify the required ID of the subscription to associate with the device.
-
Device-specific credentials
The credentials unique to the device such as the Subscription ID, Tenant ID, and the Client ID and Secret. See Add a Device.
Prerequisites
The following values and permissions are required to add a Microsoft Azure device in TOS:
Credentials
- Subscription ID: The ID of your Azure subscription. How to find it
- Directory ID (Tenant ID): The ID of your Azure Active Directory tenant. How to find it
- Application (Client) ID and App Secret: Both are generated when you register an app in Microsoft Entra ID. Registration and authentication steps
These tasks are required in Azure: Register an app, create a role, and assign the role.
Roles and permissions
Permissions in Azure are assigned through roles. You can either create a custom role to define the required permissions or use an existing role.
To create a custom role, see the Microsoft documentation: Create or update Azure custom roles.
When assigning the role, set the scope at the level of the subscription or resource group that you want TOS to monitor. Permissions set at a higher level (for example, subscription) are inherited by lower levels (for example, resource groups).
The customer role can be created in the Azure portal or using a JSON file.
{
    "id": "/subscriptions/d3d3ff27-93fa-41aa-93a2-84d311c7582e/providers/Microsoft.Authorization/roleDefinitions/b6b7e229-4bf3-4d17-ae31-cc594b52ab2c",
    "properties": {
        "roleName": "automation-devices-role",
        "description": "Aligned to Tufin KC 'Monitoring Microsoft Azure' (https://forum.tufin.com/support/kc/latest/Content/Suite/8705.htm)",
        "assignableScopes": [
            "/subscriptions/d3d3ff27-93fa-41aa-93a2-84d311c7582e"
        ],
        "permissions": [
            {
                "actions": [
                    "Microsoft.Resources/subscriptions/resourceGroups/read",
                    "Microsoft.Network/networkSecurityGroups/read",
                    "Microsoft.Network/virtualNetworks/read",
                    "Microsoft.Compute/virtualMachines/read",
                    "Microsoft.Network/networkInterfaces/read",
                    "Microsoft.Network/publicIPAddresses/read",
                    "Microsoft.Network/locations/operationResults/read",
                    "Microsoft.Network/virtualNetworkGateways/connections/read",
                    "Microsoft.Network/routeTables/read",
                    "Microsoft.Network/vpnGateways/read",
                    "Microsoft.Network/virtualNetworks/subnets/read",
                    "Microsoft.Network/virtualNetworks/virtualNetworkPeerings/read",
                    "Microsoft.Network/virtualNetworkGateways/read",
                    "Microsoft.Network/virtualNetworkGateways/getlearnedroutes/action",
                    "Microsoft.Network/localnetworkgateways/read",
                    "Microsoft.Network/connections/read",
                    "Microsoft.Network/vpnsites/read",
                    "Microsoft.Network/vpnGateways/vpnConnections/read",
                    "Microsoft.Network/loadBalancers/read",
                    "Microsoft.Compute/virtualMachineScaleSets/virtualMachines/networkInterfaces/ipConfigurations/read",
                    "Microsoft.Network/expressRouteCircuits/read",
                    "Microsoft.Network/expressRouteCircuits/peerings/read",
                    "Microsoft.Network/expressRouteCircuits/peerings/routeTables/read",
                    "Microsoft.Network/expressRouteGateways/read",
                    "Microsoft.Network/expressRouteGateways/expressRouteConnections/read",
                    "Microsoft.Network/virtualHubs/read",
                    "Microsoft.Network/virtualHubs/routingIntent/read",
                    "Microsoft.Network/virtualWans/read",
                    "Microsoft.Network/virtualHubs/hubRouteTables/read",
                    "Microsoft.Network/virtualHubs/effectiveRoutes/action",
                    "Microsoft.Network/virtualHubs/hubVirtualNetworkConnections/read",
                    "Microsoft.Network/virtualHubs/bgpConnections/read",
                    "Microsoft.Network/networkWatchers/read",
                    "Microsoft.Network/networkWatchers/flowLogs/read",
                    "Microsoft.Storage/storageAccounts/blobServices/containers/read",
                    "Microsoft.Network/networkSecurityGroups/securityRules/read",
                    "Microsoft.Network/networkSecurityGroups/securityRules/write",
                    "Microsoft.Network/applicationSecurityGroups/read",
                    "Microsoft.Management/managementGroups/read",
                    "Microsoft.Resources/subscriptions/read",
                    "Microsoft.Management/managementGroups/descendants/read",
                    "Microsoft.Network/ipGroups/read",
                    "Microsoft.Network/firewallPolicies/read",
                    "Microsoft.Network/azurefirewalls/read",
                    "Microsoft.Network/firewallPolicies/ruleCollectionGroups/read",
                    "Microsoft.OperationalInsights/workspaces/read",
                    "Microsoft.OperationalInsights/workspaces/query/read",
                    "Microsoft.Network/azureFirewalls/providers/Microsoft.Insights/DiagnosticSettings/Read"
                ],
                "notActions": [],
                "dataActions": [
                    "Microsoft.Storage/storageAccounts/blobServices/containers/blobs/read,"
                    "Microsoft.OperationalInsights/workspaces/tables/data/read"
                ],
                "notDataActions": []
            }
        ]
    }
}Microsoft.Storage/storageAccounts/blobServices/containers/blobs/read
Microsoft.OperationalInsights/workspaces/tables/data/readThese permissions should be added to the dataActions section.
General Azure monitoring
Use the following permission blocks based on the features you want to enable:
These permissions allow SecureTrack to collect details from key Azure components, including virtual networks (VNETs) and network security groups (NSGs), as well as virtual machines, interfaces, and subnets.
Microsoft.Resources/subscriptions/resourceGroups/read
Microsoft.Network/networkSecurityGroups/read
Microsoft.Network/virtualNetworks/read
Microsoft.Compute/virtualMachines/read
Microsoft.Network/networkInterfaces/read
Microsoft.Network/publicIPAddresses/read
Microsoft.Network/locations/operationResults/read
Microsoft.network/virtualnetworkgateways/connections/read
Microsoft.Network/routeTables/read
Microsoft.Network/vpnGateways/read
Microsoft.Network/virtualNetworks/subnets/read
Microsoft.Network/virtualNetworks/virtualNetworkPeerings/read
Microsoft.Network/applicationSecurityGroups/read
These permissions allow SecureTrack to retrieve network topology data used to build the network map and perform path analysis.
Microsoft.Network/virtualNetworkGateways/read
Microsoft.Network/virtualnetworkgateways/getlearnedroutes/action
Microsoft.Network/localnetworkgateways/read
Microsoft.Network/connections/read
Microsoft.Network/vpnsites/read
Microsoft.network/vpnGateways/vpnConnections/readMicrosoft.Network/loadBalancers/read
Microsoft.Compute/virtualMachineScaleSets/virtualMachines/networkInterfaces/ipConfigurations/readMicrosoft.Network/expressRouteCircuits/read
Microsoft.Network/expressRouteCircuits/peerings/read
Microsoft.Network/expressRouteCircuits/peerings/routeTables/read
Microsoft.Network/expressRouteGateways/read
Microsoft.Network/expressRouteGateways/expressRouteConnections/readMicrosoft.Network/virtualHubs/read
Microsoft.Network/virtualHubs/routingIntent/read
Microsoft.Network/virtualWans/read
Microsoft.Network/virtualHubs/hubRouteTables/read
Microsoft.Network/virtualHubs/effectiveRoutes/action
Microsoft.Network/virtualHubs/hubVirtualNetworkConnections/read
Microsoft.Network/virtualHubs/bgpConnections/readThese permissions enable SecureTrack to analyze flow log data and identify the last hit date for NSG rules and the objects used in those rules.
Azure firewall policy visibility and network troubleshooting
These permissions apply specifically to Azure Firewall and its related policy and diagnostic components.
These permissions enable SecureTrack to analyze flow log data and identify the last hit date for Azure Firewall policy rules.
VNet automatic import
When you add a device, you can enable Automatic Import for Virtual Networks (VNets) within a subscription. When enabled, SecureTrack automatically detects changes to the VNets (VNets which were added and deleted), and reflects them in the device list and revision history. Changes to the VNets are also reflected in the Map when a scheduled sync occurs or when you Sync the map.
With automatic import, VNets are imported at 10-minute intervals.
With Automatic Import enabled, devices that were deleted from Azure are automatically deleted from the list of devices in SecureTrack, and their history is no longer available. Therefore, if your continuous integration/continuous deployment (CI/CD) pipeline regenerates VNets, the history of the deleted VNet will not be available in the new replacement VNets. To retain revision data in SecureTrack for devices that have been deleted from your VNets, use manual import.
The maximum number of VNets for Automatic Import depends on your TOS deployment. For more information, contact Tufin Customer Support.
Add a device
Use the wizard to add a Microsoft Azure device so TOS can monitor it.
-
-
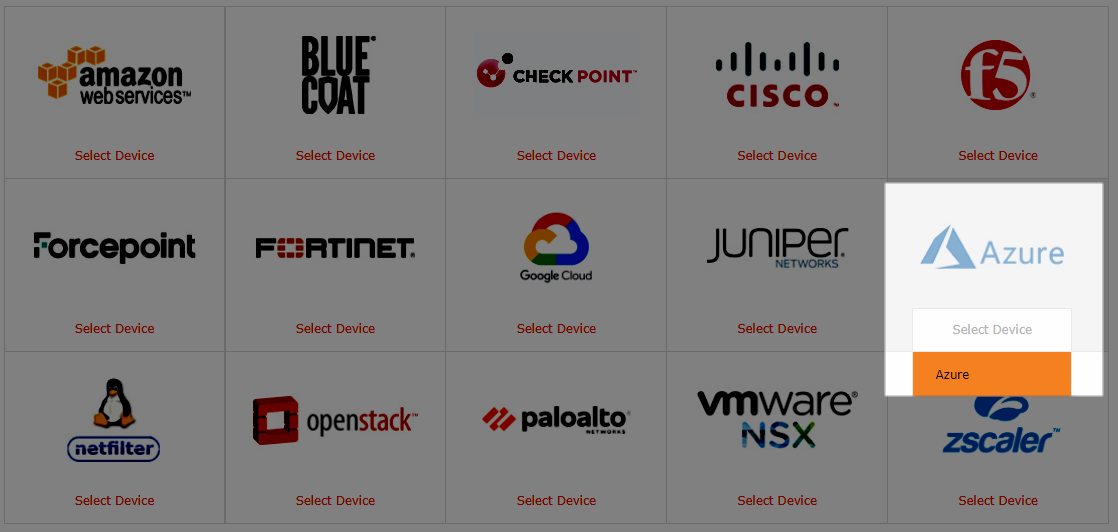
Do one of the following:
-
To add a device, select Azure > Azure Subscription.
-
To add a Cloud Organization, select Azure > Azure Tenant.
-
-
-
Configure the device settings:
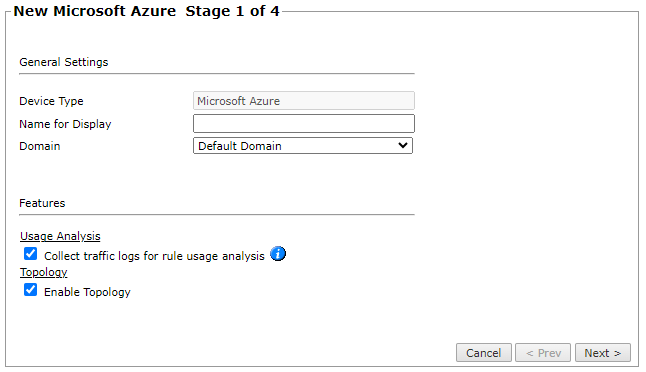
- General settings
-
Device Type: Microsoft Azure (filled automatically)
-
Name for Display
-
Domain: Available only if you have configured your system for managing multi-domains and All Domains is currently selected. Select the domain to which to add the device. The Domain can only be entered when adding a device; to change the Domain, you must migrate the device.
-
ST server: In a distributed deployment, the TOS cluster that monitors the parent device and its VNets.
-
-
Usage Analysis
-
Collect traffic logs for rule usage analysis: Supported for Azure Firewall and NSG.
-
Collect traffic logs for object usage analysis: Supported for NSG only.
Usage collection is not supported when Azure subscription is monitored on a remote collector.
-
Enable Rule Optimizer Recommendations: Supported for NSG only. Select to collect and save traffic usage data for Rule Optimizer recommendations.
Enabling Usage Analysis requires additional configuration in Azure. See Configuring Azure to Send Log Data to TOS. -
-
Topology
-
Enable Topology: Select to collect routing information for building the network Map.
Topology options for Advanced management mode are configured when you import managed devices.
-
-
VNet Import:
-
Automatic Import: To automatically detect new and deleted VNets in the Azure subscription, and reflect the updates in SecureTrack. VNets are automatically imported at 10-minute intervals.
-
Manual Import: Import VNets after you add the Azure device.
-
- General settings
-
Click Next.
-
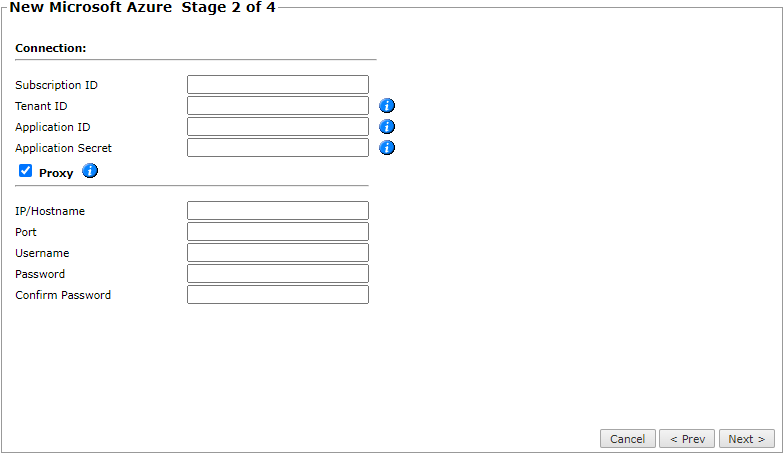
Configure the TOS connection to the Microsoft Azure device according to the parameters required by the device.
- Cloud Organization
-
Use Cloud Organization: Optional. Select to associate this device with a predefined Cloud Organization. When associated with a Cloud Organization, other connection mechanisms and credentials are automatically disabled.
-
Subscription ID: Mandatory when Use Cloud Organization is selected. The ID of the subscription to associate with the device.
-
-
Connection
Connection credentials, required if the device is not associated with a Cloud Organization.
See Prerequisites for details. -
For proxy connections, select Proxy and enter the HTTP or HTTPS proxy server details.
If the proxy performs TLS inspection, you must import the proxy’s trusted certificate into TOS before configuring the proxy. See Import a Proxy Certificate for TLS Inspection.
If the device is associated with a Cloud Organization, configure the proxy in Device Groups > Cloud Organizations, and edit the Cloud Organization Settings instead.
- Cloud Organization
-
Click Next.
-
Configure Monitoring Settings:
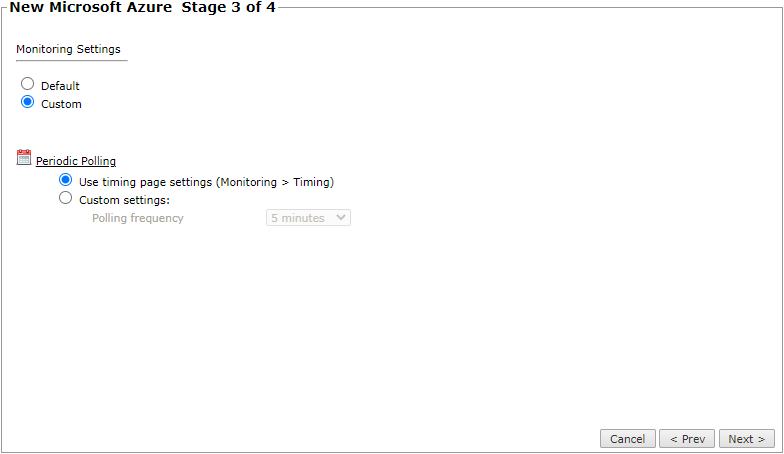
- To use timing settings from the Timing page, select Default.
-
To use custom monitoring, select Custom and
configure Periodic Polling for
SecureTrack to retrieve the
configuration from each device::
- To use the timing page settings, select Use timing page settings (Monitoring > Timing).
-
To define a custom interval, select
Custom settings and configure the
Polling frequency.
If you select 1 day, you can set the exact time (hour and minute) for daily polling.
-
Click Next and then click
Save to confirm the device
configuration settings.
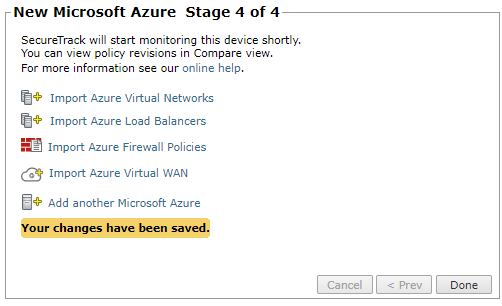
The Microsoft Azure device now appears in the Monitored Devices tree. -
Choose the next step:
-
Import Azure Virtual Networks
-
Import Azure Load Balancers
-
Import Azure Firewall Policies
-
Import Azure Virtual WAN
-
Add another Microsoft Azure
By default, Azure Virtual Networks (VNETs) without attached network interfaces (NICs) are not imported.
To allow importing VNETs without NICs, see Enabling import of Azure VNETs without NICs.
-
- Click Done.
Configure a monitored device
After you add a device, you can configure or manage it from the Monitored Devices tree. Options vary depending on your environment.
The following example shows configuration options for an Azure device. Options vary depending on the device type.
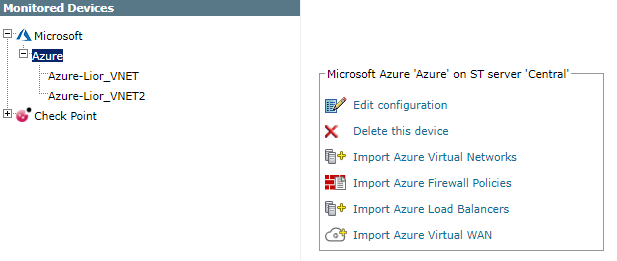
- Edit configuration: Open the wizard to modify device settings. See Add a Device.
- Delete this device: Type yes to confirm deletion.
- Import Azure Virtual Networks: Select the virtual networks to add.
- Import Azure Load Balancers: Select the load balancers to add.
- Import Azure Firewall Policies: Select the firewall policies to add.
- Import Azure Virtual WAN: Select the virtual WANs and virtual hubs to add.
Enabling import of Azure VNETs without NICs
Azure Virtual Networks (VNETs) without attached network interfaces (NICs) can be imported using a configuration flag.
By default, Azure VNETs without attached NICs are not imported.
To allow importing them, a one-time configuration command must be run. This setting applies globally to all Azure subscriptions and must be set on the central server and any remote collector that monitors Azure.
Once enabled, these VNETs appear in the import list and can be imported manually. There is no visual indication in the UI to distinguish them.
Run the following commands to enable this behavior.
Central server
Remote collector
Run this command on each remote collector that monitors Azure:
How do I get here?
SecureTrack > Monitoring ![]() > Manage Devices
> Manage Devices
Was this helpful?
Thank you!
We’d love your feedback
We really appreciate your feedback
Send this page to a colleague