On this page
T-900/T-1300 Quick Start Guide
Overview
The T-Series appliances are a Tufin-in-a-box solution that provides IT organizations with a quick, robust installation that lowers total cost of ownership.
Using distributed deployment architecture, Tufin’s T-Series appliances enable virtually unlimited scalability – multiple appliances can be connected on-demand at multiple sites, according to network needs. With enterprise-grade memory and SSD drives, the T-Series combines power and flexibility in several models to scale to the needs of mid-size to large enterprises and ensure optimal performance for your organization.
The T-900/T-1300 appliances come pre-installed with TufinOS and a TOS Aurora run file.
Shipping container contents
|
Item |
Description |
|---|---|
|
Appliance |
T-900/T-1300 appliance |
|
Cables |
2 power cables |
|
Documentation |
1 page document with a link to this Quick Start Guide Sticker with a link to unique iDRAC credentials |
|
Other hardware |
Rails Appliance front bezel |
Appliance hardware
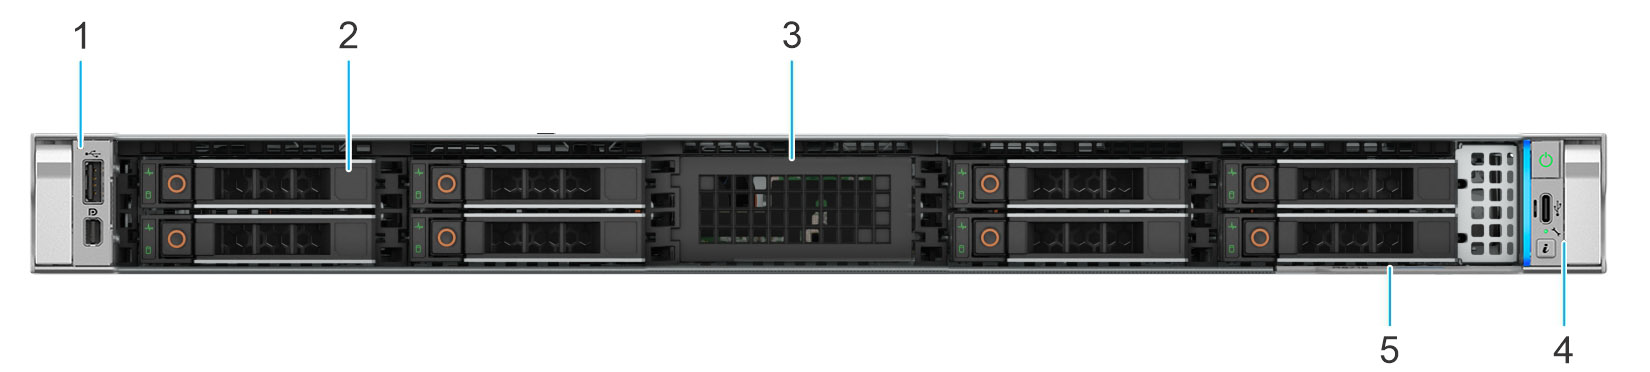
Front view of the appliance
|
Item |
Feature |
Description |
|---|---|---|
|
1 |
Left control panel (LCP) - Secondary |
Contains the USB port and Mini-Displayport |
|
2 |
2.5-inch drives |
Enables you to install drives that are supported on your system |
|
3 |
Drive blank |
Blank filler for the storage drive slot |
|
4 |
Right control panel (RCP) - Primary |
Contains the system health LED, system ID, power button, Type-C USB port, and the host status LED |
|
5 |
Express Service Tag | The Express Service Tag is a slide-out label panel that contains system information such as Service Tag, NIC, MAC address |
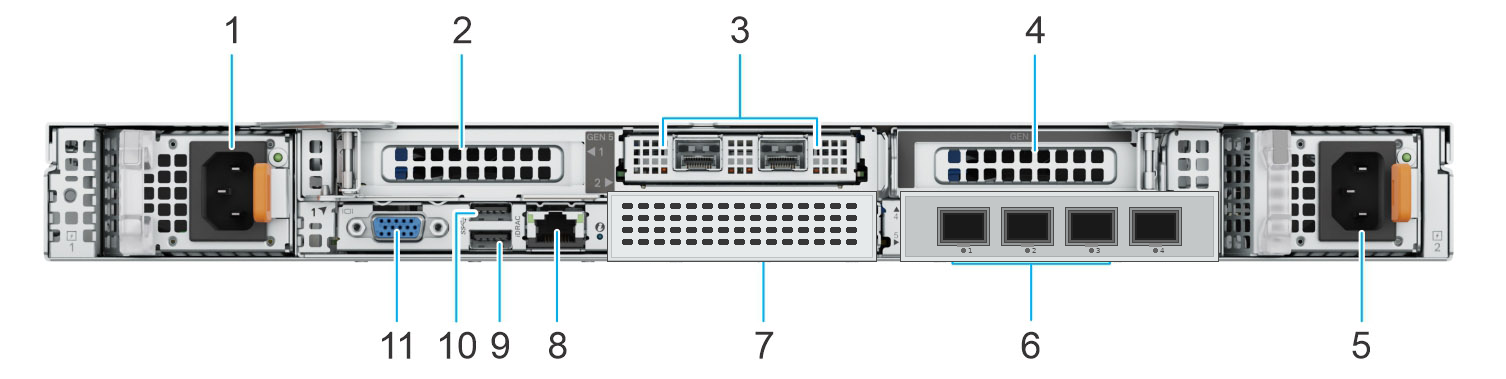
Rear view of the appliance
|
Item |
Feature |
Notes |
|---|---|---|
|
1 |
Power supply unit (PSU1) |
PSU1 is the primary power supply unit of the system |
|
2 |
PCIe expansion card riser blank |
Blank filler for the PCIe expansion riser slot |
|
3 |
PCIe expansion card riser OCP |
2 x 10GbE BASE‑T (T900: ens2fo-ens2f1, T1300: enP1s2f0-enP1s2f1) |
|
4 |
Blank filler for the PCIe expansion riser slot. |
Blank filler for the PCIe expansion riser slot |
|
5 |
Power supply unit (PSU2) |
PSU2 is the secondary power supply unit of the system |
|
6 |
OCP NIC card |
4 x 10/25GbE SFP28 (T900 & T1300: ens5f0np0, ens5f1np1, ens5f2np2 |
|
7 |
BOSS-N1 blank |
Blank filler for the BOSS-N1 module slot |
|
8 |
iDRAC dedicated port |
Enables you to remotely access iDRAC |
|
9 |
USB 3.0 port |
The USB port is 9-pin and 3.0-compliant. This port enables you to connect USB devices to the system |
|
10 |
USB 3.0 port |
The USB port is 9-pin and 3.0-compliant. This port enables you to connect USB devices to the system |
|
11 |
VGA port |
Enables you to connect a display device to the system. When connected, the system supports display resolutions of up to 1920×1080 at 60 Hz |
LED Light Indicators
See Status LED indicators in the Dell Installation and Service Manual for:
-
PowerEdge R470 (T-900)
-
PowerEdge R670 (T-1300)
Rack Installation
See the Dell rack installation guide.
Connect the appliance to the network
-
Connect the power cable.
-
Boot up the appliance by pressing the Power button on the front panel.
-
Connect the appliance to a KVM mouse and keyboard.
The start-up screen is displayed.
-
From the screen, press F10.
The System Setup screen appears.
-
If you intend to use remote access now or in the future, select iDRAC Settings. Otherwise select Device Settings.
-
Select User Configuration.
-
Change the IP address to your desired value. This must be done before you connect the appliance to the network. The IP address is required for iDRAC connectivity.
-
Connect the appliance to the network..
Configure remote access
After you connect your appliance to the network, you must configure the Integrated Dell Remote Access Controller (iDRAC) so that Dell can assist in resolving any hardware issues you report.
iDRAC is a remote server management controller that allows you to securely access your Tufin appliance from any location. It enables you to upgrade TufinOS or TOS on the appliance without having to physically access the server as well as deploy, manage, configure, and troubleshoot from any location.
Dell uses iDRAC to collect device information, which is required for hardware failures that fall under the appliance warranty.
Configure link redundancy on Tufin appliances
For appliances with two network connections, NIC bonding can be used to combine them into one virtual connection. This means that if one connection fails, the other can take over so the network keeps working.
However, this backup system will only works if one connection fails. If multiple connections fail at the same time, the link redundancy may not be successful.
Configure the network bond interface
This procedure describes configuring a network bond interface via nmtui.
-
Log in to the appliance and switch to the root environment using,
-
Determine the first two network interfaces for network bond. Connect via SSH to your machine and run:
/opt/tufinos/scripts/network_interface_by_pci_order.sh | grep "NET_IFS" | head -n2
/opt/tufinos/scripts/network_interface_by_pci_order.sh | grep "NET_IFS" | head -n1
The names of the existing interfaces are displayed. Note the names of the interfaces as you will need them for the procedure.
Disconnect from the SSH connection and continue with the procedure via RMM or a monitor connected to TTY.
Do not attempt to perform the rest of the procedure with SSH. Once the configuration is applied, you will lose connectivity to the machine.
-
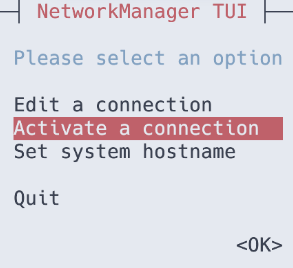
Start
nmtui.The NetworkManager TUI screen appears.
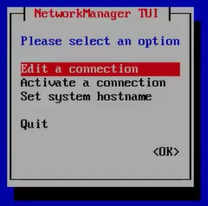
-
Select Edit a connection, and press Ok.
-
Press Add.
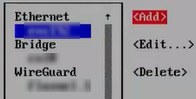
-
From the list of connection types, select Bond and press Enter.
The Edit Connection screen appears.
-
Enter:
Profile name: <meaningful profile name, for example:
bond0>Device: <port's device name>
-
Add ports to the bond to be created:
-
From the list to the left of the Slaves box, select Add.
-
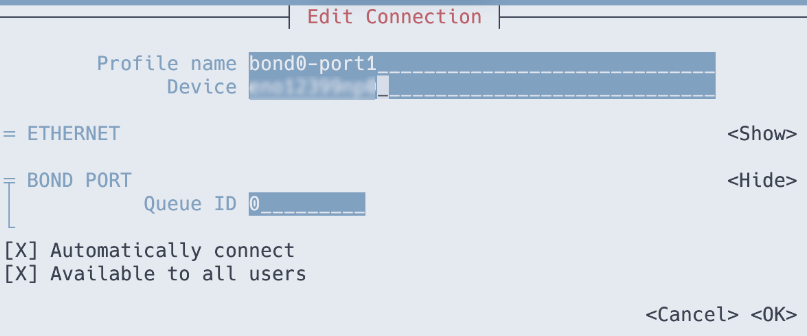
From the New Connection dialog box, select Ethernet as the connection type.
The Edit Connection screen appears.
-
Enter:
Profile name: <meaningful profile name, for example: bond0-port1>
Device: <the name of your first network interface that you wrote down in the Prerequisites>
-
Press OK to return to the window with the bond settings.
-
Repeat steps a-d to add the second port, with the following details:
Profile name: <meaningful profile name, for example:
bond0-port2>Device:<the name of your second network interface that you wrote down at the beginning of the procedure>
-
-
Set the bond properties:
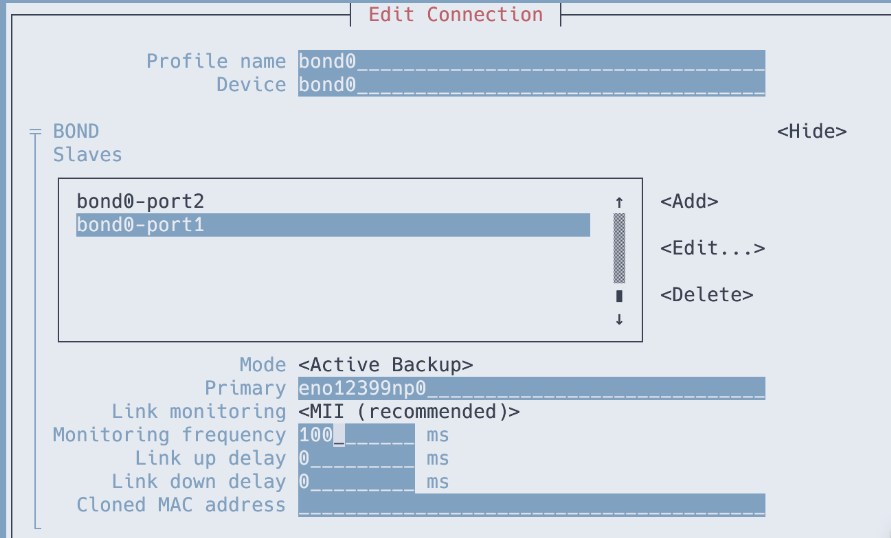
Mode: Active Backup
Primary: <name of first network interface>
Link Monitoring: MII (recommended)
Monitoring frequency: 100 ms
Link up delay: 0 ms
Link down delay: 0 ms
-
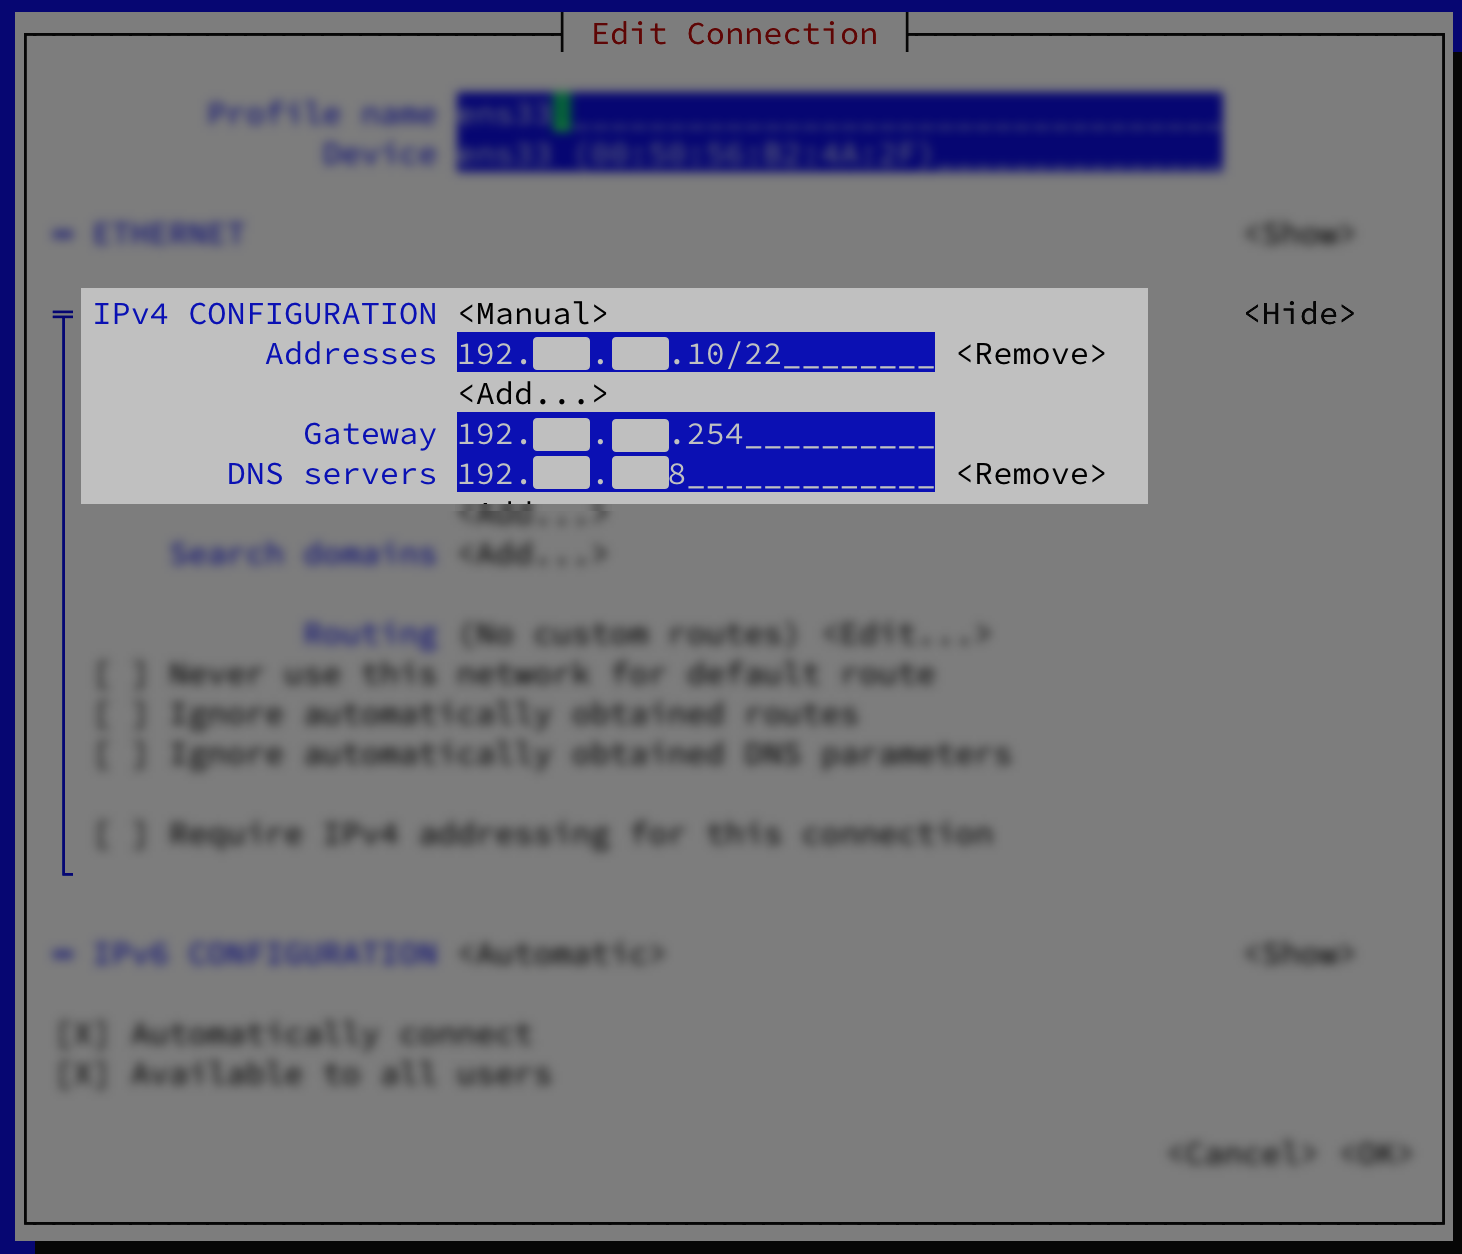
Configure the IP address settings in the IPv4 CONFIGURATION.
-
Select Manual and Show.

The Manual configuration options appear.
-
Configure according to your network requirements.
-
-
Press OK to create.
The new connection is activated.
-
Press Back to return to the main menu.
-
Deactivate the first network connection:
-
Select Activate a Connection.
-
Select the first network interface that supplied the machine connectivity, press the right arrow button, and press Deactivate.
-
-
Make sure the bond0 interface is activated. It should have the (*) character before the name.
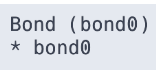
Activate the bond0 interface if it is not activated.
-
Press Back to return to the main menu.
-
Select Quit to close the nmtui application.
Verify link redundancy
-
Temporarily remove the network cable from one of the network devices and check if the other device in the bond handles the traffic.
Note that software utilities are not the proper way to test link failure events. Tools that deactivate connections, such as nmcli, show only the bonding driver’s ability to handle port configuration changes and not actual link failure events.
-
Display the status of the bond:
Output example
Ethernet Channel Bonding Driver: v3.7.1 (April 27, 2011)
Bonding Mode: fault-tolerance (active-backup)
Primary Slave: eno12399np0 (primary_reselect always)
Currently Active Slave: eno12399np0
MII Status: up
MII Polling Interval (ms): 100
Up Delay (ms): 0
Down Delay (ms): 0
Peer Notification Delay (ms): 0

Slave Interface: eno12409np1
MII Status: down
Speed: Unknown
Duplex: Unknown
Link Failure Count: 0
Permanent HW addr: 04:32:01:46:eb:e1
Slave queue ID: 0

Slave Interface: eno12399np0
MII Status: up
Speed: 1000 Mbps
Duplex: full
Link Failure Count: 0
Permanent HW addr: 04:32:01:46:eb:e0
Slave queue ID: 0
Update BIOS and iDRAC firmware
There are no BIOS updates for T-900 and T-1300 appliances.
Log in to the appliance
-
Connect via SSH to the IP address of the first network interface (if you have not changed it, use: 192.168.1.100).
-
Log in as tufin-admin with password admin.
On the first login, you will be prompted to change the default “admin” password. Do so now.
Check for TufinOS updates
Check the TufinOS 4 release history. If there is a newer version, update TufinOS.
Update TufinOS
-
Run the tmux command.
-
On the target machine, switch to the root user
-
Go to /opt/misc.
-
Go to the Download Center and select TufinOS 4.80.
Select how you want to download the installation package: Download to Computer or Copy link.
-
If you copied the link, run the following command within ten minutes:
Where <LINK> is the link you copied from the Download Center.
Make sure the server has permissions to download from https://tosportaldownloads.tufin.com.
-
If you downloaded to the computer, copy the compressed file from your local computer to the server.
-
Extract the run file from the archive.
The run file name includes the release, version, build number, and type of installation.
TufinOS update file example: TufinOS-4.40-639387-x86_64-8.8-Final-Update.run.tgz
-
Verify the integrity of the TufinOS installation package.
[<ADMIN> ~]# sha256sum -c TufinOS-X.XX-XXXXXX-x86_64-Final-Update.sha256sha256sum -c TufinOS-X.XX-XXXXXX-x86_64-Final-Update.sha256The output should return OK
-
Execute the TufinOS update file:
-
When prompted to continue the update, enter yes.
Do not interrupt the update process. Wait until the successful completion message appears.
-
After the update is complete, reboot the node:
-
Log in to the primary data node.
Set up the Appliance
-
Give the node a unique name in the cluster
-
If you want to reset the host name or IP of the machine, do so now. It cannot be done at a later stage. See Changing IP Address/Host Names.
-
If you want to configure NIC bonding, do so now. It cannot be done at a later stage. See Link Redundancy on Tufin Appliances.
-
Configure the server timezone.
where
<timezone>is in the format Area/Location. Examples: America/Jamaica, Hongkong, GMT, Europe/Prague.To view a list of the time-zone formats that can be used, run:
Ukraine only. Since the change in timezone name from Kiev to Kyiv, not all software products have been adjusted. We therefore recommend avoiding these names and instead using an alternative city in the same timezone such as Europe/Tallinn. -
Synchronize your machine time with a trusted NTP server. Follow the steps in Configuring NTP Using Chrony. In an HA deployment, all servers need to be synchronized to the same time.
-
Configure the IP address and DNS, where
<Interface Name>is the name of the interface you are using (for example, ens32). If you have several network interfaces, configure the first one. -
To assign a static IP address:
-
Run the command:
- Set IPv4 CONFIGURATION to Manual
- Set Addresses for the physical IP, together with the chosen subnet
- Set Gateway and DNS Servers to the IPs used by your organization
- Restart the network service.
and set the following parameters in the window:
-
-
 Verify that the DNS server can resolve its own address using a reverse lookup
Run:
If the name of the server appears, the DNS server can resolve its own address using a reverse lookup.
Example Output
[<ADMIN> ~]$ sudo nslookup  1.2.3.4
4.3.2.1.in-addr.arpa	name=EXAMPLE.company.com
If the name of the server does not appear, set it using a reverse lookup entry at /etc/hosts.
Example Output where
1.2.3.4 4.3.2.1.in-addr-arpawas added.[<ADMIN> ~]$ sudo cat /etc/hosts 127.0.0.1 localhost localhost.localdomain localhost4 localhost4.localdomain4 ::1 localhost6 localhost6.localdomain6 1.2.3.4 admin.company.com admin 2.3.4.5 5.4.3.2.in-addr-arpa
Install TOS
You can install the TOS version included with the appliance, or download the latest version from the customer portal.
We recommend downloading the latest version.
For the full procedure, see Install TOS.
Upgrade TOS
If you need to update TOS to a later version after it has been installed, see Update TOS.
Was this helpful?
Thank you!
We’d love your feedback
We really appreciate your feedback
Send this page to a colleague