On This Page
Clean Install of TOS Aurora on a Non-TufinOS Server
Overview
This procedure is for the clean installation of TOS Aurora on a server running RHEL, or Rocky Linux.
To add a node to an existing cluster, start with multi-node cluster. For all other installation and upgrade options, see Installing and Upgrading.
TOS Aurora is deployed together with Kubernetes.
Tufin Orchestration Suite (TOS Aurora) includes SecureTrack, SecureChange and SecureApp. You will specify the applications you want to enable, when you run the install command.
After the installation you will have created a single data node TOS cluster to which you can add additional worker nodes. This node is the primary data node, and there is no need to install TOS on any additional nodes. Worker nodes require an operating system only
High Availability (HA)
TOS Aurora can be set up to run as a high availability environment using three servers (nodes).
Distributed Deployment Using Remote Collectors
TOS Aurora can be set up to run as a distributed architecture using remote collectors (RC's).
The current procedure is meant for installing on both central and remote collector clusters. For more information, see remote collectors.
Prerequisites
General Requirements
-
This procedure must be performed by an experienced Linux administrator with knowledge of network configuration.
-
If you have made a previous unsuccessful attempt to install TOS Aurora, you must uninstall and reboot before reinstalling (see Uninstalling TOS)
- You cannot use IP Tables with TOS Aurora. In addition, all IP Tables rules will be flushed when installing.
-
Your servers must have sufficient CPUs, disk storage and main memory for TOS Aurora to work effectively. The resources required can be categorized by system size.
To evaluate the size of system you need, see Sizing Calculation for a Clean Install.
-
Once TOS Aurora has been installed, changing the host name or IP address will require reinstalling - see Changing IP Address/Host Names. If you want to change the host name of the node, do so before running the
tos installcommand.If you need assistance, consult with your sales engineer or Tufin support.
-
Tufin Orchestration Suite should be treated as high-risk security resource, similar to how you would treat any LDAP product (for example, Active Directory). Therefore, you should only install Tufin Orchestration Suite in an appropriately secured network and physical location, and only authorized users should be granted access to TOS products and the operating system on the server.
-
-
For PGA, if you are using NFS your backup server needs to be running NFS 4.
From PHF1.0.0 and later, if you are running NFS 3 on your backup server it will not work because of a security vulnerability. If you want to ignore the security vulnerability to enable NFS 3, you need to run the following commands on all TOS servers that are using TufinOS 4.20 and later:
-
The TOS installation removes all TOS files, directories and backups left on the machine from old deployments. If you have any files you want to keep, move them to a safe external location before starting this procedure.
-
See the Important Installation Information in the R24-2 Release Notes.
Operating System Requirements
-
Host: Physical server / VMware ESXi 6.5, 6.7, 7.0 or 8.0, vSphere
-
OS distribution:
-
Red Hat Enterprise Linux 8.6, 8.8, 8.9, or 8.10
-
Rocky Linux 8.6, 8.8, 8.9, or 8.10
-
-
Disks: Select a storage type of SSD. Take into consideration that TOS requires 7,500 IOPS and the throughput expected will average 250MB/s with bursts of up to 700MB/s.
-
Language: en-US
-
You will need to configure three partitions: /opt, /tmp and /var
Minimum Partition Sizes /opt/
(Small)*
/opt/
(Medium)*
/opt/
(Large)*
/tmp/
/var/
etcd
Central cluster / remote cluster primary data node / HA data nodes 80 GB 170 GB 370 GB 25 GB 200GB 128 GB Worker node (central and remote clusters) 70 GB 70 GB 70 GB 25 GB 60 GB N/A *Small, medium and large refer to the load model parameter provided by your account team.
We recommend allocating /opt partition all remaining disk space after you have partitioned the other directories.
For assistance with disk partitioning, see Increasing the Partition Size on a Virtual Machine.
-
The kernel must be up-to-date
-
SELinux must be disabled
-
rsync, wireguard and screen must be installed for transferring data, in-cluster encryption and launching shell sessions respectively
-
Required modules must get loaded using a configuration file
/etc/modules-load.d/tufin.confcontaining entries: -
Permanent kernel parameters must be set. For example, using a configuration file
/etc/sysctl.d/tufin.confcontaining entries: -
Network configurations for your interface must be set to manual IPv4 with gateway and DNS Servers set to the IPs used by your organization.
The system will use a reverse DNS lookup (PTR record) to resolve the DNS IP addresses with the domain name during the TOS installation. Therefore you have to add these PTR records to the DNS server. If you do not, the TOS installation will fail. -
You must have permissions to execute TOS CLI commands located in directory
/usr/local/bin/tosand to use sudo if necessary. -
To run TOS CLI commands without specifying the full path (
/usr/local/bin/tos), your environment path must be modified accordingly. -
The server timezone must be set.
Network Requirements
-
You must allow access to required Ports and Services.
-
Allocate a 24-bit CIDR subnet for the Kubernetes service network and a16-bit CIDR subnet for the Kubernetes pods network (10.244.0.0/16 is used by default).
The pods and services networks must be inside the following private networks: 10.0.0.0/8, 172.16.0.0/12, 192.168.0.0/16. In addition, ensure that the dedicated CIDR for the service network and pods network don't overlap with:
-
Each other
-
The physical addresses of your TOS Aurora servers (see below)
-
Your primary VIP, Syslog VIP or external load balancer IP (see below)
-
Any other subnets communicating with TOS or with TOS nodes
-
-
If a proxy is configured on your system make sure this network is excluded.
-
You must have available the following dedicated IP addresses:
- For on-premise deployments, a primary VIP that will serve as the external IP address used to access TOS Aurora from your browser. The primary VIP will not be needed in the installation of the operating system, except in the final step - the installation command.
- The physical network IP address of the first network interface used by the administrator for CLI commands. This is the IP address you will use in most steps of the procedure.
-
If additional nodes are subsequently added to the cluster, each node will require an additional dedicated physical network IP address.
- Additional syslog VIPs can be allocated as needed.
-
The VIP, all node physical network IP addresses and all syslog VIPs must be on the first network interface.
-
Make sure your first physical interface is correctly configured and all other interfaces are not on the same network.
To find the first network interface, run the following command:
[<ADMIN> ~]$ sudo /opt/tufinos/scripts/network_interface_by_pci_order.sh | awk -F'=' '/NET_IFS\[0\]/ { print $NF }'sudo /opt/tufinos/scripts/network_interface_by_pci_order.sh | awk -F'=' '/NET_IFS\[0\]/ { print $NF }'Otherwise network errors such as connectivity failures and incorrect traffic routing might occur.
- You must have a DNS server that can resolve its own address using a reverse lookup.
Downloads
-
Download the TOS R24-2 PGA.0.0 installation package from the Download Center.
The downloaded files are in .tgz format <FILENAME>.tgz.
Configure Partitions
If not done already, set up partitions according to the Prerequisites.
Configure The Operating System
-
If you are not currently logged in as user root, do so now.
-
If you want to change the host name or IP of the machine, do so now. Once TOS Aurora has been installed, changing the host name or IP address will require reinstalling - see Changing IP Address/Host Names. To change the host name, use the command below, replacing <mynode> with your preferred name.
-
Modify the environment path to run TOS CLI commands without specifying the full path (/usr/local/bin/tos).
-
Synchronize your machine time with a trusted NTP server. Follow the steps in Configuring NTP Using Chrony.
-
Configure the server timezone.
where
<timezone>is in the format Area/Location. Examples: America/Jamaica, Hongkong, GMT, Europe/Prague. List the time-zone formats that can be used in the command. -
Upgrade the kernel:
-
Disable SELinux:
-
If file /etc/selinux/config exists, edit and change the value of SELINUX to disabled:
SELINUX=disabled
- If the file doesn't exist or SELINUX is already set to disabled, do nothing.
-
- Reboot the machine and log in.
- Install Wireguard. This is needed to encrypt communication between nodes (machines) within the cluster. See Install Wireguard and follow the steps for your Linux distribution.
- Reboot the machine and log in.
-
Install tmux and rsync:
-
Disable the firewall:
-
Create the TOS Aurora load module configuration file
/etc/modules-load.d/tufin.conf. Example using vi: -
Specify the modules to be loaded by adding the following lines to the configuration file created in the previous step. The modules will then be loaded automatically on boot.
-
Load the above modules now:
[<ADMIN> ~]# cat /etc/modules-load.d/tufin.conf |xargs modprobe -acat /etc/modules-load.d/tufin.conf |xargs modprobe -aLook carefully at the output to confirm all modules loaded correctly; an error message will be issued for any modules that failed to load.
-
Check that Wireguard has loaded correctly.
The output will appear something like this:
wireguard              201106  0
ip6_udp_tunnel         12755  1 wireguard
udp_tunnel             14423  1 wireguard
If Wireguard is not listed in the output, contact support.
-
Create the TOS Aurora kernel configuration file /etc/sysctl.d/tufin.conf. Example using vi:
-
Specify the kernel settings to be made by adding the following lines to the configuration file created in the previous step. The settings will then be applied on boot.
-
Apply the above kernel settings now:
Mount The etcd Database to A Separate Disk
The etcd database should be on a separate disk to improve the stability of TOS Aurora and reduce latency. Moving the etcd database to a separate disk ensures that the kubernetes database has access to all the resources required to ensure an optimal TOS performance.
See Move etcd - New Non-Cloud VM.
The Install Procedure
Before you proceed, read and understand Prerequisites - this may prevent unexpected failures.
Install TOS Aurora
-
If you wish to configure NIC bonding, you must do it before installing TOS Aurora. See Link Redundancy on Tufin Appliances.
-
Run the tmux command:
-
On the target machine, create the directory /opt/misc/, if it does not exist already.
-
Transfer the run file (already downloaded) to the /opt/misc/ directory.
-
Go to /opt/misc/
-
Verify the integrity of the TOS installation packages by entering the following commands and comparing the output with the checksum information.
-
Extract the TOS run file from its archive.
-
Run the TOS Aurora run file.
-
Run the install command, replacing the parameters:
<PRIMARY>- The VIP you will use to access TOS Aurora as described in Prerequisites-
<SERVICE-CIDR>- The CIDR you want to use for the Kubernetes service network, as described in Prerequisites -
<PODS-CIDR>Optional. The CIDR you want to use for the Kubernetes pods network, as described in Prerequisites. The default pods network is 10.244.0.0/16 -
<MODULE-TYPE>- One of the following values:- ST for SecureTrack only
- ST, SC for both SecureTrack and SecureChange/SecureApp
- RC for a remote collector
<LOAD>- small, medium or large, as provided by your account team, based on your sizing calculation.
There is also an option to do a dry run, to verify the procedure in advance by going through all the stages without installing anything. To do a dry run, add the parameter
--dry-runto the install command.[<ADMIN> ~]$ sudo tos install --modules=<MODULE-TYPE> --primary-vip=<PRIMARY> --services-network=<SERVICE-CIDR> --pod-network=<PODS-CIDR> --load-model=<LOAD> -dsudo tos install --modules=<MODULE-TYPE> --primary-vip=<PRIMARY> --services-network=<SERVICE-CIDR> --pod-network=<PODS-CIDR> --load-model=<LOAD> -dExamples:
$ sudo tos install --modules=ST,SC --primary-vip=192.168.1.2 --services-network=10.10.10.0/24 --load-model=medium -d
$ sudo tos install --modules=RC --primary-vip=162.148.10.0 --services-network=10.10.10.0/24 --load-model=large -d
-
The EULA is displayed. After reading, enter
qto exit the document. If you accept the EULA, enteryand wait until the command completes.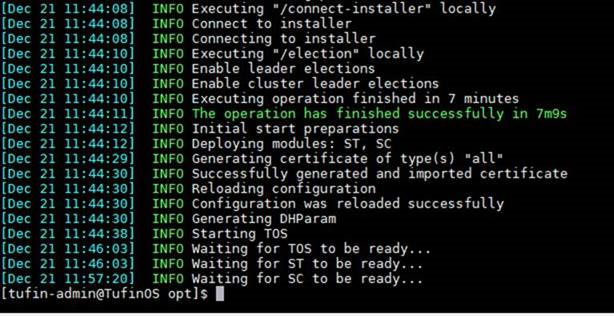
-
You can now safely exit the CLI tmux session:
-
If the installation was for a central (main) cluster, log into TOS Aurora at https://<VIP> in your browser with user=admin, password=admin. If a warning message is shown regarding the site security certificate, 'accept the risk' and continue to the site. You will be prompted to set a new password.
If the installation was for a remote collector, connect it to the central cluster.
-
 Check the TOS status.
-
On the primary data node, check the TOS status.
-
In the output, check if the System Status is Ok and all the items listed under Components appear as Ok. If this is not the case, contact Tufin Support.
Example output:
[<ADMIN> ~]$ tos status [Mar 28 13:42:09] INFO Checking cluster health status TOS Aurora Tos Version: 24.2 (PRC1.1.0) System Status: "Ok" Cluster Status: Status: "Ok" Mode: "Single Node" Nodes Nodes: - ["node1"] Type: "Primary" Status: "Ok" Disk usage: - ["/opt"] Status: "Ok" Usage: 36% registry Expiration ETA: 819 days Status: "Ok" Infra Databases: - ["cassandra"] Status: "Ok" - ["kafka"] Status: "Ok" - ["mongodb"] Status: "Ok" - ["mongodb_sc"] Status: "Ok" - ["ongDb"] Status: "Ok" - ["postgres"] Status: "Ok" - ["postgres_sc"] Status: "Ok" Application Application Services Status OK Running services 54/54 Backup Storage: Location: "Local s3:http://minio.default.svc:9000/velerok8s/restic/default " Status: "Ok" Latest Backup: 2024-03-23 05:00:34 +0000 UTC -
[<ADMIN> ~]$ sha256sum tos-xxxx-xxxxxxxx-final-xxxx.run.tgz[<ADMIN> ~]$ sha1sum tos-xxxx-xxxxxxxx-final-xxxx.run.tgzThe run file name includes the release, version, and build number.
TOS file example: R24-2-pga0.0-final-4577.run
Post-Install Configuration
SSL Certificates
Secured connections to TOS Aurora require a valid SSL certificate. Such a certificate is generated during the installation. It is automatically renewed when it expires and also when upgrading to later versions of TOS Aurora. When connecting for the first time after certificate renewal, you will be prompted to accept the new certificate. You can also use your own CA signed certificate, but such certificates will not be renewed automatically.
SAN Certificates
For every FortiManager device you intend to monitor, add a SAN signed certificate.
License Activation
Relevant only for central clusters, skip for remote collectors.
-
Tiered license: See Uploading License Files to TOS (Solution Tiers)
-
Legacy license: Adding Licenses (Legacy Model)
After the license is activated, have all TOS users enable the automatic license mechanism in their browser. For more information, see Site Usage Monitoring.
Using Syslog for Accountability and More
You can use syslog to send accountability and other information from your devices to SecureTrack - see Sending Additional Information via Syslog. If you want to use this feature and you have installed TOS on-premise, you must also set up a Syslog VIP Address.
Adding Worker Nodes to Your Cluster
TOS Aurora is deployed as a single node Kubernetes cluster. See Multi-Node Cluster for more information about adding additional nodes.
Setting up External Backups
We recommend setting up backups on external storage.
Setting up Scheduled Backups
We recommend creating a backup policy as soon as possible.
HA (High Availability)
To set up an HA environment, see High Availability.
DR (Disaster Recovery)
To setup TOS redundancy across sites, see Disaster Recovery.
Sending Cluster Health Status to Tufin
Enabled by default, system information is sent periodically to Tufin Support for the purpose of troubleshooting and identifying performance issues. It can be disabled (see Sending Cluster Health Status). The information includes:
-
DB status and size
-
Backup status
-
Kubernetes status and metrics
-
CPU metrics
-
Memory status
-
I/O
It does not include IP addresses, personal user information, or device information. All the information sent is encrypted and is accessible only to Tufin support teams.
The information is sent to Tufin from TOS users' browsers to the Tufin sub-domain mailbox.tufin.com, therefore requests from user browsers to this sub-domain must be allowed.
TOS Monitoring
TOS Monitoring lets you monitor the status of the TOS cluster and its nodes by generating a notification whenever a change in status occurs, such as a node failing, or a usage threshold reached, such as CPU or disk usage.
We recommend that you set up notifications in TOS Monitoring (see TOS Monitoring).
Additional Configuration
A number of additional parameters can be set now or later e.g. session timeout and SNMP - see Configuring TOS.
SecureChange Settings
Relevant only for central clusters; skip for remote collectors.
If you have installed SecureChange:
-
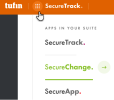
Go into SecureChange by one the following means:
-
Sign in to TOS with the URL given previously and then select SecureChange from the app launcher.
-
Sign in directly to SecureChange by entering
https://<IP>/tufinapps/securechangein the browser.
-
-
Configure the DNS.
-
Go to
 Settings > Miscellaneous.
-
Delete the default value that appears in the field Server DNS name. Enter a value for Server DNS name - the DNS server to use for links in email notifications. This can be an IP address in the format 11.22.33.44 or a FQDN in the format https://mydomain.com. The SecureChange DNS name is published by SecureChange so it can be accessed from external sources. For example, it is embedded in notification mails sent by SecureChange, which include a link to a ticket, such as an email notifying a handler assigned with a task, or informing a requester that the ticket has been successfully resolved.
-
-
Additional setup that can be done now or later:
- Internal SSO Authentication. Internal SSO is enabled by default when TOS is installed, giving user access to all TOS components using the same credentials - SecureTrack, SecureChange, SecureApp, and extensions. When disabled, there is no connection between a SecureTrack user and SecureChange user with the same name.
- Mail server connection
- LDAP directory connection to use LDAP user accounts
- Local users and user roles
- Subsequent password changes can be made from the command line , see SecureChange Command Line Reference.
-
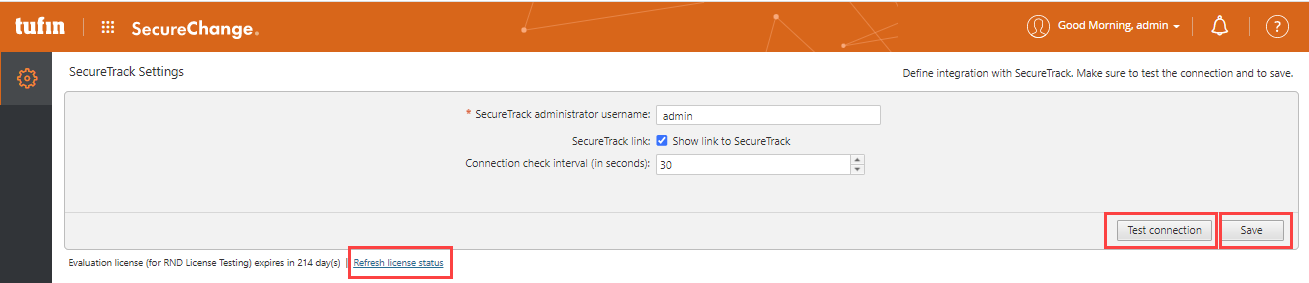
Change access to SecureTrack from SecureChange
-
Go to
Settings > SecureTrack: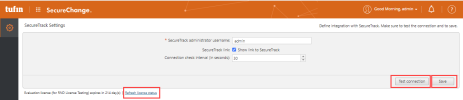
-
Change the default SecureTrack administrator. For SecureChange to access SecureTrack data, a SecureTrack administrator must be specified. By default this is the predefined user 'Admin' and everything will work fine if you leave it as it is. However, if you want a different user, create a new administrator and enter the user name. If you have already configured multi-domain management, this user can be either a super administrator or multi-domain administrator, depending on whether you want to restrict the administrator to selected domains.
-
Remove link to SecureTrack . By default you can go from SecureChange to SecureTrack by selecting the SecureTrack link in the app launcher. If you want to remove this option, unmark the checkbox.

-
Change connection check interval. The default value for the frequency of SecureChange testing connectivity to SecureTrack can be changed if desired.
-
Click Test connection to verify that SecureChange has a connection to SecureTrack.
-
Click Refresh license status. This will ensure that SecureTrack and SecureChange share the highest level of connectivity.
-
Click Save.
-

Was this helpful?
Thank you!
We’d love your feedback
We really appreciate your feedback
Send this page to a colleague
